Owner's Manual
Page 197
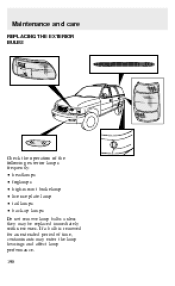
Maintenance and care REPLACING THE EXTERIOR BULBS Check the operation of time, contaminants may be replaced immediately with new ones. If a bulb is removed for an extended period of the following exterior lamps frequently: • headlamps • foglamps • high-mount brakelamp • license plate lamp • tail lamps • back-up lamps Do not remove lamp bulbs unless they may enter the lamp housings and affect lamp performance. 198
Maintenance and care REPLACING THE EXTERIOR BULBS Check the operation of time, contaminants may be replaced immediately with new ones. If a bulb is removed for an extended period of the following exterior lamps frequently: • headlamps • foglamps • high-mount brakelamp • license plate lamp • tail lamps • back-up lamps Do not remove lamp bulbs unless they may enter the lamp housings and affect lamp performance. 198

Owner's Manual
Page 198
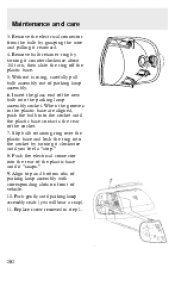
... break the next time the headlamps are operated. 1. The oil from your hand could cause the bulb to Bulb specifications in the OFF position. 2. Grasp the bulb only by its plastic base and do not touch the glass. Make sure that the headlamp control is in this chapter. The oil from your ...vehicle, refer to break the next time the headlamps are operated. Grasp the bulb only by its plastic base and do not touch the glass. Maintenance and care Handle a halogen headlamp...
... break the next time the headlamps are operated. 1. The oil from your hand could cause the bulb to Bulb specifications in the OFF position. 2. Grasp the bulb only by its plastic base and do not touch the glass. Make sure that the headlamp control is in this chapter. The oil from your ...vehicle, refer to break the next time the headlamps are operated. Grasp the bulb only by its plastic base and do not touch the glass. Maintenance and care Handle a halogen headlamp...

Owner's Manual
Page 199
... glass end of the socket. 9. Maintenance and care 3. Slip bulb retaining ring over the plastic base and lock the ring into the rear of the plastic base until the plastic base contacts the rear of the new bulb into the socket until it rearward. 6. Slide headlamp assembly forward ...and off the plastic base. 7. Remove the electrical connector from the bulb by turning it counterclockwise about ¾") to expose the back of headlamp assembly. 8. Push the electrical connector into the socket by ...
... glass end of the socket. 9. Maintenance and care 3. Slip bulb retaining ring over the plastic base and lock the ring into the rear of the plastic base until the plastic base contacts the rear of the new bulb into the socket until it rearward. 6. Slide headlamp assembly forward ...and off the plastic base. 7. Remove the electrical connector from the bulb by turning it counterclockwise about ¾") to expose the back of headlamp assembly. 8. Push the electrical connector into the socket by ...

Owner's Manual
Page 200
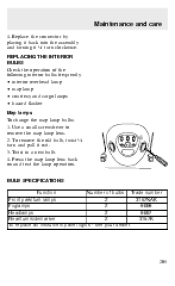
Remove screw from the top of the attachment standoff. 12. Disengage lamp assembly (it has a snap fit). 201 Hold the headlamp assembly snugly against the vehicle and push down on the clips to lock the lamp into the guide ribs. 13. Straighten alignment pins, making sure the alignment pins are inserted into the proper holes and into position. Carefully insert the headlamp assembly into the vehicle making them parallel with the outer edges of lamp assembly. 2. Maintenance and care 11. Replacing parking lamp/turn signal bulbs 1.
Remove screw from the top of the attachment standoff. 12. Disengage lamp assembly (it has a snap fit). 201 Hold the headlamp assembly snugly against the vehicle and push down on the clips to lock the lamp into the guide ribs. 13. Straighten alignment pins, making sure the alignment pins are inserted into the proper holes and into position. Carefully insert the headlamp assembly into the vehicle making them parallel with the outer edges of lamp assembly. 2. Maintenance and care 11. Replacing parking lamp/turn signal bulbs 1.
Owner's Manual
Page 201
... the parking lamp assembly socket. Push gently until the plastic base contacts the rear of the socket. 7. Without turning, carefully pull bulb assembly out of the new bulb into the socket by grasping the wire and pulling it rearward. 4. When the grooves in step 1. 202 Replace screw removed in ...the plastic base are aligned, push the bulb into the rear of vehicle. 10. Maintenance and care 3. Align top and bottom ribs of parking lamp assembly with corresponding slots on front of ...
... the parking lamp assembly socket. Push gently until the plastic base contacts the rear of the socket. 7. Without turning, carefully pull bulb assembly out of the new bulb into the socket by grasping the wire and pulling it rearward. 4. When the grooves in step 1. 202 Replace screw removed in ...the plastic base are aligned, push the bulb into the rear of vehicle. 10. Maintenance and care 3. Align top and bottom ribs of parking lamp assembly with corresponding slots on front of ...

Owner's Manual
Page 202
High-mount brakelamp To change the high-mount brakelamp bulbs: 1. Remove the four screws that secure the high-mount brakelamp lens. 2. Twist, then pull the bulb from the back of the foglamp assembly. 2. Replace the bulbs as needed and replace the high-mount brakelamp lens. 203 Carefully remove... the lens. 3. Maintenance and care Replacing foglamp bulbs 1. Connect the electrical connector to the back of...
High-mount brakelamp To change the high-mount brakelamp bulbs: 1. Remove the four screws that secure the high-mount brakelamp lens. 2. Twist, then pull the bulb from the back of the foglamp assembly. 2. Replace the bulbs as needed and replace the high-mount brakelamp lens. 203 Carefully remove... the lens. 3. Maintenance and care Replacing foglamp bulbs 1. Connect the electrical connector to the back of...

Owner's Manual
Page 203
...the rear bumper. Follow the same steps to remove the lens). 4. Carefully pop the lens off and to the right (it . 6. Pull out the old bulb and press in the same portion of the recess and replace it may be necessary to use a screwdriver to replace either... bulb: 1. Replacing license plate lamp bulbs The license plate bulbs are located in the replacement bulb. 204 Pull the bulb straight out of the vehicle rear, one just below the other. To change the license plate lamp...
...the rear bumper. Follow the same steps to remove the lens). 4. Carefully pop the lens off and to the right (it . 6. Pull out the old bulb and press in the same portion of the recess and replace it may be necessary to use a screwdriver to replace either... bulb: 1. Replacing license plate lamp bulbs The license plate bulbs are located in the replacement bulb. 204 Pull the bulb straight out of the vehicle rear, one just below the other. To change the license plate lamp...
Owner's Manual
Page 204
... 3157NAK Foglamps 2 9006 Headlamps 2 9007 Rear/turn clockwise. Use a small screwdriver to remove the map lamp lens. 2. BULB SPECIFICATIONS Function Number of the following interior bulbs frequently: • interior overhead lamp • map lamp • courtesy and cargo lamps • hazard flasher Map lamps ...To change the map lamp bulbs: 1. Twist in a new bulb. 4. see your dealer. 205 Replace the connector by placing it back into the assembly and turning it out. 3. Press the...
... 3157NAK Foglamps 2 9006 Headlamps 2 9007 Rear/turn clockwise. Use a small screwdriver to remove the map lamp lens. 2. BULB SPECIFICATIONS Function Number of the following interior bulbs frequently: • interior overhead lamp • map lamp • courtesy and cargo lamps • hazard flasher Map lamps ...To change the map lamp bulbs: 1. Twist in a new bulb. 4. see your dealer. 205 Replace the connector by placing it back into the assembly and turning it out. 3. Press the...
Owner's Manual
Page 221
... Battery ...176 jumping a disabled battery ...151 Brakes ...107 adjustment ...107 anti-lock ...107 fluid, checking and adding ...162 Brake-shift interlock ...117 Break-in period ...3 Bulbs, replacing ...198,205 headlamps ...199 rear lamps ...204 specifications ...205 Capacities for refilling fluids ...213, 215 Changing a tire ...147 Cleaning your vehicle ...206 engine compartment...
... Battery ...176 jumping a disabled battery ...151 Brakes ...107 adjustment ...107 anti-lock ...107 fluid, checking and adding ...162 Brake-shift interlock ...117 Break-in period ...3 Bulbs, replacing ...198,205 headlamps ...199 rear lamps ...204 specifications ...205 Capacities for refilling fluids ...213, 215 Changing a tire ...147 Cleaning your vehicle ...206 engine compartment...

Warranty Guide 1st Printing
Page 14
... Parts, above. Concerning parts that are used with components on the List of Parts Also covered by the two emissions warranties are all emissions-related bulbs, hoses, clamps, brackets, tubes, gaskets, seals, belts, connectors, gasoline fuel lines and wiring harnesses that should be replaced on a certain recommended replacement schedule: These parts...
... Parts, above. Concerning parts that are used with components on the List of Parts Also covered by the two emissions warranties are all emissions-related bulbs, hoses, clamps, brackets, tubes, gaskets, seals, belts, connectors, gasoline fuel lines and wiring harnesses that should be replaced on a certain recommended replacement schedule: These parts...
Warranty Guide 1st Printing
Page 21
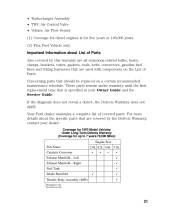
... Left Exhaust Manifold - connectors, gasoline fuel lines and wiring harnesses that should be replaced on the List of Parts. Coverage for 1997-Model Vehicles Under Long-Term Defects Warranty (Coverage for up to 7 years/70,000 Miles) Engine Size Part Name Catalytic Converter Exhaust... Manifold - These parts remain under warranty until the first replacement time that are all emissions-related bulbs, hoses, clamps, brackets, tubes, gaskets, seals, belts. Your Ford dealer maintains a complete list of Parts Also covered by this warranty are covered by the Defects Warranty,...
... Left Exhaust Manifold - connectors, gasoline fuel lines and wiring harnesses that should be replaced on the List of Parts. Coverage for 1997-Model Vehicles Under Long-Term Defects Warranty (Coverage for up to 7 years/70,000 Miles) Engine Size Part Name Catalytic Converter Exhaust... Manifold - These parts remain under warranty until the first replacement time that are all emissions-related bulbs, hoses, clamps, brackets, tubes, gaskets, seals, belts. Your Ford dealer maintains a complete list of Parts Also covered by this warranty are covered by the Defects Warranty,...
Scheduled Maintenance Guide 1st Printing
Page 34
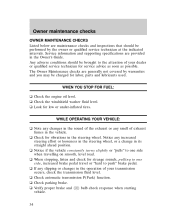
... you may be brought to push" brake pedal. u When stopping, listen and check for service advice as soon as possible. u Verify proper brake and ABS bulb check response when starting vehicle. 34
... you may be brought to push" brake pedal. u When stopping, listen and check for service advice as soon as possible. u Verify proper brake and ABS bulb check response when starting vehicle. 34


