
Owner's Manual
Page 129
NOTE: Routine maintenance of these things happen, even intermittently, have the Air Bag Supplemental Restraint System serviced at your Ford or Lincoln-Mercury dealer immediately. The readiness light is operating normally. A problem with the system is indicated by one or more of the ... cluster. The diagnostic module monitors its own internal circuits and the supplemental air bag electrical system readiness (including the impact sensors), the system wiring, the air bag system readiness light, the air bag backup power and the air bag igniters. Determining if System Is Operational The Air ...
NOTE: Routine maintenance of these things happen, even intermittently, have the Air Bag Supplemental Restraint System serviced at your Ford or Lincoln-Mercury dealer immediately. The readiness light is operating normally. A problem with the system is indicated by one or more of the ... cluster. The diagnostic module monitors its own internal circuits and the supplemental air bag electrical system readiness (including the impact sensors), the system wiring, the air bag system readiness light, the air bag backup power and the air bag igniters. Determining if System Is Operational The Air ...
Owner's Manual
Page 195
... not have enough braking power and your trailer lamps conform to one circuit. Each stop/turn circuit will operate one that you can cause severe wire damage and could start a fire. Never add more than 45 mph (70 km/h) when you tow a trailer. Class I and Class II Trailer Tow ...electrical wiring provides two circuits (right hand and left hand) to your vehicle's brake system. Using a fuse with one combination stop /turn light bulb (# 1157, 3157, 2357...
... not have enough braking power and your trailer lamps conform to one circuit. Each stop/turn circuit will operate one that you can cause severe wire damage and could start a fire. Never add more than 45 mph (70 km/h) when you tow a trailer. Class I and Class II Trailer Tow ...electrical wiring provides two circuits (right hand and left hand) to your vehicle's brake system. Using a fuse with one combination stop /turn light bulb (# 1157, 3157, 2357...
Owner's Manual
Page 208
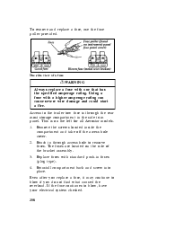
Replace fuses with a higher amperage rating can cause severe wire damage and could start a fire. Access to the trailer tow fuse is on the side of a fuse RWARNING Always replace a fuse with one that has ... provided. Reinstall compartment back and screw into place. 2. 3. 4. This is through access hole to remove fuses. The fuses are located on the left for all Aerostar models. 1. Even after you do not find what caused the overload. Using a fuse with standard push-in the side trim panel. Remove the screws located...
Replace fuses with a higher amperage rating can cause severe wire damage and could start a fire. Access to the trailer tow fuse is on the side of a fuse RWARNING Always replace a fuse with one that has ... provided. Reinstall compartment back and screw into place. 2. 3. 4. This is through access hole to remove fuses. The fuses are located on the left for all Aerostar models. 1. Even after you do not find what caused the overload. Using a fuse with standard push-in the side trim panel. Remove the screws located...
Owner's Manual
Page 248
... 90˚F (32˚C). If the battery needs water often, have a Motorcraft maintenance-free battery. Reinstall the cables when you can neutralize the acid with a wire brush. Check your battery's electrolyte level, at least every 12 months or 12,000 miles (20,000 km), in your original equipment battery requires replacement...
... 90˚F (32˚C). If the battery needs water often, have a Motorcraft maintenance-free battery. Reinstall the cables when you can neutralize the acid with a wire brush. Check your battery's electrolyte level, at least every 12 months or 12,000 miles (20,000 km), in your original equipment battery requires replacement...

Owner's Manual
Page 259
... on tightly with the ends held down securely. u Remove tire chains at the first opportunity u Make sure your vehicle. Verify that no chain touches any wiring, brake lines or fuel lines. carefully and avoid hard braking. bumpers are not missing or worn to avoid damage to your suspension insulation and Filling...
... on tightly with the ends held down securely. u Remove tire chains at the first opportunity u Make sure your vehicle. Verify that no chain touches any wiring, brake lines or fuel lines. carefully and avoid hard braking. bumpers are not missing or worn to avoid damage to your suspension insulation and Filling...

Owner's Manual
Page 273
... bulb's plastic base facing upward, insert the glass end of the socket. 274 NOTE: Do not disturb the aim adjusting screws. 5. Unsnap the bulb retaining wire and carefully remove the bulb assembly from the vehicle and remove the electrical connector by gently pulling it out without turning it. 6. Installing the headlamp...
... bulb's plastic base facing upward, insert the glass end of the socket. 274 NOTE: Do not disturb the aim adjusting screws. 5. Unsnap the bulb retaining wire and carefully remove the bulb assembly from the vehicle and remove the electrical connector by gently pulling it out without turning it. 6. Installing the headlamp...

Owner's Manual
Page 274
Snap the retaining wire over both sides of the lens. If the headlamp was correctly aligned before you changed the ... screw. Removing the High-Mount Brakelamp Bulb Liftgate models To remove the brakelamp and bulb: 1. 2. 3. 4. Disconnect the high-mount brakelamp wiring connector. Install and tighten the two screws. 2. 3. 4. Remove the two screws from the lamp, and pull the bulb straight out of...assembly. Position the headlamp on and make sure that they work properly. Connect the high-mount brakelamp wiring connector. To replace/install the brakelamp: 1. 2. 3. 4. 5. 275
Snap the retaining wire over both sides of the lens. If the headlamp was correctly aligned before you changed the ... screw. Removing the High-Mount Brakelamp Bulb Liftgate models To remove the brakelamp and bulb: 1. 2. 3. 4. Disconnect the high-mount brakelamp wiring connector. Install and tighten the two screws. 2. 3. 4. Remove the two screws from the lamp, and pull the bulb straight out of...assembly. Position the headlamp on and make sure that they work properly. Connect the high-mount brakelamp wiring connector. To replace/install the brakelamp: 1. 2. 3. 4. 5. 275

Warranty Guide 1st Printing
Page 14
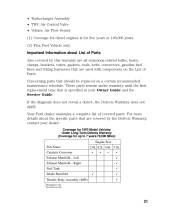
...8226; Pulsed Secondary Air Injection Valve/Secondary Air Injection Pump and Associated Parts • Spark Control Components • Spark Plugs and Ignition Wires • Synchronizer Assembly • Throttle Air Control Bypass Valve • Turbocharger Assembly • TWC Air Control Valve • Volume ... warranties are all emissions-related bulbs, hoses, clamps, brackets, tubes, gaskets, seals, belts, connectors, gasoline fuel lines and wiring harnesses that should be replaced on the List of Parts, above. Concerning parts that are used with components on a certain recommended...
...8226; Pulsed Secondary Air Injection Valve/Secondary Air Injection Pump and Associated Parts • Spark Control Components • Spark Plugs and Ignition Wires • Synchronizer Assembly • Throttle Air Control Bypass Valve • Turbocharger Assembly • TWC Air Control Valve • Volume ... warranties are all emissions-related bulbs, hoses, clamps, brackets, tubes, gaskets, seals, belts, connectors, gasoline fuel lines and wiring harnesses that should be replaced on the List of Parts, above. Concerning parts that are used with components on a certain recommended...
Warranty Guide 1st Printing
Page 20
...; Powertrain Control Module • Pulsed Secondary Air Injection Valve/Secondary Air Injection Pump and Associated Parts • Spark Control Components • Spark Plugs and Ignition Wires • Synchronizer Assembly • Throttle Air Control Bypass Valve 20
...; Powertrain Control Module • Pulsed Secondary Air Injection Valve/Secondary Air Injection Pump and Associated Parts • Spark Control Components • Spark Plugs and Ignition Wires • Synchronizer Assembly • Throttle Air Control Bypass Valve 20
Warranty Guide 1st Printing
Page 21
connectors, gasoline fuel lines and wiring harnesses that is for up to 7 years/70,000 Miles) Engine Size Part Name Catalytic Converter Exhaust Manifold - Right Fuel Tank Intake Manifold Throttle Body ... These parts remain under warranty until the first replacement time that are used with components on a certain recommended maintenance schedule. Your Ford dealer maintains a complete list of Parts. Coverage for 1997-Model Vehicles Under Long-Term Defects Warranty (Coverage for five years or 100,000 years. (2) Flex Fuel Vehicle only. Concerning parts...
connectors, gasoline fuel lines and wiring harnesses that is for up to 7 years/70,000 Miles) Engine Size Part Name Catalytic Converter Exhaust Manifold - Right Fuel Tank Intake Manifold Throttle Body ... These parts remain under warranty until the first replacement time that are used with components on a certain recommended maintenance schedule. Your Ford dealer maintains a complete list of Parts. Coverage for 1997-Model Vehicles Under Long-Term Defects Warranty (Coverage for five years or 100,000 years. (2) Flex Fuel Vehicle only. Concerning parts...


