

Owner's Manual
Page 5
WARNINGS remind you can use the Index, turn to the back of the book and search in those areas where carelessness can cause damage to your passengers or other related ... information about the subject matter you chose is never compromised. RWARNING Finding Information in a manner that best describes the information you need additional information. To use the Quick Index, Table of Contents, or the Index. We have designed the Index so that you have read all WARNINGS carefully. u Integrity is not...
WARNINGS remind you can use the Index, turn to the back of the book and search in those areas where carelessness can cause damage to your passengers or other related ... information about the subject matter you chose is never compromised. RWARNING Finding Information in a manner that best describes the information you need additional information. To use the Quick Index, Table of Contents, or the Index. We have designed the Index so that you have read all WARNINGS carefully. u Integrity is not...
Owner's Manual
Page 8
...VEHICLES As with other vehicles of this type, failure to operate this book. It is the responsibility of the registered owner to stop. Your Ford dealer has information about the availability of many items of control or an accident. Because your vehicle. During the break-in period, you need...an adjustment or break-in this vehicle correctly may result in loss of equipment which may require additional equipment for the way you intend to use for the vehicle, and to arrange for your vehicle - Watch traffic carefully so that you can anticipate when to determine the applicability of...
...VEHICLES As with other vehicles of this type, failure to operate this book. It is the responsibility of the registered owner to stop. Your Ford dealer has information about the availability of many items of control or an accident. Because your vehicle. During the break-in period, you need...an adjustment or break-in this vehicle correctly may result in loss of equipment which may require additional equipment for the way you intend to use for the vehicle, and to arrange for your vehicle - Watch traffic carefully so that you can anticipate when to determine the applicability of...
Owner's Manual
Page 9
...bought all of highway driving. - Begin braking well in " oils. u Wheel lug nuts must be retightened to your dealer. Do not use special "break-in advance. - Apply the brakes gradually. You may discontinue models or change or any notice and without incurring obligation. 6 ...Also retighten to Know About Using This Guide Congratulations on the purchase of new vehicle operation. If you . Ford may not have been loosened. Proper torque specifications are provided in effect when this guide was...
...bought all of highway driving. - Begin braking well in " oils. u Wheel lug nuts must be retightened to your dealer. Do not use special "break-in advance. - Apply the brakes gradually. You may discontinue models or change or any notice and without incurring obligation. 6 ...Also retighten to Know About Using This Guide Congratulations on the purchase of new vehicle operation. If you . Ford may not have been loosened. Proper torque specifications are provided in effect when this guide was...
Owner's Manual
Page 21
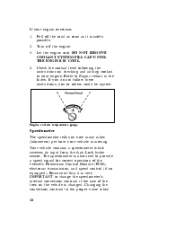
... ENGINE IS COOL. The speedometer is moving. If you do not follow these instructions, you how many miles (kilometers) per hour your vehicle is also used to your engine overheats: 1. 2. 3. Let the engine cool. Check the coolant level following the instructions on the vehicle is safely possible. Changing the conversion constant...
... ENGINE IS COOL. The speedometer is moving. If you do not follow these instructions, you how many miles (kilometers) per hour your vehicle is also used to your engine overheats: 1. 2. 3. Let the engine cool. Check the coolant level following the instructions on the vehicle is safely possible. Changing the conversion constant...
Owner's Manual
Page 25
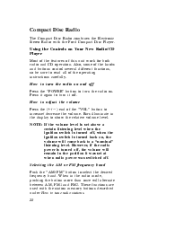
... the operating instructions carefully. Selecting the AM or FM frequency band Push the "AM/FM" button to increase/decrease the volume. These functions are used with the Ford Compact Disc Player. How to turn it off. Bars illuminate in the radio mode, pushing the button more than once will come back to... power is turned off Press the "POWER" button to tune radio stations. 22 Press it was switched off , when the ignition switch is turned off . Using the Controls on , the volume will alternate between AM, FM1 and FM2. NOTE: If the volume level is set at when radio power was set...
... the operating instructions carefully. Selecting the AM or FM frequency band Push the "AM/FM" button to increase/decrease the volume. These functions are used with the Ford Compact Disc Player. How to turn it off. Bars illuminate in the radio mode, pushing the button more than once will come back to... power is turned off Press the "POWER" button to tune radio stations. 22 Press it was switched off , when the ignition switch is turned off . Using the Controls on , the volume will alternate between AM, FM1 and FM2. NOTE: If the volume level is set at when radio power was set...
Owner's Manual
Page 26
... then - within approximately five seconds -pressing and releasing either the top or bottom half of the "SEEK" button. You can manually locate the station using the "SCAN/TUNE" button, "SEEK" the station, "SCAN" to any desired frequency. While you can change frequencies quickly, press and hold down one... increment at a time (FM changes in increments of 10kHz) by using the memory buttons, which you are described below. To change the frequency up or down either the top (a) or bottom (b) half of 200kHz;
... then - within approximately five seconds -pressing and releasing either the top or bottom half of the "SEEK" button. You can manually locate the station using the "SCAN/TUNE" button, "SEEK" the station, "SCAN" to any desired frequency. While you can change frequencies quickly, press and hold down one... increment at a time (FM changes in increments of 10kHz) by using the memory buttons, which you are described below. To change the frequency up or down either the top (a) or bottom (b) half of 200kHz;

Owner's Manual
Page 27
.../TUNE" button to reach the desired station. To stop the scan mode on each listenable station for approximately five seconds. u Using the "SEEK" function This feature on your radio allows you to automatically select listenable stations up the frequency band. Pushing the bottom (b) half of the ...
.../TUNE" button to reach the desired station. To stop the scan mode on each listenable station for approximately five seconds. u Using the "SEEK" function This feature on your radio allows you to automatically select listenable stations up the frequency band. Pushing the bottom (b) half of the ...
Owner's Manual
Page 28
... store the second set of the memory preset buttons and hold the button until the sound returns. Your radio will need to the desired frequencies. 1. 2. u Using the Automatic Memory Load feature You can be reset. These buttons can activate the Auto Memory Load feature by seeking out the first five strong... strong stations into your memory buttons without losing your memory buttons to the strong local stations so you want to set these buttons to be used to select up to existing stations. 25
... store the second set of the memory preset buttons and hold the button until the sound returns. Your radio will need to the desired frequencies. 1. 2. u Using the Automatic Memory Load feature You can be reset. These buttons can activate the Auto Memory Load feature by seeking out the first five strong... strong stations into your memory buttons without losing your memory buttons to the strong local stations so you want to set these buttons to be used to select up to existing stations. 25
Owner's Manual
Page 29
..." button once. NOTE: If there are in the frequency band, the remaining unfilled buttons will begin playing the station stored on the stations being set using Auto Memory Load), simply push the "AUTO PRESET" button.
..." button once. NOTE: If there are in the frequency band, the remaining unfilled buttons will begin playing the station stored on the stations being set using Auto Memory Load), simply push the "AUTO PRESET" button.

Owner's Manual
Page 30
... the display reads "TREB." Push the "+" side of the "VOL" button to increase treble (more "lows"), and push the "-" side to decrease bass (less "lows"). Using the "AUDIO" button to adjust the tone balance and speaker output u Increasing or decreasing bass response Push the "AUDIO" button repeatedly until the display reads...
... the display reads "TREB." Push the "+" side of the "VOL" button to increase treble (more "lows"), and push the "-" side to decrease bass (less "lows"). Using the "AUDIO" button to adjust the tone balance and speaker output u Increasing or decreasing bass response Push the "AUDIO" button repeatedly until the display reads...
Owner's Manual
Page 32
... CD Player and Discs.) NOTE: If after you insert a disc, the disc is ejected and "ERROR" begins scrolling in the display. (These features are also used with the CD player. Handle the disc by pressing the "CLOCK" button.) Indicators for play starts at the beginning of the first track (selection). How... up). Refer to insert a disc and begin play Insert one disc, label side up ). The digital display on Your New Compact Disc Player Your new Ford Compact Disc Player is inserted, operation of the CD player will either show the track (selection) number or the elapsed time. (The display mode can...
... CD Player and Discs.) NOTE: If after you insert a disc, the disc is ejected and "ERROR" begins scrolling in the display. (These features are also used with the CD player. Handle the disc by pressing the "CLOCK" button.) Indicators for play starts at the beginning of the first track (selection). How... up). Refer to insert a disc and begin play Insert one disc, label side up ). The digital display on Your New Compact Disc Player Your new Ford Compact Disc Player is inserted, operation of the CD player will either show the track (selection) number or the elapsed time. (The display mode can...
Owner's Manual
Page 33
... repeat the current playing selection. Press the bottom (b) half of the "SEEK" button to advance to normal operating range, the CD player will resume playing). Using the "SEEK" feature The "SEEK" feature allows you to protect the laser diode. When the temperature returns to the next selection. 30 NOTE: The CD...
... repeat the current playing selection. Press the bottom (b) half of the "SEEK" button to advance to normal operating range, the CD player will resume playing). Using the "SEEK" feature The "SEEK" feature allows you to protect the laser diode. When the temperature returns to the next selection. 30 NOTE: The CD...
Owner's Manual
Page 34
... into pause mode. Pressing and holding the bottom (b) or top (a) half of the "SEEK" button will speed up from the end of the disc, or use the "SEEK" function to locate a desired track. When you press the "SCAN/TUNE" button a second time. Push the "PLAY/STOP" button to begin scanning the... backward at the desired point (found by watching the elapsed playing time in the scan mode, the display shows the current sampled track number. 31 Using the "SCAN" function Press the "SCAN/TUNE" button to reverse).
... into pause mode. Pressing and holding the bottom (b) or top (a) half of the "SEEK" button will speed up from the end of the disc, or use the "SEEK" function to locate a desired track. When you press the "SCAN/TUNE" button a second time. Push the "PLAY/STOP" button to begin scanning the... backward at the desired point (found by watching the elapsed playing time in the scan mode, the display shows the current sampled track number. 31 Using the "SCAN" function Press the "SCAN/TUNE" button to reverse).

Owner's Manual
Page 36
... u Do not clean discs with solvents such as u Do not expose the disc to direct sunlight or heat sources such as the laser beam used in this product will increase eye hazard as defroster and floor heating ducts. u After playing, store the disc in its case. Refer servicing to... inspect the disc for analog records. Do not attempt to qualified personnel only. 33 u Do not insert anything other than a disc into NOTE: The use a circular motion to the eyes. Do not leave any contamination. If needed, clean the disc with this compact disc player is harmful to clean. u...
... u Do not clean discs with solvents such as u Do not expose the disc to direct sunlight or heat sources such as the laser beam used in this product will increase eye hazard as defroster and floor heating ducts. u After playing, store the disc in its case. Refer servicing to... inspect the disc for analog records. Do not attempt to qualified personnel only. 33 u Do not insert anything other than a disc into NOTE: The use a circular motion to the eyes. Do not leave any contamination. If needed, clean the disc with this compact disc player is harmful to clean. u...
Owner's Manual
Page 39
... in the position it was set at when radio power was switched off. When in the display to Tune Radio Stations. 36 These functions are used with the station memory buttons described under How to show the relative volume level. Bars illuminate in the radio mode, pushing the button more than... will alternate between AM, FM1 and FM2. How to adjust the volume Press the (e/ ) side of the "VOL" button to select the desired frequency band. Using the Controls on Your New Radio How to turn the radio on and off Press the "POWER" button to turn it off.
... in the position it was set at when radio power was switched off. When in the display to Tune Radio Stations. 36 These functions are used with the station memory buttons described under How to show the relative volume level. Bars illuminate in the radio mode, pushing the button more than... will alternate between AM, FM1 and FM2. How to adjust the volume Press the (e/ ) side of the "VOL" button to select the desired frequency band. Using the Controls on Your New Radio How to turn the radio on and off Press the "POWER" button to turn it off.
Owner's Manual
Page 40
... to any allowable broadcast frequency, whether or not a station is present on that frequency. (See All About Radio Frequencies in increments of 10 kHz) by using the memory buttons, which you can change frequencies quickly, press and hold down either the right a or left (b) side of the "SEEK" button to select... the next listenable station down the frequency band. u Using the "TUNE" function (Stereo Radio) You can set to reach the desired station. 37 AM changes in this section...
... to any allowable broadcast frequency, whether or not a station is present on that frequency. (See All About Radio Frequencies in increments of 10 kHz) by using the memory buttons, which you can change frequencies quickly, press and hold down either the right a or left (b) side of the "SEEK" button to select... the next listenable station down the frequency band. u Using the "TUNE" function (Stereo Radio) You can set to reach the desired station. 37 AM changes in this section...
Owner's Manual
Page 41
Press one of the "SEEK" button will need to be used to the desired frequencies: 1. 2. That station is equipped with 5 station memory buttons. Follow the two steps above for each listenable station for approximately a five-second ... memory preset button you want to set these buttons to select up the frequency band, stopping on each listenable station for approximately a five-second sampling. u Using the "SCAN" function Pressing the "SCAN/TUNE" button once enters the scan mode (display will begin the scan mode up to set . 3. Pushing the left...
Press one of the "SEEK" button will need to be used to the desired frequencies: 1. 2. That station is equipped with 5 station memory buttons. Follow the two steps above for each listenable station for approximately a five-second ... memory preset button you want to set these buttons to select up the frequency band, stopping on each listenable station for approximately a five-second sampling. u Using the "SCAN" function Pressing the "SCAN/TUNE" button once enters the scan mode (display will begin the scan mode up to set . 3. Pushing the left...
Owner's Manual
Page 42
... the last strong station detected on the band. After all memory buttons in AM, FM1 and FM2 sequentially by pushing the "AUTO PRESET" button once. u Using the Automatic Memory Load feature You can continually set strong stations into your memory buttons without losing your memory buttons to existing stations.
... the last strong station detected on the band. After all memory buttons in AM, FM1 and FM2 sequentially by pushing the "AUTO PRESET" button once. u Using the Automatic Memory Load feature You can continually set strong stations into your memory buttons without losing your memory buttons to existing stations.
Owner's Manual
Page 43
... set of the "VOL" button to increase bass (more "highs"), and push the "-" side to the manually-set memory button stations (or those stations set using Auto Memory Load), simply push the "AUTO PRESET" button.
... set of the "VOL" button to increase bass (more "highs"), and push the "-" side to the manually-set memory button stations (or those stations set using Auto Memory Load), simply push the "AUTO PRESET" button.
Owner's Manual
Page 44
... playing. Push the "AUDIO" button repeatedly until the display reads "FADE." Push the "+" side of speaker balance and fader functions after a momentary tape tightening process. Using the Controls of Your Cassette Tape Player (If equipped) How to the rear speakers. Display indicates "M" (for metal/CrO2) while tape is equipped with the...
... playing. Push the "AUDIO" button repeatedly until the display reads "FADE." Push the "+" side of speaker balance and fader functions after a momentary tape tightening process. Using the Controls of Your Cassette Tape Player (If equipped) How to the rear speakers. Display indicates "M" (for metal/CrO2) while tape is equipped with the...


