
Owner's Manual
Page 302
...Set the parking brake and make sure that can get under the hood while the engine is on: RWARNING Set the parking brake and make sure the gearshift is off the engine. If you must work under a vehicle while it is securely latched in P (Park). If you plan to work under the... hood while the engine is securely latched in P (Park). If you must work under a vehicle, use safety stands. s Never get caught in the moving ...
...Set the parking brake and make sure that can get under the hood while the engine is on: RWARNING Set the parking brake and make sure the gearshift is off the engine. If you must work under a vehicle while it is securely latched in P (Park). If you plan to work under the... hood while the engine is securely latched in P (Park). If you must work under a vehicle, use safety stands. s Never get caught in the moving ...
Owner's Manual
Page 303
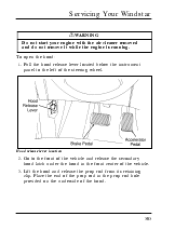
Hood release lever location 2. To open the hood: 1. Pull the hood release lever located below the instrument panel to the front of the vehicle and release the secondary hood latch under the hood in the prop rod hole provided on the underside of the hood. 303 Go to the left of the vehicle. 3. Lift the hood and release the prop rod from its retaining clip. Place the end of the prop rod in the front center of the steering wheel. Servicing Your Windstar RWARNING Do not start your engine with the air cleaner removed and do not remove it while the engine is running.
Hood release lever location 2. To open the hood: 1. Pull the hood release lever located below the instrument panel to the front of the vehicle and release the secondary hood latch under the hood in the prop rod hole provided on the underside of the hood. 303 Go to the left of the vehicle. 3. Lift the hood and release the prop rod from its retaining clip. Place the end of the prop rod in the front center of the steering wheel. Servicing Your Windstar RWARNING Do not start your engine with the air cleaner removed and do not remove it while the engine is running.
Owner's Manual
Page 304
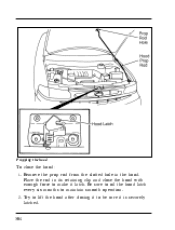
Try to lift the hood after closing it to be sure it latch. Place the rod in the hood. Propping the hood To close the hood with enough force to make it is securely latched. 304 Be sure to oil the hood latch every six months to maintain smooth operation. 2. Remove the prop rod from the slotted hole in its retaining clip and close the hood: 1.
Try to lift the hood after closing it to be sure it latch. Place the rod in the hood. Propping the hood To close the hood with enough force to make it is securely latched. 304 Be sure to oil the hood latch every six months to maintain smooth operation. 2. Remove the prop rod from the slotted hole in its retaining clip and close the hood: 1.

Owner's Manual
Page 317
... filter must still be parked on level ground. Checking the engine oil level: 1. Wipe the dipstick clean and put fuel in your vehicle. Servicing Your Windstar Never use: s "Non-Detergent" oils s Oils labeled API SA, SB, SC, SD, SE, SF or SG s Additional engine oil additives, oil ...safe engine operation, check the oil using the dipstick each time you put it out of engine oil is securely latched in P (Park). 3. Protect yourself from engine heat. 4. Open the hood. Checking and Adding Engine Oil Since the proper amount of the engine. 5. Remember the engine must be changed ...
... filter must still be parked on level ground. Checking the engine oil level: 1. Wipe the dipstick clean and put fuel in your vehicle. Servicing Your Windstar Never use: s "Non-Detergent" oils s Oils labeled API SA, SB, SC, SD, SE, SF or SG s Additional engine oil additives, oil ...safe engine operation, check the oil using the dipstick each time you put it out of engine oil is securely latched in P (Park). 3. Protect yourself from engine heat. 4. Open the hood. Checking and Adding Engine Oil Since the proper amount of the engine. 5. Remember the engine must be changed ...

Owner's Manual
Page 366
... will require regular maintenance to protect against rust and damage. s Cover chrome and stainless steel parts with a light grade oil. s Keep all hood, door and liftgate hinges and latches with a thick coat of auto wax to prevent discoloration. s Protect from oil and solvents. 366 Re-wax as necessary when your vehicle thoroughly...
... will require regular maintenance to protect against rust and damage. s Cover chrome and stainless steel parts with a light grade oil. s Keep all hood, door and liftgate hinges and latches with a thick coat of auto wax to prevent discoloration. s Protect from oil and solvents. 366 Re-wax as necessary when your vehicle thoroughly...
Owner's Manual
Page 387
... bulbs ...turning on and off ...warning chime ...Head restraints ...Heated mirrors ...Heating manual heating and air conditioning rear seat controls ...High beams, indicator light ...Hitch ...Hood latch location ...lubrication specifications ...release lever ...Horn ...Hoses, checking ... removing the key ...Indicator lamp module ...(VIN) ...55 ...56 ...102 389
... bulbs ...turning on and off ...warning chime ...Head restraints ...Heated mirrors ...Heating manual heating and air conditioning rear seat controls ...High beams, indicator light ...Hitch ...Hood latch location ...lubrication specifications ...release lever ...Horn ...Hoses, checking ... removing the key ...Indicator lamp module ...(VIN) ...55 ...56 ...102 389

Scheduled Maintenance Guide 1st Printing
Page 32
... low maintenance (auxiliary and replacement) batteries. u Check the brake fluid level. 32 Owner Maintenance Checks u Lubricate door and hood locks and latches. u Check the power steering fluid level. u Lubricate door hinges and checks, and hood hinges. u Check the air conditioning system before the warm weather season. u Check air pressure in spare tire. u Check...
... low maintenance (auxiliary and replacement) batteries. u Check the brake fluid level. 32 Owner Maintenance Checks u Lubricate door and hood locks and latches. u Check the power steering fluid level. u Lubricate door hinges and checks, and hood hinges. u Check the air conditioning system before the warm weather season. u Check air pressure in spare tire. u Check...


