Owner's Manual
Page 158
... steadily for 30 seconds and then go out. When the light goes out, the system is closed to prevent the vehicle from the ignition. The hood must be closed , and then goes out.
... steadily for 30 seconds and then go out. When the light goes out, the system is closed to prevent the vehicle from the ignition. The hood must be closed , and then goes out.
Owner's Manual
Page 159
... not disarm. Disarming a triggered system The alarm can disarm the system by using the five-digit unlock code on the keyless entry keypad 157 The hood must be disarmed by pressing 7/8 and 9/0 at the same time. Close all the way to ON.
... not disarm. Disarming a triggered system The alarm can disarm the system by using the five-digit unlock code on the keyless entry keypad 157 The hood must be disarmed by pressing 7/8 and 9/0 at the same time. Close all the way to ON.

Owner's Manual
Page 264
..., and other electrical parts if you connect them to a 24-volt power supply (either vehicle's electrical systems. 262 Use only a 12-volt battery to the hood of the engine cooling fan. 4. Turn on both vehicles and stay clear of your vehicle, but make sure the vehicles do not touch each other...
..., and other electrical parts if you connect them to a 24-volt power supply (either vehicle's electrical systems. 262 Use only a 12-volt battery to the hood of the engine cooling fan. 4. Turn on both vehicles and stay clear of your vehicle, but make sure the vehicles do not touch each other...

Owner's Manual
Page 296
... modified or changed in your dealer for specific weight information. Audio Equipment CD Changer Safety Equipment Vehicle Security Systems Travel Equipment Soft Luggage Carrier Aero Hood Deflector Factory Luggage Rack & Adaptors Trailer Hitch (Class II) Console NOTE: When adding accessories, equipment, passengers, and luggage to the rules and regulations of the... Label). In addition, to insure continued compliance with those rules and should comply with the FCC's requirements, RF devices must not be installed only by Ford Motor Company. 296
... modified or changed in your dealer for specific weight information. Audio Equipment CD Changer Safety Equipment Vehicle Security Systems Travel Equipment Soft Luggage Carrier Aero Hood Deflector Factory Luggage Rack & Adaptors Trailer Hitch (Class II) Console NOTE: When adding accessories, equipment, passengers, and luggage to the rules and regulations of the... Label). In addition, to insure continued compliance with those rules and should comply with the FCC's requirements, RF devices must not be installed only by Ford Motor Company. 296

Owner's Manual
Page 302
... you must work under the hood while the engine is securely latched in P (Park). This will prevent your vehicle from moving unexpectedly. RWARNING Always ...materials away from the ignition after you turn off : RWARNING Set the parking brake and make sure that can get under the hood while the engine is off the engine. RWARNING Do not wear loose clothing or jewelry that the gearshift is on: RWARNING Set... This will prevent your vehicle from moving unexpectedly. s Never get caught in the moving parts. 302 If you open the hood, read this section carefully.
... you must work under the hood while the engine is securely latched in P (Park). This will prevent your vehicle from moving unexpectedly. RWARNING Always ...materials away from the ignition after you turn off : RWARNING Set the parking brake and make sure that can get under the hood while the engine is off the engine. RWARNING Do not wear loose clothing or jewelry that the gearshift is on: RWARNING Set... This will prevent your vehicle from moving unexpectedly. s Never get caught in the moving parts. 302 If you open the hood, read this section carefully.
Owner's Manual
Page 303
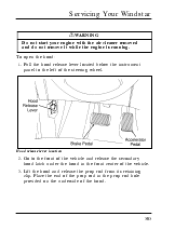
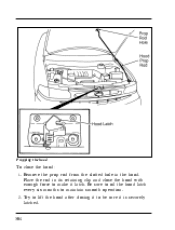
Pull the hood release lever located below the instrument panel to the front of the vehicle and release the secondary hood latch under the hood in the prop rod hole provided on the underside of the hood. 303 Place the end of the prop rod in the front center of the steering wheel. Hood release lever location 2. Lift the hood and release the prop rod from its retaining clip. Go to the left of the vehicle. 3. To open the hood: 1. Servicing Your Windstar RWARNING Do not start your engine with the air cleaner removed and do not remove it while the engine is running.
Pull the hood release lever located below the instrument panel to the front of the vehicle and release the secondary hood latch under the hood in the prop rod hole provided on the underside of the hood. 303 Place the end of the prop rod in the front center of the steering wheel. Hood release lever location 2. Lift the hood and release the prop rod from its retaining clip. Go to the left of the vehicle. 3. To open the hood: 1. Servicing Your Windstar RWARNING Do not start your engine with the air cleaner removed and do not remove it while the engine is running.
Owner's Manual
Page 304
Try to lift the hood after closing it to be sure it latch. Place the rod in the hood. Be sure to oil the hood latch every six months to maintain smooth operation. 2. Remove the prop rod from the slotted hole in its retaining clip and close the hood: 1. Propping the hood To close the hood with enough force to make it is securely latched. 304
Try to lift the hood after closing it to be sure it latch. Place the rod in the hood. Be sure to oil the hood latch every six months to maintain smooth operation. 2. Remove the prop rod from the slotted hole in its retaining clip and close the hood: 1. Propping the hood To close the hood with enough force to make it is securely latched. 304

Owner's Manual
Page 317
...is important for safe engine operation, check the oil using the dipstick each time you put it back into the oil pan. 2. Open the hood. Checking and Adding Engine Oil Since the proper amount of engine oil is securely latched in P (Park). 3. Remember the engine must still be... changed according to the maintenance schedule. The engine oil and oil filter must be parked on level ground. Checking the engine oil level: 1. Servicing Your Windstar Never use: s "Non-Detergent" oils s Oils labeled API SA, SB, SC, SD, SE, SF or SG s Additional engine oil additives, oil ...
...is important for safe engine operation, check the oil using the dipstick each time you put it back into the oil pan. 2. Open the hood. Checking and Adding Engine Oil Since the proper amount of engine oil is securely latched in P (Park). 3. Remember the engine must still be... changed according to the maintenance schedule. The engine oil and oil filter must be parked on level ground. Checking the engine oil level: 1. Servicing Your Windstar Never use: s "Non-Detergent" oils s Oils labeled API SA, SB, SC, SD, SE, SF or SG s Additional engine oil additives, oil ...

Owner's Manual
Page 352
... whole lamp. Do not remove the burned out bulb unless you can immediately replace it with a new one. To remove the headlamp bulb: 1. Lift the hood and locate the headlamp bulb installed in the OFF position. 2. The alignment of your headlamps should be checked if: s oncoming motorists frequently signal you to...
... whole lamp. Do not remove the burned out bulb unless you can immediately replace it with a new one. To remove the headlamp bulb: 1. Lift the hood and locate the headlamp bulb installed in the OFF position. 2. The alignment of your headlamps should be checked if: s oncoming motorists frequently signal you to...

Owner's Manual
Page 366
Body s Wash your vehicle in good operating condition. s Cover chrome and stainless steel parts with a light grade oil. s Keep all hood, door and liftgate hinges and latches with a thick coat of auto wax to prevent fading. s When your vehicle is washed. s Lubricate all rubber parts free ...
Body s Wash your vehicle in good operating condition. s Cover chrome and stainless steel parts with a light grade oil. s Keep all hood, door and liftgate hinges and latches with a thick coat of auto wax to prevent fading. s When your vehicle is washed. s Lubricate all rubber parts free ...
Owner's Manual
Page 387
... bulbs ...turning on and off ...warning chime ...Head restraints ...Heated mirrors ...Heating manual heating and air conditioning rear seat controls ...High beams, indicator light ...Hitch ...Hood latch location ...lubrication specifications ...release lever ...Horn ...Hoses, checking ...
... bulbs ...turning on and off ...warning chime ...Head restraints ...Heated mirrors ...Heating manual heating and air conditioning rear seat controls ...High beams, indicator light ...Hitch ...Hood latch location ...lubrication specifications ...release lever ...Horn ...Hoses, checking ...

Scheduled Maintenance Guide 1st Printing
Page 32
.... u Clean battery and terminals, check electrolyte level on low maintenance (auxiliary and replacement) batteries. u Lubricate door hinges and checks, and hood hinges. u Check the power steering fluid level. u Lubricate door and hood locks and latches. u Check the air conditioning system before the warm weather season. u Lubricate door rubber weatherstrips. u Check the brake...
.... u Clean battery and terminals, check electrolyte level on low maintenance (auxiliary and replacement) batteries. u Lubricate door hinges and checks, and hood hinges. u Check the power steering fluid level. u Lubricate door and hood locks and latches. u Check the air conditioning system before the warm weather season. u Lubricate door rubber weatherstrips. u Check the brake...


