
Owner's Manual
Page 12
... belt for more than one or both of your movement. Combination Lap and Shoulder Belts While your vehicle receives an impact of the door coming open in a collision. Lock the doors of the people will be used as a pair. However, if you brake hard, turn hard, or if your vehicle is moving....seat to lessen the risk of 5 mph (8 km/h) or more than one person or across more , the lap/shoulder belt locks and helps reduce your vehicle, close the door and lock it. Safety Restraints RWARNING Never let a passenger hold a child on his or her lap while the vehicle is in motion, the...
... belt for more than one or both of your movement. Combination Lap and Shoulder Belts While your vehicle receives an impact of the door coming open in a collision. Lock the doors of the people will be used as a pair. However, if you brake hard, turn hard, or if your vehicle is moving....seat to lessen the risk of 5 mph (8 km/h) or more than one person or across more , the lap/shoulder belt locks and helps reduce your vehicle, close the door and lock it. Safety Restraints RWARNING Never let a passenger hold a child on his or her lap while the vehicle is in motion, the...

Owner's Manual
Page 146
... open the sliding door from inside ; This lock will automatically lock after it is unlocked. 144 the door can still be opened from the inside the vehicle. Childproof Lock for the Sliding Door Your vehicle has a childproof lock for the sliding door. The outside sliding door handle Memory Lock If you set the childproof lock, the sliding door cannot be opened from...
... open the sliding door from inside ; This lock will automatically lock after it is unlocked. 144 the door can still be opened from the inside the vehicle. Childproof Lock for the Sliding Door Your vehicle has a childproof lock for the sliding door. The outside sliding door handle Memory Lock If you set the childproof lock, the sliding door cannot be opened from...
Owner's Manual
Page 147
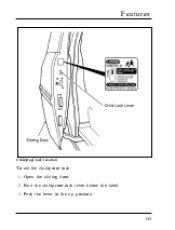
Open the sliding door. 2. Push the lever to the up position. 145 Find the childproof lock lever below the label. 3. Features Childproof lock location To set the childproof lock: 1.
Open the sliding door. 2. Push the lever to the up position. 145 Find the childproof lock lever below the label. 3. Features Childproof lock location To set the childproof lock: 1.
Owner's Manual
Page 148
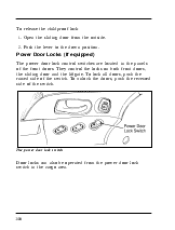
To release the childproof lock: 1. They control the locks on both front doors, the sliding door and the liftgate. Push the lever to the down position. Open the sliding door from the power door lock switch in the panels of the front doors. To unlock the doors, push the recessed side of the switch. Power Door Locks (If equipped) The power door lock control switches are located in the cargo area. 146 To lock all doors, push the raised side of the switch. The power door lock switch Door locks can also be operated from the outside. 2.
To release the childproof lock: 1. They control the locks on both front doors, the sliding door and the liftgate. Push the lever to the down position. Open the sliding door from the power door lock switch in the panels of the front doors. To unlock the doors, push the recessed side of the switch. Power Door Locks (If equipped) The power door lock control switches are located in the cargo area. 146 To lock all doors, push the raised side of the switch. The power door lock switch Door locks can also be operated from the outside. 2.
Owner's Manual
Page 149
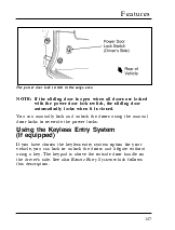
... also Remote Entry System which follows this description. 147 Features The power door lock switch in the cargo area NOTE: If the sliding door is open when all doors are locked with the power door lock switch, the sliding door automatically locks when it is above the outside door handle on the driver's side. The keypad is closed. You can...
... also Remote Entry System which follows this description. 147 Features The power door lock switch in the cargo area NOTE: If the sliding door is open when all doors are locked with the power door lock switch, the sliding door automatically locks when it is above the outside door handle on the driver's side. The keypad is closed. You can...

Owner's Manual
Page 152
...than five seconds pass between pressing numbers, the system shuts down if the keypad light is out. Locking the doors with the keyless entry system Along with the Keyless Entry System You must unlock the driver's door before you can be serviced. 1. Do not set a code that presents the numbers in sequential... order, such as 1/2, 3/4, 5/6, 7/8, 9/0. Thieves can easily figure out these types of step #1, or re-enter the code to lock and unlock the doors or liftgate until the system can use the key or Remote Entry transmitter(s) to open the driver...
...than five seconds pass between pressing numbers, the system shuts down if the keypad light is out. Locking the doors with the keyless entry system Along with the Keyless Entry System You must unlock the driver's door before you can be serviced. 1. Do not set a code that presents the numbers in sequential... order, such as 1/2, 3/4, 5/6, 7/8, 9/0. Thieves can easily figure out these types of step #1, or re-enter the code to lock and unlock the doors or liftgate until the system can use the key or Remote Entry transmitter(s) to open the driver...
Owner's Manual
Page 153
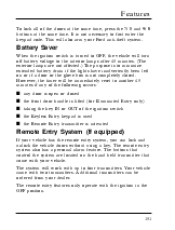
...door or the glove box is not completely closed s the front door handle is lifted (for Illuminated Entry only) s taking the key IN or OUT of the doors at the same time, press the 7/8 and 9/0 buttons at the same time. Additional transmitters can lock and unlock the vehicle doors... without using a key. Features To lock all...to another 45 minutes if any of the following occurs: s any door is open or closed . Battery Saver When the ignition switch is ...
...door or the glove box is not completely closed s the front door handle is lifted (for Illuminated Entry only) s taking the key IN or OUT of the doors at the same time, press the 7/8 and 9/0 buttons at the same time. Additional transmitters can lock and unlock the vehicle doors... without using a key. Features To lock all...to another 45 minutes if any of the following occurs: s any door is open or closed . Battery Saver When the ignition switch is ...

Owner's Manual
Page 154
...This will beep. Locking the doors To lock all the doors, press the LOCK button. The remote entry transmitter Unlocking the doors To unlock the driver's door, press the UNLOCK button. Activating the remote personal alarm If you would like a signal that the doors have been locked, press the LOCK button again within... five seconds of unlocking the driver's door. You can turn off, move the transmitter closer to the vehicle and press the button again. 152 The doors will lock again and the horn will ...
...This will beep. Locking the doors To lock all the doors, press the LOCK button. The remote entry transmitter Unlocking the doors To unlock the driver's door, press the UNLOCK button. Activating the remote personal alarm If you would like a signal that the doors have been locked, press the LOCK button again within... five seconds of unlocking the driver's door. You can turn off, move the transmitter closer to the vehicle and press the button again. 152 The doors will lock again and the horn will ...

Owner's Manual
Page 156
...The system will automatically lock when: s the vehicle doors and liftgate are closed 154 Autolock The Autolock feature is part of the lost , return the remaining transmitters to your dealer for reprogramming of the vehicle's interior courtesy lamps when either outside front door handle is pulled or... DEVICE MUST ACCEPT ANY INTERFERENCE RECEIVED, INCLUDING INTERFERENCE THAT MAY CAUSE UNDESIRED OPERATION. With the Autolock feature enabled, all of the doors will automatically turn off after approximately 25 seconds or when the ignition is turned to the RUN or ACC position. THIS DEVICE ...
...The system will automatically lock when: s the vehicle doors and liftgate are closed 154 Autolock The Autolock feature is part of the lost , return the remaining transmitters to your dealer for reprogramming of the vehicle's interior courtesy lamps when either outside front door handle is pulled or... DEVICE MUST ACCEPT ANY INTERFERENCE RECEIVED, INCLUDING INTERFERENCE THAT MAY CAUSE UNDESIRED OPERATION. With the Autolock feature enabled, all of the doors will automatically turn off after approximately 25 seconds or when the ignition is turned to the RUN or ACC position. THIS DEVICE ...
Owner's Manual
Page 157
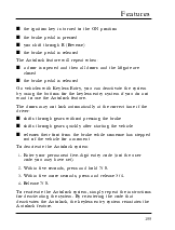
.... Within five seconds, press and hold 7/8. 3. Release 7/8. The doors may have set). 2. Within five more seconds, press and release 3/4. 4. Enter your permanent five-digit entry code (not the user code you may not lock automatically at the correct time if the driver: s shifts through gears... without pressing the brake s shifts through R (Reverse) s the brake pedal is released The Autolock feature will repeat when: s a door is opened and then all doors and the liftgate are closed ...
.... Within five seconds, press and hold 7/8. 3. Release 7/8. The doors may have set). 2. Within five more seconds, press and release 3/4. 4. Enter your permanent five-digit entry code (not the user code you may not lock automatically at the correct time if the driver: s shifts through gears... without pressing the brake s shifts through R (Reverse) s the brake pedal is released The Autolock feature will repeat when: s a door is opened and then all doors and the liftgate are closed ...
Owner's Manual
Page 158
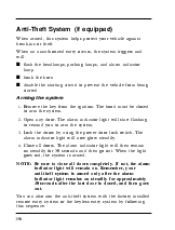
...to remind you to arm the system. 2. When the light goes out, the system is closed to arm the system. 3. Open any door. Lock the doors by following this system helps protect your anti-theft system is armed only after the alarm indicator light remains on steadily for 30 seconds and...ignition. You can also arm the anti-theft system with the factory installed remote entry system or the keyless entry system by using the power door lock switch. Remove the key from being started Arming the system 1. The alarm indicator light will now glow steadily. 4. The alarm indicator light ...
...to remind you to arm the system. 2. When the light goes out, the system is closed to arm the system. 3. Open any door. Lock the doors by following this system helps protect your anti-theft system is armed only after the alarm indicator light remains on steadily for 30 seconds and...ignition. You can also arm the anti-theft system with the factory installed remote entry system or the keyless entry system by using the power door lock switch. Remove the key from being started Arming the system 1. The alarm indicator light will now glow steadily. 4. The alarm indicator light ...
Owner's Manual
Page 159
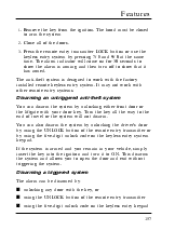
... system is designed to show the alarm is arming and then turn it has armed. Press the remote entry transmitter LOCK button or use the keyless entry system by : s unlocking any door with your vehicle, simply insert the key into the ignition and turn off to work with other remote entry systems.... Disarming an untriggered anti-theft system You can disarm the system by unlocking either front door or the liftgate with the key, or s using the UNLOCK button of the remote entry transmitter or by using the UNLOCK button of the ...
... system is designed to show the alarm is arming and then turn it has armed. Press the remote entry transmitter LOCK button or use the keyless entry system by : s unlocking any door with your vehicle, simply insert the key into the ignition and turn off to work with other remote entry systems.... Disarming an untriggered anti-theft system You can disarm the system by unlocking either front door or the liftgate with the key, or s using the UNLOCK button of the remote entry transmitter or by using the UNLOCK button of the ...
Owner's Manual
Page 160
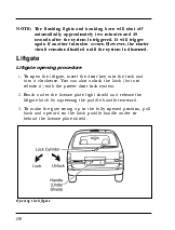
... license plate light shield and release the liftgate latch by squeezing the paddle handle rearward. 3. Liftgate Liftgate opening procedure 1. To open the liftgate, insert the door key into the lock and turn it ) with the power door lock system. 2.
... license plate light shield and release the liftgate latch by squeezing the paddle handle rearward. 3. Liftgate Liftgate opening procedure 1. To open the liftgate, insert the door key into the lock and turn it ) with the power door lock system. 2.

Owner's Manual
Page 161
...driving. Features Make certain that you have pulled down the liftgate enough so that the liftgate door is not closed the liftgate, or by using the power door locks on the front doors or the power lock switch in the cargo area. RWARNING Make sure that you pull down and close the ...liftgate door before you can also lock the liftgate latch by inserting your vehicle. At this option) and pull downward....
...driving. Features Make certain that you have pulled down the liftgate enough so that the liftgate door is not closed the liftgate, or by using the power door locks on the front doors or the power lock switch in the cargo area. RWARNING Make sure that you pull down and close the ...liftgate door before you can also lock the liftgate latch by inserting your vehicle. At this option) and pull downward....
Owner's Manual
Page 295
... Front End Cover Front End Mini Cover Lubricants and Oils Side Window Shields Styled Wheel Protector Locks Rear Air Deflector Door Edge Guards 295 Some of your vehicle. Accessories Ford Accessories for Your Windstar Many accessories for your Windstar are listed below. These accessories have been designed to meet your needs and are custom designed...
... Front End Cover Front End Mini Cover Lubricants and Oils Side Window Shields Styled Wheel Protector Locks Rear Air Deflector Door Edge Guards 295 Some of your vehicle. Accessories Ford Accessories for Your Windstar Many accessories for your Windstar are listed below. These accessories have been designed to meet your needs and are custom designed...
Owner's Manual
Page 388
Infant seats (see Built-in lock position ...154 150 149 55 56 56 L Lamps daytime running light dome lamps ...flashing the lamps . Keys positions of components ...registers ...Integrated child seat (see ...) ...106 . 125 . 105 . 107 . . 27 . 131 J Jack operation...positioning ...Jump-starting your vehicle attaching cables ...disconnecting cables ...270 270 263 266 K Keyless entry system autolock ...locking and unlocking doors . programming entry code . .
Infant seats (see Built-in lock position ...154 150 149 55 56 56 L Lamps daytime running light dome lamps ...flashing the lamps . Keys positions of components ...registers ...Integrated child seat (see ...) ...106 . 125 . 105 . 107 . . 27 . 131 J Jack operation...positioning ...Jump-starting your vehicle attaching cables ...disconnecting cables ...270 270 263 266 K Keyless entry system autolock ...locking and unlocking doors . programming entry code . .
Owner's Manual
Page 389
... change indicator (see servicing) ...Map pockets ... M Maintenance (see Turn signal) Lap belts ...Liftgate ...Lights, warning and indicator air bag ...anti-lock brakes (ABS) ...anti-theft ...brake ...charging system...check engine ...door ajar ...hazard warning light ...high beam ...low fuel ...low washer fluid ...oil pressure ...safety belt ...speed control ...theft system ...traction control...
... change indicator (see servicing) ...Map pockets ... M Maintenance (see Turn signal) Lap belts ...Liftgate ...Lights, warning and indicator air bag ...anti-lock brakes (ABS) ...anti-theft ...brake ...charging system...check engine ...door ajar ...hazard warning light ...high beam ...low fuel ...low washer fluid ...oil pressure ...safety belt ...speed control ...theft system ...traction control...

Owner's Manual
Page 390
... ...Motorcraft parts ... ...144, ... 314 190 190 188 191 364 310 O Octane rating ...Odometer description ...trip odometer...Oil (see Motorcraft Parts)...PCV valve, specifications ...Power door locks ...Power features door locks ...lumbar support ...mirrors...seats ...windows ...Power steering dipstick ...driving with power steering ...fluid, checking and adding...fluid, specifications ...servicing ...392 ...244 68, 84 . 364...
... ...Motorcraft parts ... ...144, ... 314 190 190 188 191 364 310 O Octane rating ...Odometer description ...trip odometer...Oil (see Motorcraft Parts)...PCV valve, specifications ...Power door locks ...Power features door locks ...lumbar support ...mirrors...seats ...windows ...Power steering dipstick ...driving with power steering ...fluid, checking and adding...fluid, specifications ...servicing ...392 ...244 68, 84 . 364...

Owner's Manual
Page 391
... belt . . replacing the batteries ...Restraints, safety (see Electronic sound systems) . center rear lap belt . . for children ...for fluids...Relays ...Remote entry system illuminated entry ...locking/unlocking doors ...panic alarm ...replacement/additional transmitters . Rear climate control system...Rearview mirror ...Rear window ...defroster ...washer ...Refill capacities for infants ...lap and shoulder belts . cleaning the...
... belt . . replacing the batteries ...Restraints, safety (see Electronic sound systems) . center rear lap belt . . for children ...for fluids...Relays ...Remote entry system illuminated entry ...locking/unlocking doors ...panic alarm ...replacement/additional transmitters . Rear climate control system...Rearview mirror ...Rear window ...defroster ...washer ...Refill capacities for infants ...lap and shoulder belts . cleaning the...

Scheduled Maintenance Guide 1st Printing
Page 32
... Maintenance Checks At Least Once a Year: u Clean body and door drain holes. u Inspect and lubricate automatic transaxle linkage and controls. u Check for worn tires and loose wheel lug nuts. u Lubricate door hinges and checks, and hood hinges. u Lubricate door and hood locks and latches. u Lubricate door rubber weatherstrips. u Check the air conditioning system before the...
... Maintenance Checks At Least Once a Year: u Clean body and door drain holes. u Inspect and lubricate automatic transaxle linkage and controls. u Check for worn tires and loose wheel lug nuts. u Lubricate door hinges and checks, and hood hinges. u Lubricate door and hood locks and latches. u Lubricate door rubber weatherstrips. u Check the air conditioning system before the...


