

Owner's Manual
Page 101
... may damage the tailgate if it . You can lower the tailgate completely. Then raise the tailgate to a 45 degree angle (see the following illustration) and lift the right side of the support screw. Features To release the tailgate: Open the tailgate as described above , but support it from the left hinge...
... may damage the tailgate if it . You can lower the tailgate completely. Then raise the tailgate to a 45 degree angle (see the following illustration) and lift the right side of the support screw. Features To release the tailgate: Open the tailgate as described above , but support it from the left hinge...

Owner's Manual
Page 113
Adjusting the bench seat Adjusting the bucket seat SuperCab To move the front seat forward or rearward: 1. Find the adjustment bar at lower front of the front seat. 2. Features 4. Release the lever to unlatch the seat. 113 Make sure the seat locks securely in its new position. Lift bar upward to lock the seat in place.
Adjusting the bench seat Adjusting the bucket seat SuperCab To move the front seat forward or rearward: 1. Find the adjustment bar at lower front of the front seat. 2. Features 4. Release the lever to unlatch the seat. 113 Make sure the seat locks securely in its new position. Lift bar upward to lock the seat in place.

Owner's Manual
Page 115
Lean against the back of the seat and adjust it to fold forward for the recliner. 2. To return the seatback to 30 degrees rearward. 1. Lifting the recliner handle of an unoccupied seat will allow the seat back to the position you can tilt the seatback up and hold it in ... Release the handle to lock the seatback in a collision, children should always ride with the release handle raised returns the seat back to the rear. Lift the handle up to upright position, lift the handle and lean forward. Pushing the seat back with the seatback upright.
Lean against the back of the seat and adjust it to fold forward for the recliner. 2. To return the seatback to 30 degrees rearward. 1. Lifting the recliner handle of an unoccupied seat will allow the seat back to the position you can tilt the seatback up and hold it in ... Release the handle to lock the seatback in a collision, children should always ride with the release handle raised returns the seat back to the rear. Lift the handle up to upright position, lift the handle and lean forward. Pushing the seat back with the seatback upright.

Owner's Manual
Page 117
Lift the seatback release lever on the outboard side of a sudden stop or collision. 3. NOTE: Whenever the seatback is folded forward even a small degree may not ...
Lift the seatback release lever on the outboard side of a sudden stop or collision. 3. NOTE: Whenever the seatback is folded forward even a small degree may not ...

Owner's Manual
Page 119
Features To operate the seat adjuster: 4. Lift the release bar and hold until the desired seat position is obtained, then release the bar to relock the seat. To adjust the seats forward or rearward, locate the release bar at the lower front area of the seat cushion. Adjusting seat 60/40 Split Front Bench (If equipped) The seat back release operates the same as the basic bucket seat. 60/40 split front bench 119
Features To operate the seat adjuster: 4. Lift the release bar and hold until the desired seat position is obtained, then release the bar to relock the seat. To adjust the seats forward or rearward, locate the release bar at the lower front area of the seat cushion. Adjusting seat 60/40 Split Front Bench (If equipped) The seat back release operates the same as the basic bucket seat. 60/40 split front bench 119

Owner's Manual
Page 126
... the bottom of each cupholder. 3. Use the power point. Power point electrical outlet 126 NOTE: Do not plug optional electrical accessories into the cigarette lighter. Lift the consolette from the consolette. 2. Remove the rubber pad at the bottom of each cupholder 90˚ (one quarter turn). 4. Pull the adjustable portion of...
... the bottom of each cupholder. 3. Use the power point. Power point electrical outlet 126 NOTE: Do not plug optional electrical accessories into the cigarette lighter. Lift the consolette from the consolette. 2. Remove the rubber pad at the bottom of each cupholder 90˚ (one quarter turn). 4. Pull the adjustable portion of...
Owner's Manual
Page 160
... brake fully and turn off the ignition when leaving the vehicle. The gearshift is running. Forced Downshifts To gain extra acceleration in a clockwise direction without lifting it toward you shift into P (Park). Always set the parking brake fully and make sure the gearshift is free to the appropriate gear: third, second...
... brake fully and turn off the ignition when leaving the vehicle. The gearshift is running. Forced Downshifts To gain extra acceleration in a clockwise direction without lifting it toward you shift into P (Park). Always set the parking brake fully and make sure the gearshift is free to the appropriate gear: third, second...

Owner's Manual
Page 184
.... RWARNING If the parking brake is released. Operate your vehicle will be working properly. RWARNING Do not leave the vehicle unattended with your previous vehicle. Lift your foot from your left foot while you pull the parking brake release lever. They may drive and handle differently from the parking brake pedal...
.... RWARNING If the parking brake is released. Operate your vehicle will be working properly. RWARNING Do not leave the vehicle unattended with your previous vehicle. Lift your foot from your left foot while you pull the parking brake release lever. They may drive and handle differently from the parking brake pedal...

Owner's Manual
Page 218
... designed and tested to provide both safe, predictable performance (whether loaded or empty) as well as adding or removing parts (like lift kits, stabilizer bars or snowplowing equipment) or by using replacement parts non-equivalent to free the wheel chocks. Snowplowing RWARNING Do not... use this vehicle for snowplowing. 218 s Shift transmission into gear and release the parking brake. Ford recommends that you DO NOT make modifications such as durable load carrying capability. s Apply the brake pedal and hold . Suspension Modifications ...
... designed and tested to provide both safe, predictable performance (whether loaded or empty) as well as adding or removing parts (like lift kits, stabilizer bars or snowplowing equipment) or by using replacement parts non-equivalent to free the wheel chocks. Snowplowing RWARNING Do not... use this vehicle for snowplowing. 218 s Shift transmission into gear and release the parking brake. Ford recommends that you DO NOT make modifications such as durable load carrying capability. s Apply the brake pedal and hold . Suspension Modifications ...

Owner's Manual
Page 219
...too much pressure on the opposite corners. If someone 's skin, eyes, or clothing, immediately flush the area with your hands on the ends when lifting a battery could result in injury or vehicle damage. RWARNING The gases around the battery can breathe fresh air. Make sure that you turn the engine...may die if you leave the lights on or any electrical equipment on after you can explode if exposed to flames, sparks, or lit cigarettes. Lift the battery with a carrier or with water for at least 15 minutes. An explosion could cause acid to spill. RWARNING Batteries contain sulfuric acid...
...too much pressure on the opposite corners. If someone 's skin, eyes, or clothing, immediately flush the area with your hands on the ends when lifting a battery could result in injury or vehicle damage. RWARNING The gases around the battery can breathe fresh air. Make sure that you turn the engine...may die if you leave the lights on or any electrical equipment on after you can explode if exposed to flames, sparks, or lit cigarettes. Lift the battery with a carrier or with water for at least 15 minutes. An explosion could cause acid to spill. RWARNING Batteries contain sulfuric acid...

Owner's Manual
Page 227
... brake fully and turn off the jack, someone could be seriously injured. If you are changing. Roadside Emergencies Preparing to Change the Tire NOTE: To lift your vehicle will not prevent the vehicle from moving or slipping off the jack, even if the vehicle is in P (Park) or 1 (First...
... brake fully and turn off the jack, someone could be seriously injured. If you are changing. Roadside Emergencies Preparing to Change the Tire NOTE: To lift your vehicle will not prevent the vehicle from moving or slipping off the jack, even if the vehicle is in P (Park) or 1 (First...
Owner's Manual
Page 230
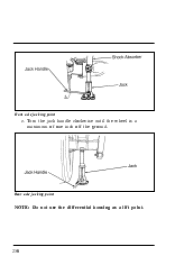
Rear axle jacking point NOTE: Do not use the differential housing as a lift point. 230 Front axle jacking point c. Turn the jack handle clockwise until the wheel is a maximum of one inch off the ground.
Rear axle jacking point NOTE: Do not use the differential housing as a lift point. 230 Front axle jacking point c. Turn the jack handle clockwise until the wheel is a maximum of one inch off the ground.

Owner's Manual
Page 234
Ranger 4x2/4x4 The recommended method to tow your roadside assistance center. However, slingbelt towing is acceptable. Towing Your Vehicle If you need to have your vehicle towed, contact a professional towing service or, if you are a member, your Ranger is with flatbed or wheel lift equipment. Ranger without rear bumper The recommended method to remove the undervehicle spare tire before attaching slingbelt towing equipment. 234 Be sure to tow your Ranger is with flatbed or wheel lift equipment. However, slingbelt towing is acceptable.
Ranger 4x2/4x4 The recommended method to tow your roadside assistance center. However, slingbelt towing is acceptable. Towing Your Vehicle If you need to have your vehicle towed, contact a professional towing service or, if you are a member, your Ranger is with flatbed or wheel lift equipment. Ranger without rear bumper The recommended method to remove the undervehicle spare tire before attaching slingbelt towing equipment. 234 Be sure to tow your Ranger is with flatbed or wheel lift equipment. However, slingbelt towing is acceptable.
Owner's Manual
Page 259
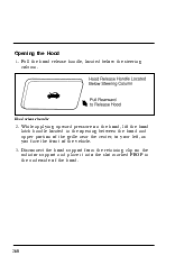
Pull the hood release handle, located below the steering column. While applying upward pressure on the radiator support and place it into the slot marked PROP in the opening between the hood and upper portion of the grille near the center, to your left, as you face the front of the hood. 260 Disconnect the hood support from the retaining clip on the hood, lift the hood latch handle located in the underside of the vehicle. 3. Hood release handle 2. Opening the Hood 1.
Pull the hood release handle, located below the steering column. While applying upward pressure on the radiator support and place it into the slot marked PROP in the opening between the hood and upper portion of the grille near the center, to your left, as you face the front of the hood. 260 Disconnect the hood support from the retaining clip on the hood, lift the hood latch handle located in the underside of the vehicle. 3. Hood release handle 2. Opening the Hood 1.

Owner's Manual
Page 260
Place the support rod in its retaining clip and close the hood, raise it so that the support rod comes away from the slotted hole in the hood. Always attempt to lift the hood after closing to make it is securely latched. 261 Servicing Your Ranger Hood and support NOTE: Read and understand Precautions When Servicing Your Vehicle at the beginning of this chapter before opening the hood. To close the hood with enough force to be sure it latch. Be sure to oil the hood latch every six months to maintain smooth operation.
Place the support rod in its retaining clip and close the hood, raise it so that the support rod comes away from the slotted hole in the hood. Always attempt to lift the hood after closing to make it is securely latched. 261 Servicing Your Ranger Hood and support NOTE: Read and understand Precautions When Servicing Your Vehicle at the beginning of this chapter before opening the hood. To close the hood with enough force to be sure it latch. Be sure to oil the hood latch every six months to maintain smooth operation.
Owner's Manual
Page 298
... fluid should be changed every 30,000 miles (48,000 km) or 21,000 miles (34,000 km) if under severe duty conditions. Servicing Your Ranger RWARNING Batteries normally produce explosive gases which burns skin, eyes, and clothing. RWARNING Applying too much pressure on the opposite corners. Call a doctor immediately. ...Therefore, do not allow flames, sparks or lit tobacco to come near a battery, always cover your face and protect your hands on the ends when lifting a battery could cause acid to spill. RWARNING Batteries contain sulfuric acid which can cause personal injury.
... fluid should be changed every 30,000 miles (48,000 km) or 21,000 miles (34,000 km) if under severe duty conditions. Servicing Your Ranger RWARNING Batteries normally produce explosive gases which burns skin, eyes, and clothing. RWARNING Applying too much pressure on the opposite corners. Call a doctor immediately. ...Therefore, do not allow flames, sparks or lit tobacco to come near a battery, always cover your face and protect your hands on the ends when lifting a battery could cause acid to spill. RWARNING Batteries contain sulfuric acid which can cause personal injury.

Owner's Manual
Page 318
... the socket by turning it 1/8 of the socket. 2. Turn the headlamps on and make sure that the headlamp switch is in the socket. Servicing Your Ranger Removing the headlamp bulb 1. Lift the hood.
... the socket by turning it 1/8 of the socket. 2. Turn the headlamps on and make sure that the headlamp switch is in the socket. Servicing Your Ranger Removing the headlamp bulb 1. Lift the hood.

Scheduled Maintenance Guide 1st Printing
Page 6
... adjust air pressure. 6 Normal Schedule NOTE: Rear axle lube quantities must be checked or changed unless a leak is suspected or repair required. u Adjust clutch by lifting pedal every 5,000 miles (8,000 km). For items marked with a number in this section. Regular Maintenance Intervals for Emission Control Service are shown in parentheses...
... adjust air pressure. 6 Normal Schedule NOTE: Rear axle lube quantities must be checked or changed unless a leak is suspected or repair required. u Adjust clutch by lifting pedal every 5,000 miles (8,000 km). For items marked with a number in this section. Regular Maintenance Intervals for Emission Control Service are shown in parentheses...

Scheduled Maintenance Guide 1st Printing
Page 7
...15,000 miles (24,000 km) or 12 months. u Adjust clutch by lifting pedal every 5,000 u Rotate tires and adjust air pressure. 20,000 MILES (32,000 Kilometers) u Change engine oil and replace oil filter. u Adjust clutch by lifting pedal every 5,000 miles (8,000 km). 15,000 MILES (24,000 Kilometers...) u Change engine oil and replace oil filter. u Adjust clutch by lifting pedal every 5,000 miles (8,000 km). u Inspect engine cooling system, hoses, and clamps; 10,000 MILES (16,000 Kilometers) u Change engine oil and replace...
...15,000 miles (24,000 km) or 12 months. u Adjust clutch by lifting pedal every 5,000 u Rotate tires and adjust air pressure. 20,000 MILES (32,000 Kilometers) u Change engine oil and replace oil filter. u Adjust clutch by lifting pedal every 5,000 miles (8,000 km). 15,000 MILES (24,000 Kilometers...) u Change engine oil and replace oil filter. u Adjust clutch by lifting pedal every 5,000 miles (8,000 km). u Inspect engine cooling system, hoses, and clamps; 10,000 MILES (16,000 Kilometers) u Change engine oil and replace...

Scheduled Maintenance Guide 1st Printing
Page 8
u Inspect exhaust heat shield(s). 8 Normal Schedule 25,000 MILES (40,000 Kilometers) u Change engine oil and replace oil filter. u Adjust clutch by lifting pedal every 5,000 u Change automatic transmission fluid. u Inspect engine cooling system, hoses, and clamps; u Rotate tires and adjust air pressure. 30,000 MILES (48,000 Kilometers) u Change engine oil and replace oil filter. miles (8,000 km). u Adjust clutch by lifting pedal every 5,000 miles (8,000 km). u Replace air cleaner filter. and check coolant strength every 15,000 miles (24,000 km) or 12 months.
u Inspect exhaust heat shield(s). 8 Normal Schedule 25,000 MILES (40,000 Kilometers) u Change engine oil and replace oil filter. u Adjust clutch by lifting pedal every 5,000 u Change automatic transmission fluid. u Inspect engine cooling system, hoses, and clamps; u Rotate tires and adjust air pressure. 30,000 MILES (48,000 Kilometers) u Change engine oil and replace oil filter. miles (8,000 km). u Adjust clutch by lifting pedal every 5,000 miles (8,000 km). u Replace air cleaner filter. and check coolant strength every 15,000 miles (24,000 km) or 12 months.

