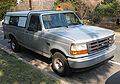

Owner's Manual
Page 8
...on 1-800-635-5560. Use of your light truck is located on the driver's side door pillar or on the 5 In addition, ambulance usage without the Ford Ambulance Preparation Package voids the Ford New Vehicle Limited Warranty and may result in loss of spraying fuel which could lead to ..., please call the Light Truck Body Builders Advisory Service on its information decal. NOTICE TO OWNERS OF LIGHT TRUCK AMBULANCE CONVERSIONS If your Ford light truck as pertinent supplements. Be sure to read the Additional Special Driving Instructions for Four-Wheel Drive Vehicle Operators, in this book...
...on 1-800-635-5560. Use of your light truck is located on the driver's side door pillar or on the 5 In addition, ambulance usage without the Ford Ambulance Preparation Package voids the Ford New Vehicle Limited Warranty and may result in loss of spraying fuel which could lead to ..., please call the Light Truck Body Builders Advisory Service on its information decal. NOTICE TO OWNERS OF LIGHT TRUCK AMBULANCE CONVERSIONS If your Ford light truck as pertinent supplements. Be sure to read the Additional Special Driving Instructions for Four-Wheel Drive Vehicle Operators, in this book...
Owner's Manual
Page 9
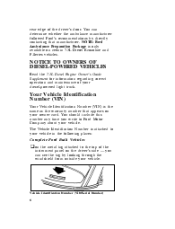
...information regarding correct operation and maintenance of your vehicle. You should include this number any time you write to the top of the driver's door. Vehicle Identification Number (VIN/Serial Number) 6 Your Vehicle Identification Number (VIN) Your Vehicle Identification Number (VIN) is attached to your ...3L Diesel Econoline and F-Series vehicles. The Vehicle Identification Number is the same as the warranty number that manufacturer. NOTE: Ford Ambulance Preparation Package is only available on your vehicle. rear edge of the instrument panel on the metal tag attached to...
...information regarding correct operation and maintenance of your vehicle. You should include this number any time you write to the top of the driver's door. Vehicle Identification Number (VIN/Serial Number) 6 Your Vehicle Identification Number (VIN) Your Vehicle Identification Number (VIN) is attached to your ...3L Diesel Econoline and F-Series vehicles. The Vehicle Identification Number is the same as the warranty number that manufacturer. NOTE: Ford Ambulance Preparation Package is only available on your vehicle. rear edge of the instrument panel on the metal tag attached to...

Owner's Manual
Page 10
... the National Highway Traffic Safety Administration and is manufactured in two (or more ) separate manufacturers, with it, it , refer to the left front door lock facing or the door latch post pillar. The label also contains Gross Vehicle Weight Rating and Gross Axle Weight Ratings, wheel and tire data and information codes...
... the National Highway Traffic Safety Administration and is manufactured in two (or more ) separate manufacturers, with it, it , refer to the left front door lock facing or the door latch post pillar. The label also contains Gross Vehicle Weight Rating and Gross Axle Weight Ratings, wheel and tire data and information codes...

Owner's Manual
Page 16
... or impacts of approximately 5 mph (8 km/h) or more. The front seat belt retractor can also be made to lessen the risk of the door coming open in the front seat. Automatic Locking Mode In this operating mode, the shoulder belt retractor will be placed in a collision. RWARNING Lock... the doors of your vehicle before driving to lock by pulling/jerking on the belt. Dual Locking Mode Retractors Vehicle Sensitive (Emergency) Locking Mode In this...
... or impacts of approximately 5 mph (8 km/h) or more. The front seat belt retractor can also be made to lessen the risk of the door coming open in the front seat. Automatic Locking Mode In this operating mode, the shoulder belt retractor will be placed in a collision. RWARNING Lock... the doors of your vehicle before driving to lock by pulling/jerking on the belt. Dual Locking Mode Retractors Vehicle Sensitive (Emergency) Locking Mode In this...

Owner's Manual
Page 18
... sure the tongue is securely fastened to follow these precautions could increase the risk and/or severity of the belt crosses your vehicle, close the door and lock it around the neck over the inside shoulder. Never use a single belt for more than one person. Never swing it . After you get...
... sure the tongue is securely fastened to follow these precautions could increase the risk and/or severity of the belt crosses your vehicle, close the door and lock it around the neck over the inside shoulder. Never use a single belt for more than one person. Never swing it . After you get...
Owner's Manual
Page 53
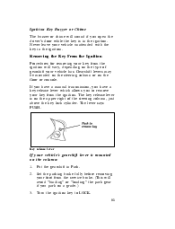
... or chime will sound if you to LOCK. 51 3. If you have a manual transmission, you have a key release lever which allows you open the driver's door while the key is mounted on a grade.) Turn the ignition key to remove your vehicle has. Put the gearshift in the ignition. Set the parking...
... or chime will sound if you to LOCK. 51 3. If you have a manual transmission, you have a key release lever which allows you open the driver's door while the key is mounted on a grade.) Turn the ignition key to remove your vehicle has. Put the gearshift in the ignition. Set the parking...

Owner's Manual
Page 76
Fuel Gauge The fuel gauge displays approximately how much fuel is in the fuel tank only when the ignition switch is in motion. High Beam Light This light comes on when the headlamps are on high beam or when you flash the lights. The fuel gauge indicator may drift from the ignition switch ON position. Fuel gauge 74 With ignition switch OFF, the fuel gauge indicator may vary slightly when the vehicle is ON. High beam indicator light "Headlamps On" Alert Chime This chime will sound if you open the door while the headlamps or parklamps are turned on .
Fuel Gauge The fuel gauge displays approximately how much fuel is in the fuel tank only when the ignition switch is in motion. High Beam Light This light comes on when the headlamps are on high beam or when you flash the lights. The fuel gauge indicator may drift from the ignition switch ON position. Fuel gauge 74 With ignition switch OFF, the fuel gauge indicator may vary slightly when the vehicle is ON. High beam indicator light "Headlamps On" Alert Chime This chime will sound if you open the door while the headlamps or parklamps are turned on .

Owner's Manual
Page 94
... marked with a white tag "center high-mount stop lamp." 92 Turning the headlamp switch fully counterclockwise will operate the interior lamp when the doors are closed. The feed is located at the left rear of the vehicle, behind the bumper and is opened. A high-mount brakelamp feed is provided ...
... marked with a white tag "center high-mount stop lamp." 92 Turning the headlamp switch fully counterclockwise will operate the interior lamp when the doors are closed. The feed is located at the left rear of the vehicle, behind the bumper and is opened. A high-mount brakelamp feed is provided ...

Owner's Manual
Page 111
...optional features. To unlock and open , the tailgate load should not exceed 500 lbs (227 kgs). Tailgate Tailgate operation When open the front door from the inside of all items defined in this chapter to the tailgate or its supports. 109 NOTE: For Stripped Chassis vehicles, see your... Body Builders manual for your vehicle, Ford recommends that you want to load heavy items onto your comfort, convenience and safety. Features Your vehicle has a variety of features designed for ...
...optional features. To unlock and open , the tailgate load should not exceed 500 lbs (227 kgs). Tailgate Tailgate operation When open the front door from the inside of all items defined in this chapter to the tailgate or its supports. 109 NOTE: For Stripped Chassis vehicles, see your... Body Builders manual for your vehicle, Ford recommends that you want to load heavy items onto your comfort, convenience and safety. Features Your vehicle has a variety of features designed for ...

Owner's Manual
Page 113
Tailgate removal RWARNING Do not drive your vehicle with the tailgate open unless there is a load holding it in the front doors. The manual door locks will override the power door lock controls. Power door lock controls 111 Power Door Locks (If equipped) The power door lock switches are located in place. To unlock all doors push the switch marked L. To lock all doors push the switch marked U.
Tailgate removal RWARNING Do not drive your vehicle with the tailgate open unless there is a load holding it in the front doors. The manual door locks will override the power door lock controls. Power door lock controls 111 Power Door Locks (If equipped) The power door lock switches are located in place. To unlock all doors push the switch marked L. To lock all doors push the switch marked U.

Owner's Manual
Page 114
... The remote also has a personal alarm feature. To unlock the other doors, press the UNLOCK button a second time within five (5) seconds of unlocking the driver's door. 112 Remote Entry System (If equipped) If your dealer. The remote entry transmitter Unlocking the doors with up to four transmitters. The system will work with the... remote entry system To unlock the driver's door, press the UNLOCK button. Your vehicle came with your vehicle. The buttons for the system are located on the two hand held transmitters that came...
... The remote also has a personal alarm feature. To unlock the other doors, press the UNLOCK button a second time within five (5) seconds of unlocking the driver's door. 112 Remote Entry System (If equipped) If your dealer. The remote entry transmitter Unlocking the doors with up to four transmitters. The system will work with the... remote entry system To unlock the driver's door, press the UNLOCK button. Your vehicle came with your vehicle. The buttons for the system are located on the two hand held transmitters that came...

Owner's Manual
Page 115
... illuminated entry system turns on the vehicle's interior lights for approximately 2 minutes 45 seconds. This will flash. When you would like a signal that the doors are being locked, press the LOCK button again within five seconds. You can turn it OFF by pressing the PANIC button again from the same... the ON or ACCESSORY position. 113 You can turn these lights off with the remote entry system To lock all the doors, press the LOCK button. Locking the doors with the remote entry LOCK button or by turning the ignition to the ON or ACCESSORY position. Remote entry personal alarm ...
... illuminated entry system turns on the vehicle's interior lights for approximately 2 minutes 45 seconds. This will flash. When you would like a signal that the doors are being locked, press the LOCK button again within five seconds. You can turn it OFF by pressing the PANIC button again from the same... the ON or ACCESSORY position. 113 You can turn these lights off with the remote entry system To lock all the doors, press the LOCK button. Locking the doors with the remote entry LOCK button or by turning the ignition to the ON or ACCESSORY position. Remote entry personal alarm ...
Owner's Manual
Page 117
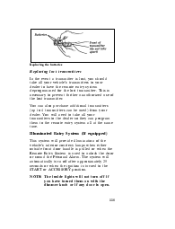
...is turned to take all at the same time. The system will need to the START or ACCESSORY position. This is necessary to unlock the door or sound the Personal Alarm. Illuminated Entry System (If equipped) This system will not turn off if you should take all your transmitters to the... dealer so they can be used to prevent further unauthorized use of the vehicle's interior courtesy lamps when either outside front door handle is pulled or when the Remote Entry System is used ) from your dealer. NOTE: The inside lights will provide illumination of the lost ...
...is turned to take all at the same time. The system will need to the START or ACCESSORY position. This is necessary to unlock the door or sound the Personal Alarm. Illuminated Entry System (If equipped) This system will not turn off if you should take all your transmitters to the... dealer so they can be used to prevent further unauthorized use of the vehicle's interior courtesy lamps when either outside front door handle is pulled or when the Remote Entry System is used ) from your dealer. NOTE: The inside lights will provide illumination of the lost ...
Owner's Manual
Page 118
... . To close, slide the windows to these lamps will be restored when the remote entry transmitter is used, any door is opened, or the ignition key is turned on inadvertently or if a door is turned off, the vehicle will prevent draining of the snap lock away from the window, then move the...
... . To close, slide the windows to these lamps will be restored when the remote entry transmitter is used, any door is opened, or the ignition key is turned on inadvertently or if a door is turned off, the vehicle will prevent draining of the snap lock away from the window, then move the...
Owner's Manual
Page 119
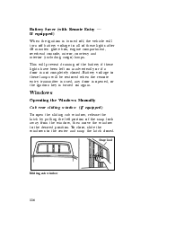
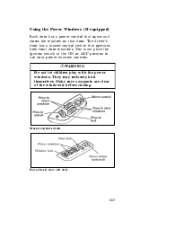
You must place the ignition switch in the ON or ACC position to use your power window controls. Make sure occupants are clear of the window(s) before closing. The driver's door has a master control switch that door. RWARNING Do not let children play with the power windows. They may seriously hurt themselves. Master control switch Power bezel crew cab only 117 Using the Power Windows (If equipped) Each door has a power control that opens and closes the window on that operates both front door windows.
You must place the ignition switch in the ON or ACC position to use your power window controls. Make sure occupants are clear of the window(s) before closing. The driver's door has a master control switch that door. RWARNING Do not let children play with the power windows. They may seriously hurt themselves. Master control switch Power bezel crew cab only 117 Using the Power Windows (If equipped) Each door has a power control that opens and closes the window on that operates both front door windows.
Owner's Manual
Page 132
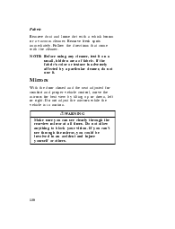
Remove fresh spots immediately. NOTE: Before using any cleaner, test it . Mirrors With the door closed and the seat adjusted for comfort and proper vehicle control, move the mirrors for best view by a particular cleaner, do not use it on a ...
Remove fresh spots immediately. NOTE: Before using any cleaner, test it . Mirrors With the door closed and the seat adjusted for comfort and proper vehicle control, move the mirrors for best view by a particular cleaner, do not use it on a ...

Owner's Manual
Page 135
Visor vanity mirror Visors that are equipped with the lighted vanity mirror also have an auxiliary visor. Illuminated Vanity Mirror (If equipped) Your vehicle may feature illuminated vanity mirrors on the lighted mirror by lifting the mirror door cover. The auxiliary visor slides right and left to cover the windshield when the primary visor is pivoted to the door window. You can turn on the sun visors. Auxiliary sun visor 133
Visor vanity mirror Visors that are equipped with the lighted vanity mirror also have an auxiliary visor. Illuminated Vanity Mirror (If equipped) Your vehicle may feature illuminated vanity mirrors on the lighted mirror by lifting the mirror door cover. The auxiliary visor slides right and left to cover the windshield when the primary visor is pivoted to the door window. You can turn on the sun visors. Auxiliary sun visor 133

Owner's Manual
Page 136
... swingaway mirror and swing-out recreational mirror On vehicles equipped with this type of mirror. 134 Outside Mirrors (Manual Control) Adjust outside mirrors with the door closed and the seat adjusted for best view by tilting up or down, left or right. Use special truck wash facilities for vehicles with "non...
... swingaway mirror and swing-out recreational mirror On vehicles equipped with this type of mirror. 134 Outside Mirrors (Manual Control) Adjust outside mirrors with the door closed and the seat adjusted for best view by tilting up or down, left or right. Use special truck wash facilities for vehicles with "non...

Owner's Manual
Page 137
... right-hand side view mirrors used are . Select the right or left mirror by moving the selector switch to keep the mirror in the driver's door panel.
... right-hand side view mirrors used are . Select the right or left mirror by moving the selector switch to keep the mirror in the driver's door panel.
Owner's Manual
Page 161
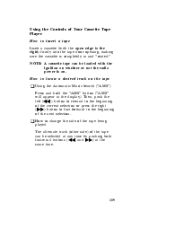
Using the Controls of Your Cassette Tape Player How to insert a tape Insert a cassette (with the open edge to the right) firmly into the tape door opening, making sure the cassette is completely in and "seated." NOTE: A cassette tape can be loaded with the ignition on whether or not the radio ...
Using the Controls of Your Cassette Tape Player How to insert a tape Insert a cassette (with the open edge to the right) firmly into the tape door opening, making sure the cassette is completely in and "seated." NOTE: A cassette tape can be loaded with the ignition on whether or not the radio ...


