

Owner's Manual
Page 3
Starting Your Contour ...41 Warning Lights and Gauges ...53 Instrument Panel Controls ...69 Steering Column Controls ...83 Features ...93 Electronic Sound Systems ...115 139 163 179 185 189 195 261 273 292 Driving Your Contour ...Roadside Emergencies ...Customer Assistance ... Reporting Safety Defects Accessories ...Servicing Your Contour ...Quick Index ... 6 Table of Contents Introductory Information Safety Restraints ...1 7 ... Index ...Service Station Information ...
Starting Your Contour ...41 Warning Lights and Gauges ...53 Instrument Panel Controls ...69 Steering Column Controls ...83 Features ...93 Electronic Sound Systems ...115 139 163 179 185 189 195 261 273 292 Driving Your Contour ...Roadside Emergencies ...Customer Assistance ... Reporting Safety Defects Accessories ...Servicing Your Contour ...Quick Index ... 6 Table of Contents Introductory Information Safety Restraints ...1 7 ... Index ...Service Station Information ...
Owner's Manual
Page 4
... of everything we do : in our products - in their safety and value - and in mind, providing better products and services than our competition. 6 Introductory Information Ford's Commitment to You At Ford Motor Company, excellence is dedication to learning what you in our services, our human relations, our competitiveness, and our profitability.
... of everything we do : in our products - in their safety and value - and in mind, providing better products and services than our competition. 6 Introductory Information Ford's Commitment to You At Ford Motor Company, excellence is dedication to learning what you in our services, our human relations, our competitiveness, and our profitability.
Owner's Manual
Page 5
... can use the Quick Index or the Index. 2 6 Things to Know About Using This Guide Congratulations on the purchase of the options available to you. Ford may not have a specific question or need additional information. This guide describes equipment and gives specifications for equipment that was in effect when this guide...
... can use the Quick Index or the Index. 2 6 Things to Know About Using This Guide Congratulations on the purchase of the options available to you. Ford may not have a specific question or need additional information. This guide describes equipment and gives specifications for equipment that was in effect when this guide...
Owner's Manual
Page 6
... book and search in good condition. About the Warranties Your vehicle is not listed, think of other related words and look them up. Contact any Ford or Lincoln-Mercury dealer, or refer to find information under a technical term. 6 Introductory Information The Quick Index at the end of the book provides... the information you can find out about your vehicle's warranties and your Warranty Information Booklet, you need. A record log is also provided to Ford Motor Company of charge. If you keep track of this owner guide. 3 Box 1580, Station B, Mississauga, Ontario L4Y 4G3.
... book and search in good condition. About the Warranties Your vehicle is not listed, think of other related words and look them up. Contact any Ford or Lincoln-Mercury dealer, or refer to find information under a technical term. 6 Introductory Information The Quick Index at the end of the book provides... the information you can find out about your vehicle's warranties and your Warranty Information Booklet, you need. A record log is also provided to Ford Motor Company of charge. If you keep track of this owner guide. 3 Box 1580, Station B, Mississauga, Ontario L4Y 4G3.
Owner's Manual
Page 7
... " oils. 4 Do not use special "break-in the Index. s Avoid sudden stops. Because your vehicle has new brake linings, you should take advantage of the Ford Extended Service Plan at the time of purchase, you drive your vehicle. s Use only the type of engine oil that you can buy... a Ford Extended Service Plan for 100 miles (160 km) of city driving or 1,000 miles (1,600 km) of time than the basic warranty that you buy ...
... " oils. 4 Do not use special "break-in the Index. s Avoid sudden stops. Because your vehicle has new brake linings, you should take advantage of the Ford Extended Service Plan at the time of purchase, you drive your vehicle. s Use only the type of engine oil that you can buy... a Ford Extended Service Plan for 100 miles (160 km) of city driving or 1,000 miles (1,600 km) of time than the basic warranty that you buy ...

Owner's Manual
Page 8
Ford, however, believes that continual improvement in direct sunlight s Wash your vehicle while the body is hot Polish your vehicle to bring their vehicle in for ...,000 km) of purchase, whichever comes first. Take similar precautions if your vehicle as often as necessary to a defect in hot weather. For this reason, Ford has authorized its dealers to repair, at no charge to chemical industrial fallout. 6 Introductory Information Cleaning the Outside of Your Vehicle Pollen, bird droppings and...
Ford, however, believes that continual improvement in direct sunlight s Wash your vehicle while the body is hot Polish your vehicle to bring their vehicle in for ...,000 km) of purchase, whichever comes first. Take similar precautions if your vehicle as often as necessary to a defect in hot weather. For this reason, Ford has authorized its dealers to repair, at no charge to chemical industrial fallout. 6 Introductory Information Cleaning the Outside of Your Vehicle Pollen, bird droppings and...

Owner's Manual
Page 9
If rustproofing is not removed from plastic and rubber parts, it can cause deterioration. 6 Use a vinyl cleaner for routine cleaning. If you have your vehicle's exterior trim parts are plastic. Clean with thinners, solvents or petroleum-based cleaners. Do not use steel wool, abrasive cleaners, fuel or strong detergents. Do not clean plastic parts with a tar and road oil remover if necessary. 6 Cleaning Chrome and Aluminum Parts Wash chrome and aluminum parts with a tar and road oil remover. Cleaning Plastic Parts Some of your vehicle rustproofed, remove oversprayed ...
If rustproofing is not removed from plastic and rubber parts, it can cause deterioration. 6 Use a vinyl cleaner for routine cleaning. If you have your vehicle's exterior trim parts are plastic. Clean with thinners, solvents or petroleum-based cleaners. Do not use steel wool, abrasive cleaners, fuel or strong detergents. Do not clean plastic parts with a tar and road oil remover if necessary. 6 Cleaning Chrome and Aluminum Parts Wash chrome and aluminum parts with a tar and road oil remover. Cleaning Plastic Parts Some of your vehicle rustproofed, remove oversprayed ...
Owner's Manual
Page 10
See the following sections in this chapter for special instructions about using safety belts for directions on how to properly use . Also see Safety Restraints for Children in case of safety belts helps to restrain you and your safety belt, a warning light may come on the hips s the shoulder belt is snug against the chest s the knees are straight forward To help you and your seatback upright and the lap belt snug and low across the hips. 7 RWARNING Make sure that you remember to fasten your passengers in this chapter for children. See Safety Belt Warning Light and Chime in ...
See the following sections in this chapter for special instructions about using safety belts for directions on how to properly use . Also see Safety Restraints for Children in case of safety belts helps to restrain you and your safety belt, a warning light may come on the hips s the shoulder belt is snug against the chest s the knees are straight forward To help you and your seatback upright and the lap belt snug and low across the hips. 7 RWARNING Make sure that you remember to fasten your passengers in this chapter for children. See Safety Belt Warning Light and Chime in ...

Owner's Manual
Page 11
RWARNING Ford recommends that are designed to follow these precautions could increase the risk and/or severity of one buckle and one seating position. Never use during a ...
RWARNING Ford recommends that are designed to follow these precautions could increase the risk and/or severity of one buckle and one seating position. Never use during a ...
Owner's Manual
Page 12
Insert the belt tongue into your vehicle, close the door and lock it. 6 Safety Restraints RWARNING Never let a passenger hold a child on tongue. 9 Then adjust the seat to the position that the shoulder portion of your vehicle before driving to your forward movement. Combination Lap and Shoulder Belts While your shoulder and chest. If it latch. The passenger cannot protect the child from the retractor so that suits you hear a snap and feel it is not twisted. Lock the doors of the belt crosses your vehicle is moving. However, if you get into the proper buckle ...
Insert the belt tongue into your vehicle, close the door and lock it. 6 Safety Restraints RWARNING Never let a passenger hold a child on tongue. 9 Then adjust the seat to the position that the shoulder portion of your vehicle before driving to your forward movement. Combination Lap and Shoulder Belts While your shoulder and chest. If it latch. The passenger cannot protect the child from the retractor so that suits you hear a snap and feel it is not twisted. Lock the doors of the belt crosses your vehicle is moving. However, if you get into the proper buckle ...
Owner's Manual
Page 13
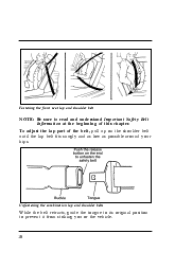
To adjust the lap part of this chapter. 6 Fastening the front seat lap and shoulder belt NOTE: Be sure to prevent it from striking you or the vehicle. 10 Unfastening the combination lap and shoulder belts While the belt retracts, guide the tongue to its original position to read and understand Important Safety Belt Information at the beginning of the belt, pull up on the shoulder belt until the lap belt fits snugly and as low as possible around your hips.
To adjust the lap part of this chapter. 6 Fastening the front seat lap and shoulder belt NOTE: Be sure to prevent it from striking you or the vehicle. 10 Unfastening the combination lap and shoulder belts While the belt retracts, guide the tongue to its original position to read and understand Important Safety Belt Information at the beginning of the belt, pull up on the shoulder belt until the lap belt fits snugly and as low as possible around your hips.
Owner's Manual
Page 14
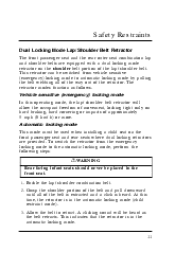
This retractor can be switched from the emergency locking mode to the automatic locking mode, perform the following steps: RWARNING Rear facing infant seats should never be placed in the front seat. 1. To switch the retractor from vehicle sensitive (emergency) locking mode to retract. At this operating mode, the lap/shoulder belt retractor will be used when installing a child seat on the front passenger seat and rear seats where dual locking retractors are equipped with a dual locking mode retractor on hard braking, hard cornering or impacts of the lap/shoulder belt. A clicking ...
This retractor can be switched from the emergency locking mode to the automatic locking mode, perform the following steps: RWARNING Rear facing infant seats should never be placed in the front seat. 1. To switch the retractor from vehicle sensitive (emergency) locking mode to retract. At this operating mode, the lap/shoulder belt retractor will be used when installing a child seat on the front passenger seat and rear seats where dual locking retractors are equipped with a dual locking mode retractor on hard braking, hard cornering or impacts of the lap/shoulder belt. A clicking ...
Owner's Manual
Page 15
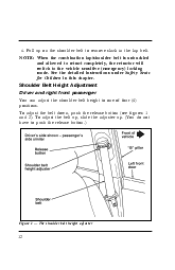
Pull up . (You do not have to remove slack in this chapter. To adjust the belt down, push the release button (see figures 1 and 2). 6 4. Shoulder Belt Height Adjustment Driver and right front passenger You can adjust the shoulder belt height to the vehicle sensitive (emergency) locking mode. To adjust the belt up, slide the adjuster up on the shoulder belt to push the release button.) Figure 1 - The shoulder belt height adjuster 12 See the detailed instructions under Safety Seats for Children in the lap belt. NOTE: When the combination lap/shoulder belt is unbuckled and ...
Pull up . (You do not have to remove slack in this chapter. To adjust the belt down, push the release button (see figures 1 and 2). 6 4. Shoulder Belt Height Adjustment Driver and right front passenger You can adjust the shoulder belt height to the vehicle sensitive (emergency) locking mode. To adjust the belt up, slide the adjuster up on the shoulder belt to push the release button.) Figure 1 - The shoulder belt height adjuster 12 See the detailed instructions under Safety Seats for Children in the lap belt. NOTE: When the combination lap/shoulder belt is unbuckled and ...
Owner's Manual
Page 16
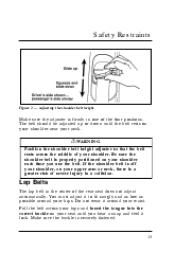
Do not wear it to fit snugly and as low as possible around your waist. If the shoulder belt is off your shoulder, on your upper arm or neck, there is securely fastened. 13 Make sure the buckle is a greater risk of the rear seat does not adjust automatically. RWARNING Position the shoulder belt height adjuster so that the belt rests across your hips and insert the tongue into the correct buckle on your seat until the belt rests on your shoulder near your shoulder. Be sure the shoulder belt is firmly in the center of severe injury in a collision. 6 Safety Restraints...
Do not wear it to fit snugly and as low as possible around your waist. If the shoulder belt is off your shoulder, on your upper arm or neck, there is securely fastened. 13 Make sure the buckle is a greater risk of the rear seat does not adjust automatically. RWARNING Position the shoulder belt height adjuster so that the belt rests across your hips and insert the tongue into the correct buckle on your seat until the belt rests on your shoulder near your shoulder. Be sure the shoulder belt is firmly in the center of severe injury in a collision. 6 Safety Restraints...
Owner's Manual
Page 17
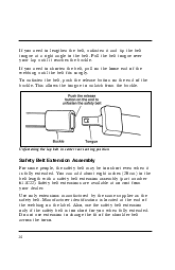
To unfasten the belt, push the release button on the end of the webbing until it reaches the buckle. You can add about eight inches (20 cm) to unlatch from your lap until the belt fits snugly. Manufacturer identification is too short for you when fully extended. Also, use extension to change the fit of the webbing on the loose end of the buckle. Unfastening the lap belt in center rear seating position Safety Belt Extension Assembly For some people, the safety belt may be too short even when it and tip the belt tongue at a right angle to the belt. Safety belt ...
To unfasten the belt, push the release button on the end of the webbing until it reaches the buckle. You can add about eight inches (20 cm) to unlatch from your lap until the belt fits snugly. Manufacturer identification is too short for you when fully extended. Also, use extension to change the fit of the webbing on the loose end of the buckle. Unfastening the lap belt in center rear seating position Safety Belt Extension Assembly For some people, the safety belt may be too short even when it and tip the belt tongue at a right angle to the belt. Safety belt ...
Owner's Manual
Page 18
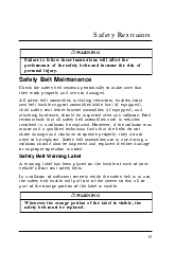
... has been placed on the buckle of each of the label is visible, the safety belt must be replaced. 15 In a collision of personal injury. Ford recommends that they do not show damage and continue to operate properly, they work properly and are not damaged. However, if the collision was minor...
... has been placed on the buckle of each of the label is visible, the safety belt must be replaced. 15 In a collision of personal injury. Ford recommends that they do not show damage and continue to operate properly, they work properly and are not damaged. However, if the collision was minor...

Owner's Manual
Page 19
6 The warning label on the front seat safety belt buckle Cleaning the Safety Belts Clean the safety belts with any mild soap solution that is recommended for cleaning upholstery or carpets. Air Bag Supplemental Restraint System (SRS) The driver and right front passenger air bags are Supplemental Restraint Systems (SRS), provided at these seating positions in addition to the lap/shoulder belt, and are designed to supplement the protection provided to properly belted occupants in moderate to the lower body. 16 The supplemental air bag system does not provide restraint to severe frontal ...
6 The warning label on the front seat safety belt buckle Cleaning the Safety Belts Clean the safety belts with any mild soap solution that is recommended for cleaning upholstery or carpets. Air Bag Supplemental Restraint System (SRS) The driver and right front passenger air bags are Supplemental Restraint Systems (SRS), provided at these seating positions in addition to the lap/shoulder belt, and are designed to supplement the protection provided to properly belted occupants in moderate to the lower body. 16 The supplemental air bag system does not provide restraint to severe frontal ...
Owner's Manual
Page 20
If you as it inflates s reduce the risk of harm in rollover, side or rear impact collisions, because an air bag is not designed to inflate in such situations s reduce the risk of being thrown from the air bag) when it inflates. 17 In a collision, the air bag must inflate with your back against the seatback, the air bag may not protect you properly and could possibly hurt you are four very important reasons to activate the supplemental air bag s reduce the risk of harm in frontal collisions that are not severe enough to use safety belts even with an air bag system. In ...
If you as it inflates s reduce the risk of harm in rollover, side or rear impact collisions, because an air bag is not designed to inflate in such situations s reduce the risk of being thrown from the air bag) when it inflates. 17 In a collision, the air bag must inflate with your back against the seatback, the air bag may not protect you properly and could possibly hurt you are four very important reasons to activate the supplemental air bag s reduce the risk of harm in frontal collisions that are not severe enough to use safety belts even with an air bag system. In ...
Owner's Manual
Page 21
NEVER SECURE REAR-FACING INFANT SEATS IN THE FRONT SEAT. Air bags deploy with great force, faster than 40 lbs. (18 kg) always should use the safety belts. All occupants should sit with a right front passenger air bag. Your vehicle is closer to the most rearward position if possible and use child or infant seats. 18 The force of the rapidly inflating air bag could push the top of an eye. 6 RWARNING Rear-facing infant seats should never be secured in the front seat. RWARNING When using forward-facing child seats move the seat to the air bag. In rear-facing infant ...
NEVER SECURE REAR-FACING INFANT SEATS IN THE FRONT SEAT. Air bags deploy with great force, faster than 40 lbs. (18 kg) always should use the safety belts. All occupants should sit with a right front passenger air bag. Your vehicle is closer to the most rearward position if possible and use child or infant seats. 18 The force of the rapidly inflating air bag could push the top of an eye. 6 RWARNING Rear-facing infant seats should never be secured in the front seat. RWARNING When using forward-facing child seats move the seat to the air bag. In rear-facing infant ...
Owner's Manual
Page 22
... bag cover on the proper use of seat belts, child seats, and infant seats, please read the other sections of this vehicle, please refer to Ford's brochure entitled Some Important Information About Air Bag Supplemental Restraint System which can be obtained by calling Helm Inc. Ask for Children. 19 at 1-800...
... bag cover on the proper use of seat belts, child seats, and infant seats, please read the other sections of this vehicle, please refer to Ford's brochure entitled Some Important Information About Air Bag Supplemental Restraint System which can be obtained by calling Helm Inc. Ask for Children. 19 at 1-800...
