
Owner's Manual
Page 119
... in position. If you load them one at a time, directly on the bed floor to avoid damage to the tailgate or its supports. 119 Next, lift the latch handle from the inside of the vehicle, pull on the bullet type lock knob. Doors Anti-theft front door lock knobs Anti-theft... comfort, convenience and safety. Tailgate To open , the tailgate load should not exceed 500 lbs (227 kgs). Features Your vehicle has a variety of your vehicle, Ford recommends that you want to load heavy items onto your vehicle, and lower the tailgate. To unlock and open the front door from the inside...
... in position. If you load them one at a time, directly on the bed floor to avoid damage to the tailgate or its supports. 119 Next, lift the latch handle from the inside of the vehicle, pull on the bullet type lock knob. Doors Anti-theft front door lock knobs Anti-theft... comfort, convenience and safety. Tailgate To open , the tailgate load should not exceed 500 lbs (227 kgs). Features Your vehicle has a variety of your vehicle, Ford recommends that you want to load heavy items onto your vehicle, and lower the tailgate. To unlock and open the front door from the inside...
Owner's Manual
Page 129
... handle to lock the seat back in a collision or sudden stop. Reclining Bucket Seats You can tilt the seat back of the seat, lift the recliner handle up and hold it to avoid injuring people in place. Lean against the back of serious injury in a collision, children should... always ride with your bucket seats backward. 1. 2. 3. 4. To return the seat back upright, lift the handle and lean forward. 129 RWARNING To reduce the risk of serious injury in a collision, always drive and ride with the seatback upright. RWARNING...
... handle to lock the seat back in a collision or sudden stop. Reclining Bucket Seats You can tilt the seat back of the seat, lift the recliner handle up and hold it to avoid injuring people in place. Lean against the back of serious injury in a collision, children should... always ride with your bucket seats backward. 1. 2. 3. 4. To return the seat back upright, lift the handle and lean forward. 129 RWARNING To reduce the risk of serious injury in a collision, always drive and ride with the seatback upright. RWARNING...
Owner's Manual
Page 130
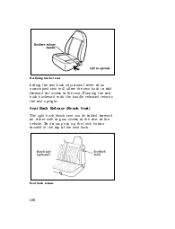
Pushing the seat back backward with the handle released returns the seat upright. Seat Back Release (Bench Seat) The split back bench seat can be folded forward on either side to gain access to the rear. To do so, push up the latch button located at the top of the vehicle. Seat back release 130 Reclining bucket seat Lifting the seat-back adjustment lever of an unoccupied seat will allow the seat back to fold forward for access to the rear of the seat back.
Pushing the seat back backward with the handle released returns the seat upright. Seat Back Release (Bench Seat) The split back bench seat can be folded forward on either side to gain access to the rear. To do so, push up the latch button located at the top of the vehicle. Seat back release 130 Reclining bucket seat Lifting the seat-back adjustment lever of an unoccupied seat will allow the seat back to fold forward for access to the rear of the seat back.
Owner's Manual
Page 131
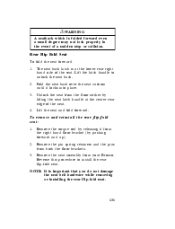
...folded forward even a small degree may not lock properly in the event of the seat. Lift the latch handle to install the rear flip-fold seat. 2. 3. Remove the pin spring ... the pins from the right hand floor bracket (by pushing forward and up). Remove the torque rod by lifting the seat latch handle at the lower rear right hand side of a sudden stop or collision. NOTE: It...removing or installing the rear flip-fold seat. 131 To remove and reinstall the rear flip-fold seat: 1. Lift the seat and fold forward. 2. 3. 4. Fold the seat back over the seat cushion until it from ...
...folded forward even a small degree may not lock properly in the event of the seat. Lift the latch handle to install the rear flip-fold seat. 2. 3. Remove the pin spring ... the pins from the right hand floor bracket (by pushing forward and up). Remove the torque rod by lifting the seat latch handle at the lower rear right hand side of a sudden stop or collision. NOTE: It...removing or installing the rear flip-fold seat. 131 To remove and reinstall the rear flip-fold seat: 1. Lift the seat and fold forward. 2. 3. 4. Fold the seat back over the seat cushion until it from ...

Owner's Manual
Page 132
... Slide Seat With the seatback tilted forward, the tilt slide seat can prevent the seat from returning to the rear seat compartment of the vehicle. Lift the seatback release lever on the outboard side of the seat cushion to access the rear seat compartment of the vehicle.
... Slide Seat With the seatback tilted forward, the tilt slide seat can prevent the seat from returning to the rear seat compartment of the vehicle. Lift the seatback release lever on the outboard side of the seat cushion to access the rear seat compartment of the vehicle.
Owner's Manual
Page 148
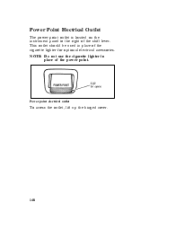
This outlet should be used in place of the power point. Power point electrical outlet To access the outlet, lift up the hinged cover. 148 Power Point Electrical Outlet The power point outlet is located on the instrument panel to the right of the cigarette lighter for optional electrical accessories. NOTE: Do not use the cigarette lighter in place of the shift lever.
This outlet should be used in place of the power point. Power point electrical outlet To access the outlet, lift up the hinged cover. 148 Power Point Electrical Outlet The power point outlet is located on the instrument panel to the right of the cigarette lighter for optional electrical accessories. NOTE: Do not use the cigarette lighter in place of the shift lever.

Owner's Manual
Page 181
... come to roll even if the automatic transmission is in P (Park) or the manual transmission is in gear. The gearshift is in a clockwise direction without lifting it toward the instrument panel. When the transfer case is securely latched in P (Park) if you . Therefore, the vehicle is running. 181 RWARNING Never leave...
... come to roll even if the automatic transmission is in P (Park) or the manual transmission is in gear. The gearshift is in a clockwise direction without lifting it toward the instrument panel. When the transfer case is securely latched in P (Park) if you . Therefore, the vehicle is running. 181 RWARNING Never leave...
Owner's Manual
Page 236
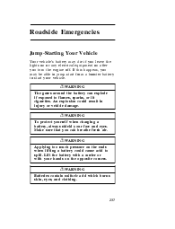
... to spill. RWARNING Applying too much pressure on the opposite corners. Make sure that you turn the engine off. Lift the battery with a carrier or with your hands on the ends when lifting a battery could result in injury or vehicle damage. Roadside Emergencies Jump-Starting Your Vehicle Your vehicle's battery may be...
... to spill. RWARNING Applying too much pressure on the opposite corners. Make sure that you turn the engine off. Lift the battery with a carrier or with your hands on the ends when lifting a battery could result in injury or vehicle damage. Roadside Emergencies Jump-Starting Your Vehicle Your vehicle's battery may be...
Owner's Manual
Page 242
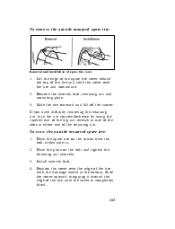
Slide the tire outward and lift off the carrier. 2. 3. Place the plate on the carrier over the bolt, styled side in one of the slots at either end of the tire ... the tire and slide the cover over the edge of the retaining nut. Install security lock. Remove the security lock, retaining nut and mounting plate. Lift the edge of the spare tire cover behind the top of the tire until the cover is completely fitted. 243 To stow the outside mounted...
Slide the tire outward and lift off the carrier. 2. 3. Place the plate on the carrier over the bolt, styled side in one of the slots at either end of the tire ... the tire and slide the cover over the edge of the retaining nut. Install security lock. Remove the security lock, retaining nut and mounting plate. Lift the edge of the spare tire cover behind the top of the tire until the cover is completely fitted. 243 To stow the outside mounted...
Owner's Manual
Page 243
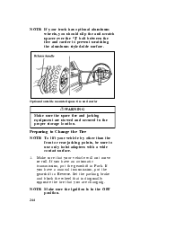
... and jacking equipment are changing. If you have a manual transmission, put the gearshift in the OFF position. 244 Preparing to Change the Tire NOTE: To lift your vehicle by other than the front or rear jacking points, be sure to prevent scratching the aluminum styled-side surface.
... and jacking equipment are changing. If you have a manual transmission, put the gearshift in the OFF position. 244 Preparing to Change the Tire NOTE: To lift your vehicle by other than the front or rear jacking points, be sure to prevent scratching the aluminum styled-side surface.
Owner's Manual
Page 250
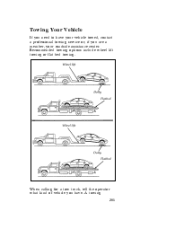
Recommended towing options include wheel lift towing or flat bed towing. A towing 251 When calling for a tow truck, tell the operator what kind of vehicle you have your vehicle towed, contact a professional towing service or, if you need to have . Towing Your Vehicle If you are a member, your roadside assistance center.
Recommended towing options include wheel lift towing or flat bed towing. A towing 251 When calling for a tow truck, tell the operator what kind of vehicle you have your vehicle towed, contact a professional towing service or, if you need to have . Towing Your Vehicle If you are a member, your roadside assistance center.
Owner's Manual
Page 275
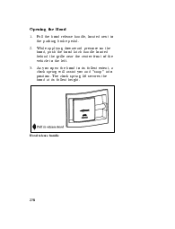
While applying downward pressure on the hood, push the hood latch handle located behind the grille near the center front of the vehicle to the parking brake pedal. As you and "snap" into position. The clock spring lift secures the hood at its fullest extent, a clock spring will assist you open the hood to its fullest height. 3. Opening the Hood 1. 2. Hood release handle 278 Pull the hood release handle, located next to the left.
While applying downward pressure on the hood, push the hood latch handle located behind the grille near the center front of the vehicle to the parking brake pedal. As you and "snap" into position. The clock spring lift secures the hood at its fullest extent, a clock spring will assist you open the hood to its fullest height. 3. Opening the Hood 1. 2. Hood release handle 278 Pull the hood release handle, located next to the left.
Owner's Manual
Page 276
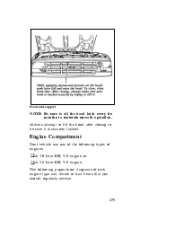
Always attempt to lift the hood after closing to maintain smooth operation. Engine Compartment Your vehicle has one of the following pages show diagrams of engines: u A 5.0 Liter EFI, V-8 engine, or u A 5.8 Liter EFI, V-8 engine. The following types of each engine type and where to find items that you should regularly service. 279 Hood and support NOTE: Be sure to oil the hood latch every six months to be sure it is securely latched.
Always attempt to lift the hood after closing to maintain smooth operation. Engine Compartment Your vehicle has one of the following pages show diagrams of engines: u A 5.0 Liter EFI, V-8 engine, or u A 5.8 Liter EFI, V-8 engine. The following types of each engine type and where to find items that you should regularly service. 279 Hood and support NOTE: Be sure to oil the hood latch every six months to be sure it is securely latched.
Owner's Manual
Page 310
RWARNING Applying too much pressure on the opposite corners. Lift the battery with a carrier or with water for at /or above +90˚F (+30˚C). (1,600 km) per month. NOTE: Except E4OD transmission, there is ... fluid leakage, the fluid level should be checked. If someone 's skin, eyes, or clothing, immediately flush the area with your hands on the ends when lifting a battery could cause acid to spill. Automatic Transmission Fluid Under normal driving conditions automatic transmission fluid should be changed every 21,000 miles (34,000...
RWARNING Applying too much pressure on the opposite corners. Lift the battery with a carrier or with water for at /or above +90˚F (+30˚C). (1,600 km) per month. NOTE: Except E4OD transmission, there is ... fluid leakage, the fluid level should be checked. If someone 's skin, eyes, or clothing, immediately flush the area with your hands on the ends when lifting a battery could cause acid to spill. Automatic Transmission Fluid Under normal driving conditions automatic transmission fluid should be changed every 21,000 miles (34,000...
Owner's Manual
Page 332
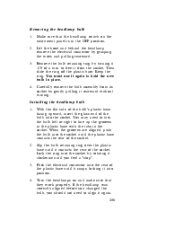
... plastic base contacts the rear of the socket. Lock the ring into the socket by grasping the wires and pulling rearward. Removing the headlamp bulb 1. 2. Lift the hood and behind the headlamp remove the electrical connector by rotating it into the rear of the plastic base until it snaps, locking it...
... plastic base contacts the rear of the socket. Lock the ring into the socket by grasping the wires and pulling rearward. Removing the headlamp bulb 1. 2. Lift the hood and behind the headlamp remove the electrical connector by rotating it into the rear of the plastic base until it snaps, locking it...