
Owner's Manual
Page 22
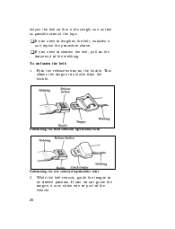
..., pull on the buckle. While the belt retracts, guide the tongue to unlatch from the buckle. Unfastening the front outboard lap/shoulder belts Unfastening the rear outboard lap/shoulder belts 2. This allows the tongue to its stowed position. If you do not guide the tongue, it and repeat the procedure above...
..., pull on the buckle. While the belt retracts, guide the tongue to unlatch from the buckle. Unfastening the front outboard lap/shoulder belts Unfastening the rear outboard lap/shoulder belts 2. This allows the tongue to its stowed position. If you do not guide the tongue, it and repeat the procedure above...
Owner's Manual
Page 50
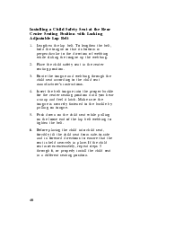
... that the seat is held securely in forward directions to ensure that its bottom is securely fastened to the buckle by pulling on the loose end of webbing while sliding the tongue up the webbing. Make sure the tongue is perpendicular to the direction of the lap belt webbing to the... Insert the belt tongue into child seat, forcibly tilt the child seat from side-to-side and in place. Installing a Child Safety Seat at the Rear Center Seating Position with Locking Adjustable Lap Belt 1.
... that the seat is held securely in forward directions to ensure that its bottom is securely fastened to the buckle by pulling on the loose end of webbing while sliding the tongue up the webbing. Make sure the tongue is perpendicular to the direction of the lap belt webbing to the... Insert the belt tongue into child seat, forcibly tilt the child seat from side-to-side and in place. Installing a Child Safety Seat at the Rear Center Seating Position with Locking Adjustable Lap Belt 1.
Owner's Manual
Page 332
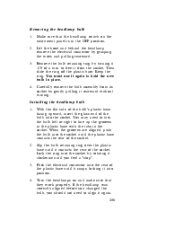
...make sure that they work properly. Keep the ring. With the flat side of the bulb's plastic base facing upward, insert the glass end of the bulb into the rear of the socket. Remove the bulb retaining ring by gently pulling it again. 335 2. 3. 4. Slip the bulb retaining ring over ... feel a "stop". Then slide the ring off the plastic base. When the grooves are aligned, push the bulb into the socket until it contacts the rear of a turn the bulb left or right to align it rearward without turning. 3. 4. Removing the headlamp bulb 1. 2. Lock the ring into position. ...
...make sure that they work properly. Keep the ring. With the flat side of the bulb's plastic base facing upward, insert the glass end of the bulb into the rear of the socket. Remove the bulb retaining ring by gently pulling it again. 335 2. 3. 4. Slip the bulb retaining ring over ... feel a "stop". Then slide the ring off the plastic base. When the grooves are aligned, push the bulb into the socket until it contacts the rear of a turn the bulb left or right to align it rearward without turning. 3. 4. Removing the headlamp bulb 1. 2. Lock the ring into position. ...
Scheduled Maintenance Guide 1st Printing
Page 7
...air pressure. (1)(2) u Check clutch reservoir fluid level. For items marked with grease fittings and lubricate slip yoke (if equipped). NOTE: Rear axle lube quantities must be checked or changed unless a leak is suspected or repair required. u Inspect and lubricate automatic transmission shift linkage....in water. u Lubricate steering linkage suspension, driveshaft U-joint if equipped with number in parentheses such as (1), see footnote at end of this type and style. Regular Maintenance Intervals for Emission Control Service are shown in this section. Normal Schedule NOTE: ...
...air pressure. (1)(2) u Check clutch reservoir fluid level. For items marked with grease fittings and lubricate slip yoke (if equipped). NOTE: Rear axle lube quantities must be checked or changed unless a leak is suspected or repair required. u Inspect and lubricate automatic transmission shift linkage....in water. u Lubricate steering linkage suspension, driveshaft U-joint if equipped with number in parentheses such as (1), see footnote at end of this type and style. Regular Maintenance Intervals for Emission Control Service are shown in this section. Normal Schedule NOTE: ...
Scheduled Maintenance Guide 1st Printing
Page 27
For items marked with your air cleaner filter if you drive in parentheses such as (1), see footnote at the end of this type and style. Maintenance Intervals for Severe Duty Schedule Severe Duty Schedule 27 However, the conditions you drive in this section. Otherwise, the ... more frequent air cleaner replacement intervals than those shown. Severe Duty Schedule NOTE: Items for Emission Control Service are shown in severe dust conditions. NOTE: Rear axle lube quantities must be checked or changed unless a leak is suspected or repair required.
For items marked with your air cleaner filter if you drive in parentheses such as (1), see footnote at the end of this type and style. Maintenance Intervals for Severe Duty Schedule Severe Duty Schedule 27 However, the conditions you drive in this section. Otherwise, the ... more frequent air cleaner replacement intervals than those shown. Severe Duty Schedule NOTE: Items for Emission Control Service are shown in severe dust conditions. NOTE: Rear axle lube quantities must be checked or changed unless a leak is suspected or repair required.
