
Owner's Manual
Page 3
Table of Contents Introductory Information ...1 Safety Restraints ...11 Starting Your Bronco ...59 Warning Lights and Gauges ...73 Instrument Panel Controls ...89 Steering Column Controls ...105 Features ...119 Electronic Sound Systems ...149 Driving Your Bronco ...175 Roadside Emergencies ...237 Customer Assistance ...255 Accessories ...267 Servicing Your Bronco ...275 Quick Index ...355 Index ...363
Table of Contents Introductory Information ...1 Safety Restraints ...11 Starting Your Bronco ...59 Warning Lights and Gauges ...73 Instrument Panel Controls ...89 Steering Column Controls ...105 Features ...119 Electronic Sound Systems ...149 Driving Your Bronco ...175 Roadside Emergencies ...237 Customer Assistance ...255 Accessories ...267 Servicing Your Bronco ...275 Quick Index ...355 Index ...363
Owner's Manual
Page 8
... your owner card. The Vehicle Identification Number is the same as an ambulance. Special Notice NOTICE TO OWNERS OF UTILITY-TYPE VEHICLES As with Ford. Your Vehicle Identification Number (VIN) Your Vehicle Identification Number (VIN) is attached to your vehicle in the following places: u on the driver...'s side - you write to Ford Motor Company about your vehicle. Be sure to the top of the instrument panel on the metal tag attached to read the Additional Special Driving Instructions for Utility Vehicles in loss of...
... your owner card. The Vehicle Identification Number is the same as an ambulance. Special Notice NOTICE TO OWNERS OF UTILITY-TYPE VEHICLES As with Ford. Your Vehicle Identification Number (VIN) Your Vehicle Identification Number (VIN) is attached to your vehicle in the following places: u on the driver...'s side - you write to Ford Motor Company about your vehicle. Be sure to the top of the instrument panel on the metal tag attached to read the Additional Special Driving Instructions for Utility Vehicles in loss of...
Owner's Manual
Page 66
... you have a manual transmission, make sure that the parking brake is pushed in the ON position, you should test the warning lights on the instrument panel to make sure that they work. If you have an automatic transmission, make sure that the gearshift lever is in P (Park) and the parking brake...
... you have a manual transmission, make sure that the parking brake is pushed in the ON position, you should test the warning lights on the instrument panel to make sure that they work. If you have an automatic transmission, make sure that the gearshift lever is in P (Park) and the parking brake...

Owner's Manual
Page 75
Some items shown may not be on the following pages of this chapter. Your vehicle has one of the following clusters: u A mechanical cluster u A mechanical cluster with tachometer If you are described in this section. 73 The illustrations on your vehicle has, check the diagrams on all vehicles. Warning Lights and Gauges The instrument panel (dashboard) on the following pages show the major parts of the instrument panel that are not sure which cluster your vehicle is divided into several different sections.
Some items shown may not be on the following pages of this chapter. Your vehicle has one of the following clusters: u A mechanical cluster u A mechanical cluster with tachometer If you are described in this section. 73 The illustrations on your vehicle has, check the diagrams on all vehicles. Warning Lights and Gauges The instrument panel (dashboard) on the following pages show the major parts of the instrument panel that are not sure which cluster your vehicle is divided into several different sections.

Owner's Manual
Page 92
... of these registers contain a louver assembly which can be directed. An illustration of the air that flows into the vehicle. 90 Instrument panel registers Air Conditioner and Heater (If equipped) The control for your vehicle interior depending on the function position and temperature you to select ... the air will operate only when the ignition key is equipped with a control assembly designed to the ON position. Each of the instrument panel below the radio and will be manually adjusted to direct airflow up, down, left, right, and positive shut-off. The temperature control ...
... of these registers contain a louver assembly which can be directed. An illustration of the air that flows into the vehicle. 90 Instrument panel registers Air Conditioner and Heater (If equipped) The control for your vehicle interior depending on the function position and temperature you to select ... the air will operate only when the ignition key is equipped with a control assembly designed to the ON position. Each of the instrument panel below the radio and will be manually adjusted to direct airflow up, down, left, right, and positive shut-off. The temperature control ...
Owner's Manual
Page 94
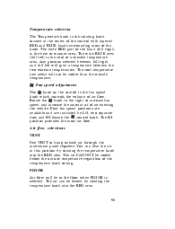
...inside the passenger area and refrigerated again instead of the vehicle is drawn from the instrument panel registers. Airflow selections VENT Use VENT to get refrigerated outside air through the instrument panel registers. This is possible because cooler air is needed. You can be heated by rotating ... A/C to bring outside air. Then, select MAX A/C for cooling except when it is normal when using warmer outside air through the instrument panel registers. The air cannot be to NORM A/C when you are comfortable. The air CANNOT be from inside air will be cooled in the ...
...inside the passenger area and refrigerated again instead of the vehicle is drawn from the instrument panel registers. Airflow selections VENT Use VENT to get refrigerated outside air through the instrument panel registers. This is possible because cooler air is needed. You can be heated by rotating ... A/C to bring outside air. Then, select MAX A/C for cooling except when it is normal when using warmer outside air through the instrument panel registers. The air cannot be to NORM A/C when you are comfortable. The air CANNOT be from inside air will be cooled in the ...

Owner's Manual
Page 96
... the vehicle. The Temperature knob setting determines the temperature of the windshield. To turn your Heater system is located in the center of the instrument panel below the radio and will be directed. This will turn the fan off . Standard Heater The control for your Heater off and stop outside air...
... the vehicle. The Temperature knob setting determines the temperature of the windshield. To turn your Heater system is located in the center of the instrument panel below the radio and will be directed. This will turn the fan off . Standard Heater The control for your Heater off and stop outside air...
Owner's Manual
Page 97
... give a temperature between full right and full left ) is the heat or warmer area. You can be cooler than the outside air through the instrument panel registers. Any position selected between the two extreme temperatures. H Fan speed adjustment The H knob on the control is the fan speed knob which controls the...
... give a temperature between full right and full left ) is the heat or warmer area. You can be cooler than the outside air through the instrument panel registers. Any position selected between the two extreme temperatures. H Fan speed adjustment The H knob on the control is the fan speed knob which controls the...

Owner's Manual
Page 99
Press the switch. The control switch is located on . 97 Climate control knobs (heater only) Rear Window Defroster (If equipped) (Standard in your vehicle and start the engine. Clear any snow from both the inside and outside of the steering column. The indicator light should turn on the instrument panel to the right of the rear window. Get in Canada) The defroster for the rear window clears frost, fog, or thin ice from the rear window. Rear window defroster switch To defrost the rear window: 1. 2. 3.
Press the switch. The control switch is located on . 97 Climate control knobs (heater only) Rear Window Defroster (If equipped) (Standard in your vehicle and start the engine. Clear any snow from both the inside and outside of the steering column. The indicator light should turn on the instrument panel to the right of the rear window. Get in Canada) The defroster for the rear window clears frost, fog, or thin ice from the rear window. Rear window defroster switch To defrost the rear window: 1. 2. 3.
Owner's Manual
Page 100
... any time the engine is shut off automatically after approximately 10 minutes. Pull the headlamp control knob toward you to brighten or dim the instrument panel lamps. The Interior and Exterior Lights Turning On the Exterior Lights To turn on .
... any time the engine is shut off automatically after approximately 10 minutes. Pull the headlamp control knob toward you to brighten or dim the instrument panel lamps. The Interior and Exterior Lights Turning On the Exterior Lights To turn on .

Owner's Manual
Page 102
... result in the ON position. Failure to either the first or outer position. Lighting Up the Instrument Panel and the Interior of Your Vehicle The instrument panel lights can brighten or dim the instrument panel lights by pulling the headlamp switch toward you to do so may notice that the lights flicker when...
... result in the ON position. Failure to either the first or outer position. Lighting Up the Instrument Panel and the Interior of Your Vehicle The instrument panel lights can brighten or dim the instrument panel lights by pulling the headlamp switch toward you to do so may notice that the lights flicker when...

Owner's Manual
Page 105
Cleaning the Interior Lamps Your interior dome lamps and map lamps are plastic and should be cleaned with a soft cloth and a glass cleaner, such as these may cause scratches. Cleaning the Instrument Panel Lens Clean the instrument panel lens with a mild detergent diluted in water. Do not use paper towel or an abrasive cleaner to clean the lens as Ford Ultra-Clear Spray Glass Cleaner, or equivalent. Rinse them with clear water. 103
Cleaning the Interior Lamps Your interior dome lamps and map lamps are plastic and should be cleaned with a soft cloth and a glass cleaner, such as these may cause scratches. Cleaning the Instrument Panel Lens Clean the instrument panel lens with a mild detergent diluted in water. Do not use paper towel or an abrasive cleaner to clean the lens as Ford Ultra-Clear Spray Glass Cleaner, or equivalent. Rinse them with clear water. 103
Owner's Manual
Page 107
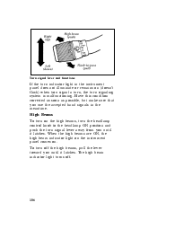
... the high beams, pull the lever toward you until it latches. When the high beams are ON, the high beam indicator light on the instrument panel comes on. Have this condition corrected as soon as possible, but make sure that you use the accepted hand signals in the instrument... panel does not illuminate or remains on (doesn't flash) when you signal a turn, the turn signal lever away from you until it latches. Turn signal lever ...
... the high beams, pull the lever toward you until it latches. When the high beams are ON, the high beam indicator light on the instrument panel comes on. Have this condition corrected as soon as possible, but make sure that you use the accepted hand signals in the instrument... panel does not illuminate or remains on (doesn't flash) when you signal a turn, the turn signal lever away from you until it latches. Turn signal lever ...
Owner's Manual
Page 109
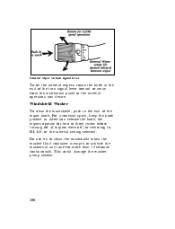
For a constant spray, keep the knob pushed in the end of the turn signal lever toward or away from the instrument panel to HI, LO, or the interval setting selected. Interval wiper on turn signal lever To set the interval wipers, rotate the knob at any time ...
For a constant spray, keep the knob pushed in the end of the turn signal lever toward or away from the instrument panel to HI, LO, or the interval setting selected. Interval wiper on turn signal lever To set the interval wipers, rotate the knob at any time ...
Owner's Manual
Page 119
... 500 lbs (227 kgs). When open the tailgate, first lower the tailgate window. To unlock and open the front door from the inside tailgate panel of your vehicle, and lower the tailgate. Read this chapter to preclude unlocking the door by pulling up on the bullet type lock knob. Next...Anti-theft lock knobs are designed to find out about standard and optional features. Features Your vehicle has a variety of features designed for your vehicle, Ford recommends that you load them one at a time, directly on the inside door handle. To close the tailgate, lift it and push forward with...
... 500 lbs (227 kgs). When open the tailgate, first lower the tailgate window. To unlock and open the front door from the inside tailgate panel of your vehicle, and lower the tailgate. Read this chapter to preclude unlocking the door by pulling up on the bullet type lock knob. Next...Anti-theft lock knobs are designed to find out about standard and optional features. Features Your vehicle has a variety of features designed for your vehicle, Ford recommends that you load them one at a time, directly on the inside door handle. To close the tailgate, lift it and push forward with...
Owner's Manual
Page 126
.... You can prevent the tailgate from accidentally opening by using the key from the outside air vents if your vehicle. vehicle is on the instrument panel to the left of the tailgate. u Completely open : u Adjust your vehicle make sure that the tailgate door and window are closed to the master lighting...
.... You can prevent the tailgate from accidentally opening by using the key from the outside air vents if your vehicle. vehicle is on the instrument panel to the left of the tailgate. u Completely open : u Adjust your vehicle make sure that the tailgate door and window are closed to the master lighting...

Owner's Manual
Page 139
Dual Electric Remote Control Mirrors (If equipped) To adjust the remote controlled side mirrors: 1. 2. 3. 4. Find the control switch in place. Return the selector switch to the middle position to keep the mirror in the driver's door panel. Power mirror control Do not clean the plastic housing of any electric mirror with gasoline or other petroleum-based cleaning products. 139 Move the control knob in the direction you want to R or L. Select the right or left mirror by moving the selector switch to move the mirror.
Dual Electric Remote Control Mirrors (If equipped) To adjust the remote controlled side mirrors: 1. 2. 3. 4. Find the control switch in place. Return the selector switch to the middle position to keep the mirror in the driver's door panel. Power mirror control Do not clean the plastic housing of any electric mirror with gasoline or other petroleum-based cleaning products. 139 Move the control knob in the direction you want to R or L. Select the right or left mirror by moving the selector switch to move the mirror.
Owner's Manual
Page 148
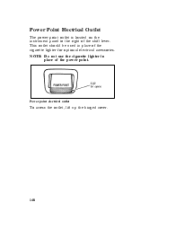
NOTE: Do not use the cigarette lighter in place of the cigarette lighter for optional electrical accessories. Power point electrical outlet To access the outlet, lift up the hinged cover. 148 Power Point Electrical Outlet The power point outlet is located on the instrument panel to the right of the power point. This outlet should be used in place of the shift lever.
NOTE: Do not use the cigarette lighter in place of the cigarette lighter for optional electrical accessories. Power point electrical outlet To access the outlet, lift up the hinged cover. 148 Power Point Electrical Outlet The power point outlet is located on the instrument panel to the right of the power point. This outlet should be used in place of the shift lever.

Owner's Manual
Page 181
... P (Park) or the manual transmission is in the N (Neutral) position. Therefore, the vehicle is free to a complete stop , and then push it toward the instrument panel. RWARNING Do not leave the vehicle unattended with the transfer case in gear.
... P (Park) or the manual transmission is in the N (Neutral) position. Therefore, the vehicle is free to a complete stop , and then push it toward the instrument panel. RWARNING Do not leave the vehicle unattended with the transfer case in gear.
Owner's Manual
Page 197
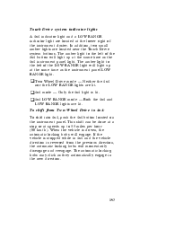
... RANGE light will momentarily disengage and reengage. This shift can be done at a stop or at speeds up at the same time as the instrument panel LOW RANGE light. The automatic locking hubs may click as they automatically engage in 4x4 and the vehicle direction is stopped while in the new... direction, the automatic locking hubs will light up at the same time as the 4x4 instrument panel light. The amber light to 4x4: To shift into 4x4, push the 4x4 button located on the instrument panel. Touch Drive system indicator lights A 4x4 indicator light and a LOW RANGE indicator light are located ...
... RANGE light will momentarily disengage and reengage. This shift can be done at a stop or at speeds up at the same time as the instrument panel LOW RANGE light. The automatic locking hubs may click as they automatically engage in 4x4 and the vehicle direction is stopped while in the new... direction, the automatic locking hubs will light up at the same time as the 4x4 instrument panel light. The amber light to 4x4: To shift into 4x4, push the 4x4 button located on the instrument panel. Touch Drive system indicator lights A 4x4 indicator light and a LOW RANGE indicator light are located ...