

Owner Manual
Page 49
..., personal injury or cargo damage may need to be (0 km/h). Make sure the liftgate is closed and latched before pushing any buildup of snow or ice time, the liftgate may occur. Be sure to remove any of the power reset power liftgate functionality. accessed through a snap-in cover located on the lift...
..., personal injury or cargo damage may need to be (0 km/h). Make sure the liftgate is closed and latched before pushing any buildup of snow or ice time, the liftgate may occur. Be sure to remove any of the power reset power liftgate functionality. accessed through a snap-in cover located on the lift...

Owner Manual
Page 74
... sides of the SABIC. The area where the side curtain air bag is equipped with left and right SABIC, do not stack luggage or other cargo up high enough to block the location of the vehicle may not be obvious in the interior trim, but they will open during air bag... SAB and SABIC air bags during impacts that require side air bag occupant protection. 72 THINGS TO KNOW BEFORE STARTING YOUR VEHICLE • Air Bag covers may deploy. • Your vehicle is located should remain free from any obstructions. (Continued) The system includes side impact sensors that are calibrated to deploy...
... sides of the SABIC. The area where the side curtain air bag is equipped with left and right SABIC, do not stack luggage or other cargo up high enough to block the location of the vehicle may not be obvious in the interior trim, but they will open during air bag... SAB and SABIC air bags during impacts that require side air bag occupant protection. 72 THINGS TO KNOW BEFORE STARTING YOUR VEHICLE • Air Bag covers may deploy. • Your vehicle is located should remain free from any obstructions. (Continued) The system includes side impact sensors that are calibrated to deploy...

Owner Manual
Page 123
...263 ▫ Door Storage ...264 ▫ Front Center Console ...264 ▫ Rear Full Center Console - If Equipped ...271 ▫ Cargo Tie-Down Hooks ...272 Ⅵ REAR WINDOW FEATURES ...274 ▫ Rear Window Wiper/Washer ...274 ▫ Rear Window Defroster ...275 &#...8549; ROOF LUGGAGE RACK - If Equipped ...269 Ⅵ CARGO AREA FEATURES ...269 ▫ Rechargeable Flashlight ...269 ▫ Cargo Storage ...271 ▫ Retractable Cargo Area Cover - IF EQUIPPED ...276 ▫ Deploying the Crossbars...277 ▫ Stowing The Crossbars ...279 3...
...263 ▫ Door Storage ...264 ▫ Front Center Console ...264 ▫ Rear Full Center Console - If Equipped ...271 ▫ Cargo Tie-Down Hooks ...272 Ⅵ REAR WINDOW FEATURES ...274 ▫ Rear Window Wiper/Washer ...274 ▫ Rear Window Defroster ...275 &#...8549; ROOF LUGGAGE RACK - If Equipped ...269 Ⅵ CARGO AREA FEATURES ...269 ▫ Rechargeable Flashlight ...269 ▫ Cargo Storage ...271 ▫ Retractable Cargo Area Cover - IF EQUIPPED ...276 ▫ Deploying the Crossbars...277 ▫ Stowing The Crossbars ...279 3...

Owner Manual
Page 273
It will not prevent cargo from shifting or protect passengers from loose cargo. UNDERSTANDING THE FEATURES OF YOUR VEHICLE 271 Cargo Storage There is a removable storage bin located on the left side of this cover is for privacy, not to secure loads. If Equipped NOTE: The purpose of the rear cargo area. Additional storage can be found in the load floor. To access the lower storage, lift the handle and raise the storage lid. 3 Load Floor Handle Retractable Cargo Area Cover -
It will not prevent cargo from shifting or protect passengers from loose cargo. UNDERSTANDING THE FEATURES OF YOUR VEHICLE 271 Cargo Storage There is a removable storage bin located on the left side of this cover is for privacy, not to secure loads. If Equipped NOTE: The purpose of the rear cargo area. Additional storage can be found in the load floor. To access the lower storage, lift the handle and raise the storage lid. 3 Load Floor Handle Retractable Cargo Area Cover -

Owner Manual
Page 274
...store it over the The cargo tie-downs, located on the cargo area floor, should be opened with the cargo cover in the vehicle. Insert the pins on the cargo floor or in the passenger compartment. 272 UNDERSTANDING THE FEATURES OF YOUR VEHICLE To cover the cargo area: Cargo Tie-Down Hooks 1. The.... 2. Pull it in the pillar trim cover. 3. Do not store the cargo cover on the ends of the cover into the slots in the vehicle. It could cause injury. Tie-Down Hooks Grasp the cover at the center handle. In a collision, a loose cargo cover in the vehicle could fly around in ...
...store it over the The cargo tie-downs, located on the cargo area floor, should be opened with the cargo cover in the vehicle. Insert the pins on the cargo floor or in the passenger compartment. 272 UNDERSTANDING THE FEATURES OF YOUR VEHICLE To cover the cargo area: Cargo Tie-Down Hooks 1. The.... 2. Pull it in the pillar trim cover. 3. Do not store the cargo cover on the ends of the cover into the slots in the vehicle. It could cause injury. Tie-Down Hooks Grasp the cover at the center handle. In a collision, a loose cargo cover in the vehicle could fly around in ...
Owner Manual
Page 529
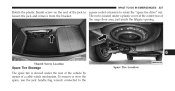
To remove or stow the spare, use the jack handle/lug wrench connected to rotate the "spare tire drive" nut. The nut is stowed under a plastic cover at the center-rear of the jack to square socket extension to the Spare Tire Location the cargo floor area, just inside the liftgate opening. 6 Thumb Screw Location Spare Tire Stowage The spare tire is located under the rear of the vehicle by means of a cable winch mechanism. WHAT TO DO IN EMERGENCIES 527 Rotate the plastic thumb screw on the end of loosen the jack and remove from the bracket.
To remove or stow the spare, use the jack handle/lug wrench connected to rotate the "spare tire drive" nut. The nut is stowed under a plastic cover at the center-rear of the jack to square socket extension to the Spare Tire Location the cargo floor area, just inside the liftgate opening. 6 Thumb Screw Location Spare Tire Stowage The spare tire is located under the rear of the vehicle by means of a cable winch mechanism. WHAT TO DO IN EMERGENCIES 527 Rotate the plastic thumb screw on the end of loosen the jack and remove from the bracket.
Owner Manual
Page 541
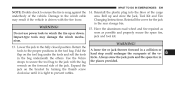
... jack thrown forward in the bag underneath the others. Always stow the jack parts and the spare tire in the rear storage bin. Reinstall the cover for the jack in the places provided. 6 Lower the jack to ensure the tire is snug against the 14. Have the aluminum road wheel and... up and store the Jack, Tool Kit and Tire may damage the winch mechanism. 13. WARNING! Reinstall the plastic plug into the floor of the cargo underbody of the vehicle.
... jack thrown forward in the bag underneath the others. Always stow the jack parts and the spare tire in the rear storage bin. Reinstall the cover for the jack in the places provided. 6 Lower the jack to ensure the tire is snug against the 14. Have the aluminum road wheel and... up and store the Jack, Tool Kit and Tire may damage the winch mechanism. 13. WARNING! Reinstall the plastic plug into the floor of the cargo underbody of the vehicle.

Owner Manual
Page 647
... System...28 Replacement Bulbs ...606 Replacement Keys ...18 Replacement Parts...563 Replacement Tires ...472 Reporting Safety Defects ...629 Restraints, Child ...83 Restraints, Occupant ...49 Retractable Cargo Area Cover ...271 Roll Over Warning ...5 Roof Type Carrier ...276 Rotation, Tires ...475 Safety Checks Inside Vehicle...111 Safety Checks Outside Vehicle ...114 Safety Defects, Reporting...
... System...28 Replacement Bulbs ...606 Replacement Keys ...18 Replacement Parts...563 Replacement Tires ...472 Reporting Safety Defects ...629 Restraints, Child ...83 Restraints, Occupant ...49 Retractable Cargo Area Cover ...271 Roll Over Warning ...5 Roof Type Carrier ...276 Rotation, Tires ...475 Safety Checks Inside Vehicle...111 Safety Checks Outside Vehicle ...114 Safety Defects, Reporting...

User Guide
Page 117
... the fuse panel. 115 ELECTRONICS NOTE: • Do not exceed the maximum power of the power outlet can cause damage not covered by your new vehicle warranty. • The rear cargo power outlet can be switched to be replaced. See below image for fuse locations. • Power outlets are designed for accessory...
... the fuse panel. 115 ELECTRONICS NOTE: • Do not exceed the maximum power of the power outlet can cause damage not covered by your new vehicle warranty. • The rear cargo power outlet can be switched to be replaced. See below image for fuse locations. • Power outlets are designed for accessory...
User Guide
Page 135
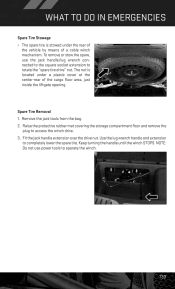
... tools from the bag. 2. To remove or stow the spare, use power tools to rotate the "spare tire drive" nut. Raise the protective rubber mat covering the storage compartment floor and remove the plug to completely lower the spare tire. WHAT TO DO IN EMERGENCIES Spare Tire Stowage • The spare... tire is located under the rear of the vehicle by means of the cargo floor area, just inside the liftgate opening. The nut is stowed under a plastic cover at the center-rear of a cable winch mechanism.
... tools from the bag. 2. To remove or stow the spare, use power tools to rotate the "spare tire drive" nut. Raise the protective rubber mat covering the storage compartment floor and remove the plug to completely lower the spare tire. WHAT TO DO IN EMERGENCIES Spare Tire Stowage • The spare... tire is located under the rear of the vehicle by means of the cargo floor area, just inside the liftgate opening. The nut is stowed under a plastic cover at the center-rear of a cable winch mechanism.

User Guide
Page 143
... tool kit. Lightly tighten the lug nuts. 3. The vehicle could be damaged if the spare tire is 110 ft/lbs (150 N·m). Reinstall the cover for this vehicle. Lower the vehicle to the proper positions in the rear storage bin. Impact type tools can damage the winch mechanism. Return the... tools to the ground by jacking on the forward side of the cargo area. Use the Velcro® straps to secure the tool bag to ensure that all lug nuts are properly seated against the wheel. Finish ...
... tool kit. Lightly tighten the lug nuts. 3. The vehicle could be damaged if the spare tire is 110 ft/lbs (150 N·m). Reinstall the cover for this vehicle. Lower the vehicle to the proper positions in the rear storage bin. Impact type tools can damage the winch mechanism. Return the... tools to the ground by jacking on the forward side of the cargo area. Use the Velcro® straps to secure the tool bag to ensure that all lug nuts are properly seated against the wheel. Finish ...

User Guide
Page 171
EXTERIOR: • Molded Running Boards • Front End Cover • Chrome Tubular Side Steps INTERIOR: • Premium Carpet Floor Mats • All-Weather Mats • Heated Seats ELECTRONICS: • Mopar Web (WiFi) &#...Hitch Receiver • Roof Mount Bike Carrier • Cargo Basket 169 MOPAR® ACCESSORIES AUTHENTIC ACCESSORIES BY MOPAR® • The following highlights just some of the many Authentic Dodge Accessories by MOPAR® featuring a fit, finish, and functionality specifically for your Dodge Durango. • In choosing Authentic Accessories you gain far more...
EXTERIOR: • Molded Running Boards • Front End Cover • Chrome Tubular Side Steps INTERIOR: • Premium Carpet Floor Mats • All-Weather Mats • Heated Seats ELECTRONICS: • Mopar Web (WiFi) &#...Hitch Receiver • Roof Mount Bike Carrier • Cargo Basket 169 MOPAR® ACCESSORIES AUTHENTIC ACCESSORIES BY MOPAR® • The following highlights just some of the many Authentic Dodge Accessories by MOPAR® featuring a fit, finish, and functionality specifically for your Dodge Durango. • In choosing Authentic Accessories you gain far more...


