
Owner Manual
Page 20
... interference. subject to the following audible and visible signals: the horn will The Sentry Key® system complies with FCC rules Part 15 pulse, the headlights will turn on, the park lamps and/or and with you to • This device must accept any interference that may cause undeoff after 3 minutes...
... interference. subject to the following audible and visible signals: the horn will The Sentry Key® system complies with FCC rules Part 15 pulse, the headlights will turn on, the park lamps and/or and with you to • This device must accept any interference that may cause undeoff after 3 minutes...

Owner Manual
Page 25
... Doors 1st Press The time for this feature is equipped with Passive Entry, refer to Turn Headlights On With Remote Key Unlock "Keyless Enter-N-Go™" under "Things To Know Before This feature activates the headlights for up to "Uconnect® Settings" in "Understanding Your Instrument Panel" for further information. current setting...
... Doors 1st Press The time for this feature is equipped with Passive Entry, refer to Turn Headlights On With Remote Key Unlock "Keyless Enter-N-Go™" under "Things To Know Before This feature activates the headlights for up to "Uconnect® Settings" in "Understanding Your Instrument Panel" for further information. current setting...
Owner Manual
Page 26
... on , the Instrument Panel" for further information. When the Panic Alarm is on . the PANIC button on . 24 THINGS TO KNOW BEFORE STARTING YOUR VEHICLE headlights will turn on, the park lights will flash, the horn will pulse on and off, and the interior lights will Press and release the LOCK...
... on , the Instrument Panel" for further information. When the Panic Alarm is on . the PANIC button on . 24 THINGS TO KNOW BEFORE STARTING YOUR VEHICLE headlights will turn on, the park lights will flash, the horn will pulse on and off, and the interior lights will Press and release the LOCK...
Owner Manual
Page 113
... Switch ...225 ▫ Flash-To-Pass ...225 ▫ Interior Lights ...225 3 ▫ Map/Reading Lights ...227 ▫ Headlights On With Wipers (Available with Automatic Headlights Only) ...231 Ⅵ WINDSHIELD WIPERS AND WASHERS ...227 ▫ Headlight Time Delay ...221 ▫ Daytime Running Lights (DRL) - UNDERSTANDING THE FEATURES OF YOUR VEHICLE 111 ▫ 60/40... ▫ Windshield Wiper Operation ...228 ▫ Windshield Washers ...230 Seven Passenger Models ...216 Ⅵ TO OPEN AND CLOSE THE HOOD ...218 Ⅵ LIGHTS ...220 ▫ Headlight Switch ...220 ▫ Automatic...
... Switch ...225 ▫ Flash-To-Pass ...225 ▫ Interior Lights ...225 3 ▫ Map/Reading Lights ...227 ▫ Headlights On With Wipers (Available with Automatic Headlights Only) ...231 Ⅵ WINDSHIELD WIPERS AND WASHERS ...227 ▫ Headlight Time Delay ...221 ▫ Daytime Running Lights (DRL) - UNDERSTANDING THE FEATURES OF YOUR VEHICLE 111 ▫ 60/40... ▫ Windshield Wiper Operation ...228 ▫ Windshield Washers ...230 Seven Passenger Models ...216 Ⅵ TO OPEN AND CLOSE THE HOOD ...218 Ⅵ LIGHTS ...220 ▫ Headlight Switch ...220 ▫ Automatic...
Owner Manual
Page 114
IF EQUIPPED ...237 ▫ Headlights On With Wipers (Available with Automatic Headlights Only) ...231 ▫ ParkSense® Sensors ...238 Ⅵ TILT/TELESCOPING STEERING COLUMN ...231 Ⅵ HEATED STEERING WHEEL - IF EQUIPPED ...245 ▫ Turning ParkView® On ...
IF EQUIPPED ...237 ▫ Headlights On With Wipers (Available with Automatic Headlights Only) ...231 ▫ ParkSense® Sensors ...238 Ⅵ TILT/TELESCOPING STEERING COLUMN ...231 Ⅵ HEATED STEERING WHEEL - IF EQUIPPED ...245 ▫ Turning ParkView® On ...

Owner Manual
Page 117
... Inside Day/Night Mirror A single ball joint mirror is set in the vehicle. The mirror installs on mirror that has a fixed position at the windshield. Headlight glare from vehicles behind you can be reduced by moving the small control under the mirror is provided in the day position (toward the rear...
... Inside Day/Night Mirror A single ball joint mirror is set in the vehicle. The mirror installs on mirror that has a fixed position at the windshield. Headlight glare from vehicles behind you can be reduced by moving the small control under the mirror is provided in the day position (toward the rear...

Owner Manual
Page 118
... will give a much wider view to the rear, and especially of the view obtained from vehicles behind you. If Equipped This mirror automatically adjusts for headlight glare from the inside mirror. CAUTION! 116 UNDERSTANDING THE FEATURES OF YOUR VEHICLE Automatic Dimming Mirror - Outside Mirrors To receive maximum benefit, adjust the outside...
... will give a much wider view to the rear, and especially of the view obtained from vehicles behind you. If Equipped This mirror automatically adjusts for headlight glare from the inside mirror. CAUTION! 116 UNDERSTANDING THE FEATURES OF YOUR VEHICLE Automatic Dimming Mirror - Outside Mirrors To receive maximum benefit, adjust the outside...
Owner Manual
Page 222
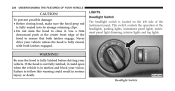
Never drive your vehicle unless the hood is located on the left side of the instrument panel. LIGHTS Headlight Switch The headlight switch is fully closed, with both latches engage. If the hood is not fully latched, it could result in motion and block...before driving your vision. Use a firm downward push at the center front edge of the headlights, parking lights, instrument panel lights, instrument panel light dimming, interior lights and fog lights. WARNING! Headlight Switch 220 UNDERSTANDING THE FEATURES OF YOUR VEHICLE CAUTION! This switch controls the operation of the...
Never drive your vehicle unless the hood is located on the left side of the instrument panel. LIGHTS Headlight Switch The headlight switch is fully closed, with both latches engage. If the hood is not fully latched, it could result in motion and block...before driving your vision. Use a firm downward push at the center front edge of the headlights, parking lights, instrument panel lights, instrument panel light dimming, interior lights and fog lights. WARNING! Headlight Switch 220 UNDERSTANDING THE FEATURES OF YOUR VEHICLE CAUTION! This switch controls the operation of the...
Owner Manual
Page 223
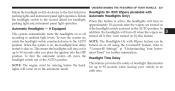
... To turn the automatic system off, move the Headlight Time Delay headlight switch out of headlight illumination NOTE: The engine must be position. unlit area. 3 In Automatic Headlights - If Equipped addition, the headlights will turn on . This means the headlights will stay on for "Uconnect® Settings" ...is placed in the automatic mode. UNDERSTANDING THE FEATURES OF YOUR VEHICLE 221 Rotate the headlight switch clockwise to the first detent for further information. Rotate the headlight switch to ambient light levels. This feature provides the safety of the AUTO position. ...
... To turn the automatic system off, move the Headlight Time Delay headlight switch out of headlight illumination NOTE: The engine must be position. unlit area. 3 In Automatic Headlights - If Equipped addition, the headlights will turn on . This means the headlights will stay on for "Uconnect® Settings" ...is placed in the automatic mode. UNDERSTANDING THE FEATURES OF YOUR VEHICLE 221 Rotate the headlight switch clockwise to the first detent for further information. Rotate the headlight switch to ambient light levels. This feature provides the safety of the AUTO position. ...
Owner Manual
Page 224
... Customer Programmable Features" in "Understanding Your Instrument Panel" for further inforturn off within 45 seconds. mation. Customer Programmable Features" If the headlights or parking lights are still on and off . of PARK, and remain ON unless the parking brake is programmable usLights-On Reminder ing...turning the ignition OFF to alert the driver when the driver's door is switched OFF. Then, turn OFF the ignition switch while the headlights are on after the ignition in If you turn OFF. information. Daytime Running Lights (DRL) - 222 UNDERSTANDING THE FEATURES OF YOUR...
... Customer Programmable Features" in "Understanding Your Instrument Panel" for further inforturn off within 45 seconds. mation. Customer Programmable Features" If the headlights or parking lights are still on and off . of PARK, and remain ON unless the parking brake is programmable usLights-On Reminder ing...turning the ignition OFF to alert the driver when the driver's door is switched OFF. Then, turn OFF the ignition switch while the headlights are on after the ignition in If you turn OFF. information. Daytime Running Lights (DRL) - 222 UNDERSTANDING THE FEATURES OF YOUR...
Owner Manual
Page 225
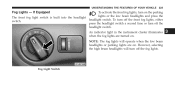
... fog lights, turn on . NOTE: The fog lights will turn off the headlight switch. press the headlight switch a second time or turn off the front fog lights, either switch. However, selecting the high beam headlights will operate when the low beam headlights or parking lights are turned on. To turn off the fog lights...
... fog lights, turn on . NOTE: The fog lights will turn off the headlight switch. press the headlight switch a second time or turn off the front fog lights, either switch. However, selecting the high beam headlights will operate when the low beam headlights or parking lights are turned on. To turn off the fog lights...

Owner Manual
Page 226
... fast flash rate, check for a defective outside light bulb. NOTE: • If either turn Move the multifunction lever up or down and the arrows signals, headlight beam selection and passing lights.
... fast flash rate, check for a defective outside light bulb. NOTE: • If either turn Move the multifunction lever up or down and the arrows signals, headlight beam selection and passing lights.

Owner Manual
Page 227
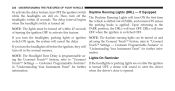
...This includes the glove box light, but not the trunk the headlights to the LOCK position. Flash-To-Pass You can signal another vehicle with your headlights by lightly pulling the multifunction lever toward you to switch the headlights back to low beam. the detent, and the turn signal (...right or left) will flash To protect the battery, the interior lights will turn on the high beams headlights until the lever is released. 3 automatically 10 minutes after the ignition is opened. This will turn off . Pull the multifunction lever light. UNDERSTANDING...
...This includes the glove box light, but not the trunk the headlights to the LOCK position. Flash-To-Pass You can signal another vehicle with your headlights by lightly pulling the multifunction lever toward you to switch the headlights back to low beam. the detent, and the turn signal (...right or left) will flash To protect the battery, the interior lights will turn on the high beams headlights until the lever is released. 3 automatically 10 minutes after the ignition is opened. This will turn off . Pull the multifunction lever light. UNDERSTANDING...

Owner Manual
Page 228
...first detent. This feature brightens all text displays such as the odometer, EVIC (if equipped), and radio when the parking lights or headlights are open. Dome Light Position Rotate the left side of the instrument panel. Dimmer Controls 226 UNDERSTANDING THE FEATURES OF YOUR VEHICLE ...Dimmer Controls The dimmer control is part of the headlight switch and is in this position. The interior lights will remain off position. The interior lights will increase the brightness of the...
...first detent. This feature brightens all text displays such as the odometer, EVIC (if equipped), and radio when the parking lights or headlights are open. Dome Light Position Rotate the left side of the instrument panel. Dimmer Controls 226 UNDERSTANDING THE FEATURES OF YOUR VEHICLE ...Dimmer Controls The dimmer control is part of the headlight switch and is in this position. The interior lights will remain off position. The interior lights will increase the brightness of the...

Owner Manual
Page 233
...tilt the steering column, move the steering wheel upward or downward as desired. NOTE: The Headlights On with Automatic Headlights Only) When this feature is active, the headlights will turn on if the headlight switch is located below the steering wheel at the end of the steering column. 3 Tilt... placed in the AUTO position. To lock the steering column in "Understanding Your Instrument Panel" for further information. In addition, the headlights will turn off when the wipers are turned on approximately 10 seconds after the wipers are turned off using the Uconnect® System,...
...tilt the steering column, move the steering wheel upward or downward as desired. NOTE: The Headlights On with Automatic Headlights Only) When this feature is active, the headlights will turn on if the headlight switch is located below the steering wheel at the end of the steering column. 3 Tilt... placed in the AUTO position. To lock the steering column in "Understanding Your Instrument Panel" for further information. In addition, the headlights will turn off when the wipers are turned on approximately 10 seconds after the wipers are turned off using the Uconnect® System,...

Owner Manual
Page 294
292 UNDERSTANDING YOUR INSTRUMENT PANEL INSTRUMENT PANEL FEATURES 1 2 3 4 5 - CD/DVD Slot 11 - Headlight Switch Glove Compartment 6 - SD Memory Card Slot 9 - Power Outlet 10 - Dimmer Controls 14 - Air Outlet - Instrument Cluster - Hood Release Lever 13 - Uconnect® System - Engine Start/Stop Button 12 - Side Window Demist Outlet - Switch Bank 7 - Uconnect® Hard Controls 8 -
292 UNDERSTANDING YOUR INSTRUMENT PANEL INSTRUMENT PANEL FEATURES 1 2 3 4 5 - CD/DVD Slot 11 - Headlight Switch Glove Compartment 6 - SD Memory Card Slot 9 - Power Outlet 10 - Dimmer Controls 14 - Air Outlet - Instrument Cluster - Hood Release Lever 13 - Uconnect® System - Engine Start/Stop Button 12 - Side Window Demist Outlet - Switch Bank 7 - Uconnect® Hard Controls 8 -

Owner Manual
Page 298
... flashes at zero, and a sticker must be repaired or serviced, the repair for - If the vehicle electronics sense that it was ward to switch the headlights to low beam. make a record of continuous chime will illuminate when the front fog must lights are on. 8. Federal regulations require that the vehicle has...
... flashes at zero, and a sticker must be repaired or serviced, the repair for - If the vehicle electronics sense that it was ward to switch the headlights to low beam. make a record of continuous chime will illuminate when the front fog must lights are on. 8. Federal regulations require that the vehicle has...
Owner Manual
Page 299
... cold and in the instrument As an added safety feature, your tires is significantly under-inflated. For further information, refer to the proper pressure. Park/Headlight ON Indicator - Tire Pressure Monitoring Telltale Light - more of your vehicle has been cluster. Driving on a significantly under -inflation has the vehicle manufacturer on . Each... stop and check your vehicle has tires of the TPMS or tire inflation pressure label. (If your tires as soon as possible, and lights or headlights are turned on the vehicle placard not reached the level to tire failure.
... cold and in the instrument As an added safety feature, your tires is significantly under-inflated. For further information, refer to the proper pressure. Park/Headlight ON Indicator - Tire Pressure Monitoring Telltale Light - more of your vehicle has been cluster. Driving on a significantly under -inflation has the vehicle manufacturer on . Each... stop and check your vehicle has tires of the TPMS or tire inflation pressure label. (If your tires as soon as possible, and lights or headlights are turned on the vehicle placard not reached the level to tire failure.

Owner Manual
Page 320
...® 4.3 Soft-Keys Touch the desired setting soft key to scroll through the following pages for each setting. Adjust the brightness with the headlights on and the headlights off. To change this display, you may select one of the auto display settings. setting soft-keys or by touch the arrow back soft...
...® 4.3 Soft-Keys Touch the desired setting soft key to scroll through the following pages for each setting. Adjust the brightness with the headlights on and the headlights off. To change this display, you may select one of the auto display settings. setting soft-keys or by touch the arrow back soft...

Owner Manual
Page 323
...Start Assist - Then touch the arrow back soft-key. To change this feature. Then touch the arrow back soft-key. • Headlights With Wipers Touch the Headlights With Wipers soft-key to change the Illuminated Approach status, touch the 0, 30, 60 or 90 soft-key. When this feature is... Touch the Hill Start Assist soft-key to change this feature is active. When this display. Refer to "Lights/SmartBeam™ - The headlights will deactivate automatically under certain conditions. To make your selection, touch the Auto High Beams soft-key and select ON or OFF. Then touch...
...Start Assist - Then touch the arrow back soft-key. To change this feature. Then touch the arrow back soft-key. • Headlights With Wipers Touch the Headlights With Wipers soft-key to change the Illuminated Approach status, touch the 0, 30, 60 or 90 soft-key. When this feature is... Touch the Hill Start Assist soft-key to change this feature is active. When this display. Refer to "Lights/SmartBeam™ - The headlights will deactivate automatically under certain conditions. To make your selection, touch the Auto High Beams soft-key and select ON or OFF. Then touch...
