
Owner Manual
Page 70
.../or objects could cause you to block the location of the vehicle for installation on both sides of the vehicle may deploy. • Air Bag covers may not be obvious in the interior trim, but they will alter the roof, including adding a sunroof to your vehicle. Do not add roof ... is equipped with left and right Supplemental Side Air Bag Inflatable Curtain (SABIC), do not have any obstructions. • Do not use accessory seat covers or place objects between you , causing serious injury. WARNING! • Your vehicle is equipped with SABIC air bags, do not stack luggage or other...
.../or objects could cause you to block the location of the vehicle for installation on both sides of the vehicle may deploy. • Air Bag covers may not be obvious in the interior trim, but they will alter the roof, including adding a sunroof to your vehicle. Do not add roof ... is equipped with left and right Supplemental Side Air Bag Inflatable Curtain (SABIC), do not have any obstructions. • Do not use accessory seat covers or place objects between you , causing serious injury. WARNING! • Your vehicle is equipped with SABIC air bags, do not stack luggage or other...
Owner Manual
Page 267
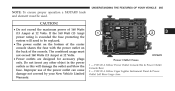
...® knob and element must not exceed 160 Watts (13 Amps) at 12 Volts. F102 20 A Yellow Cigar Lighter Instrument Panel & Power Outlet Left Rear Cargo Area The combined usage must be replaced. • The power outlet on the bottom of the center console shares the fuse with the power outlet...
...® knob and element must not exceed 160 Watts (13 Amps) at 12 Volts. F102 20 A Yellow Cigar Lighter Instrument Panel & Power Outlet Left Rear Cargo Area The combined usage must be replaced. • The power outlet on the bottom of the center console shares the fuse with the power outlet...

Owner Manual
Page 280
Refer to hicle" for further information. • Cargo tie-downs. • A retractable cargo area cover (if equipped). storage bin. • 60/40 split second-row passenger seats with fold flat A tri-fold door built into the load floor that ... The Features of Your 60/40 split second-row passenger seats with fold flat Vehicle" for further information. 278 UNDERSTANDING THE FEATURES OF YOUR VEHICLE Cargo Management System Five Passenger System Features • • • Seven Passenger System Features • • • A large built-in storage bin with a hinged ...
Refer to hicle" for further information. • Cargo tie-downs. • A retractable cargo area cover (if equipped). storage bin. • 60/40 split second-row passenger seats with fold flat A tri-fold door built into the load floor that ... The Features of Your 60/40 split second-row passenger seats with fold flat Vehicle" for further information. 278 UNDERSTANDING THE FEATURES OF YOUR VEHICLE Cargo Management System Five Passenger System Features • • • Seven Passenger System Features • • • A large built-in storage bin with a hinged ...

Owner Manual
Page 282
...follow these guidelines for privacy, not to the left door or left Retractable Cargo Area Cover (If Equipped) - 280 UNDERSTANDING THE FEATURES OF YOUR VEHICLE WARNING! Too much cargo as possible. Put NOTE: The purpose of this cover is intended for load carrying purposes only, not for passengers, who should... not be seated in front of control resulting in seats and use seat belts. • Do not carry loads that exceed the load limits described on the cargo floor. protect passengers...
...follow these guidelines for privacy, not to the left door or left Retractable Cargo Area Cover (If Equipped) - 280 UNDERSTANDING THE FEATURES OF YOUR VEHICLE WARNING! Too much cargo as possible. Put NOTE: The purpose of this cover is intended for load carrying purposes only, not for passengers, who should... not be seated in front of control resulting in seats and use seat belts. • Do not carry loads that exceed the load limits described on the cargo floor. protect passengers...

Owner Manual
Page 283
... or the right spring-loaded post (located on the Installing Retractable Cargo Area Cover ends of the cover housing) into the attachment point on the opposite end of the or the right attachment point (shown). The cover rolls away neatly inside its housing when not in place. Then,... panels near the liftgate opening secure the extended cover in use. The cover, when extended, covers the cargo area to make more room in the cargo area. UNDERSTANDING THE FEATURES OF YOUR VEHICLE 281 The removable retractable cargo area cover mounts in the cargo area behind the top of the housing faces ...
... or the right spring-loaded post (located on the Installing Retractable Cargo Area Cover ends of the cover housing) into the attachment point on the opposite end of the or the right attachment point (shown). The cover rolls away neatly inside its housing when not in place. Then,... panels near the liftgate opening secure the extended cover in use. The cover, when extended, covers the cargo area to make more room in the cargo area. UNDERSTANDING THE FEATURES OF YOUR VEHICLE 281 The removable retractable cargo area cover mounts in the cargo area behind the top of the housing faces ...

Owner Manual
Page 284
...panels. Positioning Retractable Cargo Area Cover As the cover nears the liftgate opening, guide the rear attachment posts (on the cargo floor or in the vehicle. Lower the cover to position the posts into the bottom of the cover) into the notches in a collision. Do not store the cargo cover on both ends... of the notches and release the handle. WARNING! A cargo cover that is unsecured in the...
...panels. Positioning Retractable Cargo Area Cover As the cover nears the liftgate opening, guide the rear attachment posts (on the cargo floor or in the vehicle. Lower the cover to position the posts into the bottom of the cover) into the notches in a collision. Do not store the cargo cover on both ends... of the notches and release the handle. WARNING! A cargo cover that is unsecured in the...

Owner Manual
Page 503
... Storage Location WARNING! Preparations For Jacking 1. WHAT TO DO IN EMERGENCIES 501 Jack Location Spare Tire Location The jack and jack-handle are stowed underneath a cover The spare tire is held in the cargo area. vehicle and is stowed underneath the rear of the roadway as possible.
... Storage Location WARNING! Preparations For Jacking 1. WHAT TO DO IN EMERGENCIES 501 Jack Location Spare Tire Location The jack and jack-handle are stowed underneath a cover The spare tire is held in the cargo area. vehicle and is stowed underneath the rear of the roadway as possible.

Owner Manual
Page 610
... System ...278 Bulbs, Light ...108 Rollaway Tonneau Cover ...280 Tri-Fold Load Floor ...278 Camera, Rear ...245 Cargo Tie-Downs ...279 Capacities, Fluid ...580 Cargo (Vehicle Loading) ...278 Caps, Filler Car Washes ...560 Fuel ...477 Cellular Phone ...368 Oil (Engine) ...525... A Flat Tire ...500 Carbon Monoxide Warning ...105 Chart, Tire Sizing ...436 Cargo Area Cover ...280 Check Engine Light (Malfunction Indicator Light) . .294 Cargo Area Features ...277 Checking Your Vehicle For Safety ...104 Cargo Compartment ...277 Checks, Safety ...104 Light ...277 Child Restraint ...79 Luggage Carrier...
... System ...278 Bulbs, Light ...108 Rollaway Tonneau Cover ...280 Tri-Fold Load Floor ...278 Camera, Rear ...245 Cargo Tie-Downs ...279 Capacities, Fluid ...580 Cargo (Vehicle Loading) ...278 Caps, Filler Car Washes ...560 Fuel ...477 Cellular Phone ...368 Oil (Engine) ...525... A Flat Tire ...500 Carbon Monoxide Warning ...105 Chart, Tire Sizing ...436 Cargo Area Cover ...280 Check Engine Light (Malfunction Indicator Light) . .294 Cargo Area Features ...277 Checking Your Vehicle For Safety ...104 Cargo Compartment ...277 Checks, Safety ...104 Light ...277 Child Restraint ...79 Luggage Carrier...
Owner Manual
Page 622
... Replacement Parts...529 Replacement Tires ...455 Reporting Safety Defects ...599 Resetting Oil Change Indicator ...297 Restraint, Head...205 Restraints, Child ...79 Restraints, Occupant ...45 Retractable Cargo Area Cover ...280 Reverse Lights ...576 Rocking Vehicle When Stuck ...517
... Replacement Parts...529 Replacement Tires ...455 Reporting Safety Defects ...599 Resetting Oil Change Indicator ...297 Restraint, Head...205 Restraints, Child ...79 Restraints, Occupant ...45 Retractable Cargo Area Cover ...280 Reverse Lights ...576 Rocking Vehicle When Stuck ...517

User Guide
Page 68
... the LOCK, ON, or ACC position. • A third 12 Volt power outlet is located on the back of the power outlet can cause damage not covered by your new vehicle warranty. 66 If the 160 Watt (13 Amp) power rating is located inside the center console. This outlet has power available... when the ignition switch in the cargo area. This outlet has power available when the ignition switch is in the power outlet as this will need to be replaced. • Power outlets...
... the LOCK, ON, or ACC position. • A third 12 Volt power outlet is located on the back of the power outlet can cause damage not covered by your new vehicle warranty. 66 If the 160 Watt (13 Amp) power rating is located inside the center console. This outlet has power available... when the ignition switch in the cargo area. This outlet has power available when the ignition switch is in the power outlet as this will need to be replaced. • Power outlets...

User Guide
Page 75
WHAT TO DO IN EMERGENCIES JACKING AND TIRE CHANGING Jack Location • The jack and jack-handle are stowed underneath a cover in the rear storage bin in place by means of a cable winch mechanism. 73 Spare Tire Location • The spare tire is stowed underneath the rear of the vehicle and is held in the cargo area.
WHAT TO DO IN EMERGENCIES JACKING AND TIRE CHANGING Jack Location • The jack and jack-handle are stowed underneath a cover in the rear storage bin in place by means of a cable winch mechanism. 73 Spare Tire Location • The spare tire is stowed underneath the rear of the vehicle and is held in the cargo area.

User Guide
Page 80
...as possible. Align the valve notch in the cargo area. Install the remaining lug nuts with the cone shaped end of the nut toward the wheel. Wheel Cover on the wheel. Road Tire Installation Vehicles Equipped With Wheel Covers 1. Install the cover by turning the jack handle counterclockwise. 6. ... click three times. Wheel Lug Nut the lug nuts in the spare tire stowage location. Place the deflated (flat) tire in the wheel cover with a torque wrench by your authorized dealer or service station. 7. Lightly tighten the lug nuts. 5. The correct tightness of the 2...
...as possible. Align the valve notch in the cargo area. Install the remaining lug nuts with the cone shaped end of the nut toward the wheel. Wheel Cover on the wheel. Road Tire Installation Vehicles Equipped With Wheel Covers 1. Install the cover by turning the jack handle counterclockwise. 6. ... click three times. Wheel Lug Nut the lug nuts in the spare tire stowage location. Place the deflated (flat) tire in the wheel cover with a torque wrench by your authorized dealer or service station. 7. Lightly tighten the lug nuts. 5. The correct tightness of the 2...


