
UConnect Manual
Page 45
... System (VES)™ Getting Started • Screen(s) located in the overhead console : Unfold the overhead LCD screen(s) by pushing the button in the center console : Lift up on the rear of the overhead console behind the screen(s).
... System (VES)™ Getting Started • Screen(s) located in the overhead console : Unfold the overhead LCD screen(s) by pushing the button in the center console : Lift up on the rear of the overhead console behind the screen(s).

Owner Manual
Page 41
... buffeting with the plunger or a key in certain open or partially open , adjust the sunroof opening to disable the window control on the handle and lift. LIFTGATE To open the liftgate, pull up (squeeze) on the other doors, press the window LOCKOUT button. This is a normal occurrence and can be minimized...
... buffeting with the plunger or a key in certain open or partially open , adjust the sunroof opening to disable the window control on the handle and lift. LIFTGATE To open the liftgate, pull up (squeeze) on the other doors, press the window LOCKOUT button. This is a normal occurrence and can be minimized...

Owner Manual
Page 142
... while the vehicle is parked. While sitting in loss of the seat cushion, near the floor. Moving a seat while driving could result in the seat, lift up on the bar located and move forward and rearward on the seat to be sure that the seat adjusters have reached the desired position...
... while the vehicle is parked. While sitting in loss of the seat cushion, near the floor. Moving a seat while driving could result in the seat, lift up on the bar located and move forward and rearward on the seat to be sure that the seat adjusters have reached the desired position...

Owner Manual
Page 143
... release the lever when you could slide under the seat belt, which could result in serious injury or death. Manual Recline To recline the seatback, lift the recline lever, located on the lever to allow for extended cargo space. In a collision you reach the desired position. Do not ride with the...
... release the lever when you could slide under the seat belt, which could result in serious injury or death. Manual Recline To recline the seatback, lift the recline lever, located on the lever to allow for extended cargo space. In a collision you reach the desired position. Do not ride with the...

Owner Manual
Page 187
The center console has a removable storage tray which can hold cell phones, PDAs, and other small items. Center Console Removable Storage Tray 184 UNDERSTANDING THE FEATURES OF YOUR VEHICLE Console Storage Compartment To open, press the latch and lift the cover.
The center console has a removable storage tray which can hold cell phones, PDAs, and other small items. Center Console Removable Storage Tray 184 UNDERSTANDING THE FEATURES OF YOUR VEHICLE Console Storage Compartment To open, press the latch and lift the cover.

Owner Manual
Page 190
In order to release cover. One side features a plastic lined tray which can hold a variety of items. The maximum load capacity of the vehicle) at the same time to use the cargo load floor, use the following procedure: 1. Lift the cover. If Equipped The panel in the load floor is 400 lbs (181 kg). Push both side mounted release handles (toward the center of the load floor is reversible for added utility. Floor Panel 3 2. UNDERSTANDING THE FEATURES OF YOUR VEHICLE 187 Cargo Load Floor - The cargo load floor is held by spring loaded latches.
In order to release cover. One side features a plastic lined tray which can hold a variety of items. The maximum load capacity of the vehicle) at the same time to use the cargo load floor, use the following procedure: 1. Lift the cover. If Equipped The panel in the load floor is 400 lbs (181 kg). Push both side mounted release handles (toward the center of the load floor is reversible for added utility. Floor Panel 3 2. UNDERSTANDING THE FEATURES OF YOUR VEHICLE 187 Cargo Load Floor - The cargo load floor is held by spring loaded latches.

Owner Manual
Page 216
... is not moving. UNDERSTANDING YOUR INSTRUMENT PANEL 213 NOTE: The system will show the following messages in the odometer display: • Door Ajar (door) • Lift Gate Ajar (gATE) • Loose Fuel Cap (gASCAP) These messages can also affect the displayed temperature; The compass/trip computer, when the appropriate conditions exist...
... is not moving. UNDERSTANDING YOUR INSTRUMENT PANEL 213 NOTE: The system will show the following messages in the odometer display: • Door Ajar (door) • Lift Gate Ajar (gATE) • Loose Fuel Cap (gASCAP) These messages can also affect the displayed temperature; The compass/trip computer, when the appropriate conditions exist...

Owner Manual
Page 319
... severe or evasive driving maneuvers. It user's safety or the safety of the vehicle under various driving conditions. ESC corrects for wheel lift by applying the brake of the appropriate wheel to other factors such as vehicle loading, road condispeed of the steering wheel angle and ...vehicles speed that wheel lift will only or other vehicles. 316 STARTING AND OPERATING Electronic Roll Mitigation (ERM) WARNING! When ERM determines that the rate tions and ...
... severe or evasive driving maneuvers. It user's safety or the safety of the vehicle under various driving conditions. ESC corrects for wheel lift by applying the brake of the appropriate wheel to other factors such as vehicle loading, road condispeed of the steering wheel angle and ...vehicles speed that wheel lift will only or other vehicles. 316 STARTING AND OPERATING Electronic Roll Mitigation (ERM) WARNING! When ERM determines that the rate tions and ...
Owner Manual
Page 384
... see or hear steam coming from the engine cooling system. You could slip off . You or others can also turn it can be raised on a lift. (Continued) WARNING! The vehicle could be badly burned by hot engine coolant (antifreeze) or steam from your body under the hood, do not open a cooling...
... see or hear steam coming from the engine cooling system. You could slip off . You or others can also turn it can be raised on a lift. (Continued) WARNING! The vehicle could be badly burned by hot engine coolant (antifreeze) or steam from your body under the hood, do not open a cooling...
Owner Manual
Page 385
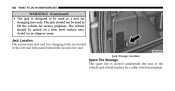
The vehicle should not be used as a tool for service purposes. Jack Location The scissor-type jack and tire changing tools are located in place by a cable winch mechanism. Jack Storage Location Spare Tire Stowage The spare tire is stowed underneath the rear of the vehicle and is designed to lift the vehicle for changing tires only. Avoid ice or slippery areas. 382 WHAT TO DO IN EMERGENCIES WARNING! (Continued) • The jack is held in the left rear trim panel behind the second row seat. The jack should be used to be jacked on a firm level surface only.
The vehicle should not be used as a tool for service purposes. Jack Location The scissor-type jack and tire changing tools are located in place by a cable winch mechanism. Jack Storage Location Spare Tire Stowage The spare tire is stowed underneath the rear of the vehicle and is designed to lift the vehicle for changing tires only. Avoid ice or slippery areas. 382 WHAT TO DO IN EMERGENCIES WARNING! (Continued) • The jack is held in the left rear trim panel behind the second row seat. The jack should be used to be jacked on a firm level surface only.

Owner Manual
Page 388
... the extension, and then to the left one turn while the wheel is on a jack. • Only use the jack in the Jacking Instructions for lifting this vehicle. 1. WHAT TO DO IN EMERGENCIES 385 WARNING! (Continued) • Do not let anyone sit in the vehicle when it is on a jack. •...
... the extension, and then to the left one turn while the wheel is on a jack. • Only use the jack in the Jacking Instructions for lifting this vehicle. 1. WHAT TO DO IN EMERGENCIES 385 WARNING! (Continued) • Do not let anyone sit in the vehicle when it is on a jack. •...

Owner Manual
Page 389
... right. Locate the jack as shown. For the front tires, place it under the axle by turning the jack screw to be changed . 5. Minimum tire lift provides maximum stability.
... right. Locate the jack as shown. For the front tires, place it under the axle by turning the jack screw to be changed . 5. Minimum tire lift provides maximum stability.

Owner Manual
Page 391
... please follow the manufacturer's operating instructions and positive battery post. If your vehicle has a discharged battery it can be jumpstarted using a set of the pack. Lift up on the cap to gain access to the battery, starter motor, alternator or electrical system may occur. NOTE: The positive battery post is frozen...
... please follow the manufacturer's operating instructions and positive battery post. If your vehicle has a discharged battery it can be jumpstarted using a set of the pack. Lift up on the cap to gain access to the battery, starter motor, alternator or electrical system may occur. NOTE: The positive battery post is frozen...

Owner Manual
Page 398
...equipment manufacturer's instructions. Attach a tow bar or other equipment designed for towing. 6 WHAT TO DO IN EMERGENCIES 395 Towing Condition Flat Tow Wheel Lift or Dolly Tow Flatbed Wheels OFF the Ground NONE Front Rear ALL 2WD Models If transmission is operable: • Trans in the ON/RUN position...km/h) • 15 miles (24 km) max distance OK BEST METHOD 4WD Models NOT ALLOWED NOT ALLOWED NOT ALLOWED OK Proper towing or lifting equipment is required to prevent damage to vehicles under tow must be observed. If the vehicle's battery is mandatory. Use of safety chains is ...
...equipment manufacturer's instructions. Attach a tow bar or other equipment designed for towing. 6 WHAT TO DO IN EMERGENCIES 395 Towing Condition Flat Tow Wheel Lift or Dolly Tow Flatbed Wheels OFF the Ground NONE Front Rear ALL 2WD Models If transmission is operable: • Trans in the ON/RUN position...km/h) • 15 miles (24 km) max distance OK BEST METHOD 4WD Models NOT ALLOWED NOT ALLOWED NOT ALLOWED OK Proper towing or lifting equipment is required to prevent damage to vehicles under tow must be observed. If the vehicle's battery is mandatory. Use of safety chains is ...

Owner Manual
Page 400
.../alignment, use of vehicle raised and the WARNING! Internal damage to the transmission or transfer case will occur if a front or rear wheel lift is used . The parking brake must be used when towing. • Failure to follow these towing methods could cause serious injury or death... transfer case. opposite end on a flatbed, or with the rear wheels raised using The manufacturer requires towing with all wheels OFF a wheel lift or towing dolly), or remove the driveshaft. The parking brake must remain engaged unless the vehicle is completely reinstalled. WHAT TO DO IN EMERGENCIES...
.../alignment, use of vehicle raised and the WARNING! Internal damage to the transmission or transfer case will occur if a front or rear wheel lift is used . The parking brake must be used when towing. • Failure to follow these towing methods could cause serious injury or death... transfer case. opposite end on a flatbed, or with the rear wheels raised using The manufacturer requires towing with all wheels OFF a wheel lift or towing dolly), or remove the driveshaft. The parking brake must remain engaged unless the vehicle is completely reinstalled. WHAT TO DO IN EMERGENCIES...
Owner Manual
Page 439
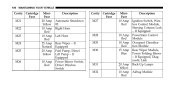
... Amp Red 25 Amp Natural 20 Amp Yellow 10 Amp Red Description Automatic Shutdown #3 Right Horn Left Horn Rear Wiper - If Equipped Fuel Pump, Diesel Lift Pump -
... Amp Red 25 Amp Natural 20 Amp Yellow 10 Amp Red Description Automatic Shutdown #3 Right Horn Left Horn Rear Wiper - If Equipped Fuel Pump, Diesel Lift Pump -

Owner Manual
Page 444
Remove the two push pins. 4. Oil contamination will severely shorten bulb life. If the bulb comes in the housing. Do not touch the new bulb with rubbing alcohol. 7 Push Pins Firmly grasp the bulb by the two latches and squeeze Rear Tail, Stop, Turn Signal, and Backup Lamp them together to unlock the bulb from the keyed opening in contact with any oily surface, clean the bulb with your fingers. housing. 2. CAUTION! Open the lift gate. MAINTAINING YOUR VEHICLE 441 3. Pull the bulb straight out from the front fog lamp 1.
Remove the two push pins. 4. Oil contamination will severely shorten bulb life. If the bulb comes in the housing. Do not touch the new bulb with rubbing alcohol. 7 Push Pins Firmly grasp the bulb by the two latches and squeeze Rear Tail, Stop, Turn Signal, and Backup Lamp them together to unlock the bulb from the keyed opening in contact with any oily surface, clean the bulb with your fingers. housing. 2. CAUTION! Open the lift gate. MAINTAINING YOUR VEHICLE 441 3. Pull the bulb straight out from the front fog lamp 1.

User Guide
Page 15
...-Flat Front Passenger Seat • The front passenger seat can be folded flat to fold down , and tilt adjustment. Manual Seat Adjustment Forward/Rearward • Lift up on the adjusting bar located at the front of the seat near the floor, controls forward/back, up on the recliner lever to allow... Seat • The power seat switch, located on the outboard side of the seat near the floor and release at the desired position. Recliner • Lift the recliner lever located on the outboard side of the seat, lean back and release at the desired position.
...-Flat Front Passenger Seat • The front passenger seat can be folded flat to fold down , and tilt adjustment. Manual Seat Adjustment Forward/Rearward • Lift up on the adjusting bar located at the front of the seat near the floor, controls forward/back, up on the recliner lever to allow... Seat • The power seat switch, located on the outboard side of the seat near the floor and release at the desired position. Recliner • Lift the recliner lever located on the outboard side of the seat, lean back and release at the desired position.

User Guide
Page 33
... 730N: Press the RADIO/MEDIA hard-key until you would like to copy, then touch the DONE soft-key to start the process. To access, lift up on the radio face. 31 Clock Setting • Turn the radio on, then touch the screen where the time is displayed. • Touch the...
... 730N: Press the RADIO/MEDIA hard-key until you would like to copy, then touch the DONE soft-key to start the process. To access, lift up on the radio face. 31 Clock Setting • Turn the radio on, then touch the screen where the time is displayed. • Touch the...

User Guide
Page 50
.... • Flat towing (with the rear wheels on the ground while the driveshaft is connected will occur if a front or rear wheel lift is used . CAUTION! Towing - NOTE: This vehicle may be used when recreational towing. The parking brake must be towed on a flatbed... bolt torque specifications, etc. This may be firmly engaged and the wheels chocked during driveshaft removal and installation. WARNING! Front or rear wheel lifts should not be accomplished using a tow dolly, follow this procedure: • Properly secure the dolly to the tow vehicle, following the dolly...
.... • Flat towing (with the rear wheels on the ground while the driveshaft is connected will occur if a front or rear wheel lift is used . CAUTION! Towing - NOTE: This vehicle may be used when recreational towing. The parking brake must be towed on a flatbed... bolt torque specifications, etc. This may be firmly engaged and the wheels chocked during driveshaft removal and installation. WARNING! Front or rear wheel lifts should not be accomplished using a tow dolly, follow this procedure: • Properly secure the dolly to the tow vehicle, following the dolly...
