
UConnect Manual
Page 9
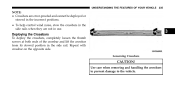
... as you enter or exit allows up to seven cellular phones to be kept on and has been paired to Uconnect™ Phone allows you stow your radio when using simple voice commands (e.g., ЉCall" ѧ phone use. the system will automatically mute your ible phones, call 1-877-855-8400. The...
... as you enter or exit allows up to seven cellular phones to be kept on and has been paired to Uconnect™ Phone allows you stow your radio when using simple voice commands (e.g., ЉCall" ѧ phone use. the system will automatically mute your ible phones, call 1-877-855-8400. The...
Owner Manual
Page 64
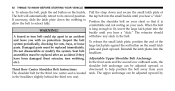
..., Adjustable Upper Shoulder Belt Anchorage In the front seats and the second row outboard seats, the etc.). Pull the strap down the webbing to its stowed position. buckle until you with no protection.
..., Adjustable Upper Shoulder Belt Anchorage In the front seats and the second row outboard seats, the etc.). Pull the strap down the webbing to its stowed position. buckle until you with no protection.
Owner Manual
Page 72
..., it will dealer or by seat belts, and cargo is unbelted, the Seat Belt Reminder Light will turn on and remain on the front passenger seat or when the seat is recommended that are onds of the ignition switch being cycled to the 96 second warning sequence. If the driver... or front seat passenger is properly stowed. blinking the Seat Belt Reminder Light and sounding an BeltAlert can be restrained in pet harnesses or pet carriers that pets be enabled...
..., it will dealer or by seat belts, and cargo is unbelted, the Seat Belt Reminder Light will turn on and remain on the front passenger seat or when the seat is recommended that are onds of the ignition switch being cycled to the 96 second warning sequence. If the driver... or front seat passenger is properly stowed. blinking the Seat Belt Reminder Light and sounding an BeltAlert can be restrained in pet harnesses or pet carriers that pets be enabled...
Owner Manual
Page 94
... that all install the restraint using the LATCH attaching system to install a child restraint, please ensure that the seat belts are not toys and should stow the seat belt out of the reach of tucking the seat belt behind the child restraint and out of the seatback. The vehicle lower anchorages...
... that all install the restraint using the LATCH attaching system to install a child restraint, please ensure that the seat belts are not toys and should stow the seat belt out of the reach of tucking the seat belt behind the child restraint and out of the seatback. The vehicle lower anchorages...
Owner Manual
Page 110
...; Power Lumbar - If Equipped ...139 ▫ Quad Seats - If Equipped ...153 ▫ Manually Folding Third Row Seats - If Equipped ...134 ▫ Head Restraints ...135 ▫ Stow 'n Go Seating - If Equipped ...152 ▫ Third Row Power Recline - 108 UNDERSTANDING THE FEATURES OF YOUR VEHICLE Ⅵ Seats ...127 ▫ Power Seats - If...
...; Power Lumbar - If Equipped ...139 ▫ Quad Seats - If Equipped ...153 ▫ Manually Folding Third Row Seats - If Equipped ...134 ▫ Head Restraints ...135 ▫ Stow 'n Go Seating - If Equipped ...152 ▫ Third Row Power Recline - 108 UNDERSTANDING THE FEATURES OF YOUR VEHICLE Ⅵ Seats ...127 ▫ Power Seats - If...

Owner Manual
Page 141
... Push Button Head Restraints - To lower the head restraint, press the push 2. downward on the head restraint. If Equipped On vehicles equipped with Stow 'n Go seats, the seats will fold and tumble in the center position can be raised and lowered for further information. Second Row Bench... 1. Recline the front seatback fully forward. Second Row Stow 'n Go On vehicles equipped with Stow 'n Go seating, the second and third row seats can be folded into the floor for convenient storage...
... Push Button Head Restraints - To lower the head restraint, press the push 2. downward on the head restraint. If Equipped On vehicles equipped with Stow 'n Go seats, the seats will fold and tumble in the center position can be raised and lowered for further information. Second Row Bench... 1. Recline the front seatback fully forward. Second Row Stow 'n Go On vehicles equipped with Stow 'n Go seating, the second and third row seats can be folded into the floor for convenient storage...
Owner Manual
Page 142
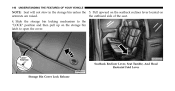
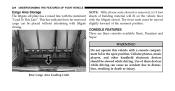
Seatback Recliner Lever, Seat Tumble, And Head Restraint Fold Lever Storage Bin Cover Lock Release the outboard side of the seat. 4. Slide the storage bin locking mechanism to open the cover. Pull upward on the seatback recliner lever located on the storage bin latch to the "LOCK" position and then pull up on armrests are raised. 140 UNDERSTANDING THE FEATURES OF YOUR VEHICLE NOTE: Seat will not stow in the storage bin unless the 5.
Seatback Recliner Lever, Seat Tumble, And Head Restraint Fold Lever Storage Bin Cover Lock Release the outboard side of the seat. 4. Slide the storage bin locking mechanism to open the cover. Pull upward on the seatback recliner lever located on the storage bin latch to the "LOCK" position and then pull up on armrests are raised. 140 UNDERSTANDING THE FEATURES OF YOUR VEHICLE NOTE: Seat will not stow in the storage bin unless the 5.
Owner Manual
Page 145
UNDERSTANDING THE FEATURES OF YOUR VEHICLE 143 CAUTION! To Unstow Second Row Seats 1. Folded And Latched Position To tumble or stow the seat from contact with the storage bin covers open the cover. 2. In a collision, serious injury could result if the seat storage bin covers are ...not properly latched. • Do not drive the vehicle with the front seat tracks, which have minimal clearance to the cover. Stow 'n Go Seat - Lift the seatback to the "Unlocked" position. Pull up on the strap to lift the seat out of the seat to open...
UNDERSTANDING THE FEATURES OF YOUR VEHICLE 143 CAUTION! To Unstow Second Row Seats 1. Folded And Latched Position To tumble or stow the seat from contact with the storage bin covers open the cover. 2. In a collision, serious injury could result if the seat storage bin covers are ...not properly latched. • Do not drive the vehicle with the front seat tracks, which have minimal clearance to the cover. Stow 'n Go Seat - Lift the seatback to the "Unlocked" position. Pull up on the strap to lift the seat out of the seat to open...
Owner Manual
Page 147
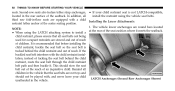
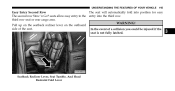
UNDERSTANDING THE FEATURES OF YOUR VEHICLE 145 The seat will automatically fold into position for easy Easy Entry Second Row The second row Stow 'n Go seats allow easy entry to the entry into the third row. third row seat or rear cargo area. In the event of the seat. WARNING! Pull up on the seatback recliner lever on the outboard side of a collision you could be injured if the seat is not fully latched. 3 Seatback Recliner Lever, Seat Tumble, And Head Restraint Fold Lever
UNDERSTANDING THE FEATURES OF YOUR VEHICLE 145 The seat will automatically fold into position for easy Easy Entry Second Row The second row Stow 'n Go seats allow easy entry to the entry into the third row. third row seat or rear cargo area. In the event of the seat. WARNING! Pull up on the seatback recliner lever on the outboard side of a collision you could be injured if the seat is not fully latched. 3 Seatback Recliner Lever, Seat Tumble, And Head Restraint Fold Lever
Owner Manual
Page 154
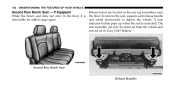
If Equipped While the bench seat does not stow in the floor, it is unlocked. and rotate downwards to deploy the wheels. To remove the seat, squeeze each release handle removable for added cargo space. 152 UNDERSTANDING THE FEATURES OF YOUR VEHICLE Release levers are located on its Easy Out Rollers. The seat assembly can now be removed from the vehicle and moved on the rear leg assemblies, near Second Row Bench Seat - Second Row Bench Seat Release Handles A lock indicator button pops up when the seat is the floor.
If Equipped While the bench seat does not stow in the floor, it is unlocked. and rotate downwards to deploy the wheels. To remove the seat, squeeze each release handle removable for added cargo space. 152 UNDERSTANDING THE FEATURES OF YOUR VEHICLE Release levers are located on its Easy Out Rollers. The seat assembly can now be removed from the vehicle and moved on the rear leg assemblies, near Second Row Bench Seat - Second Row Bench Seat Release Handles A lock indicator button pops up when the seat is the floor.

Owner Manual
Page 157
... seats can be folded individually NOTE: or together. Should this occur, remove the obstacle and press the button again, for safe operation. Open to fold/stow the power third row seats. Once the seat stops moving, then the desired position can be selected. • The third row power seat system includes...
... seats can be folded individually NOTE: or together. Should this occur, remove the obstacle and press the button again, for safe operation. Open to fold/stow the power third row seats. Once the seat stops moving, then the desired position can be selected. • The third row power seat system includes...
Owner Manual
Page 160
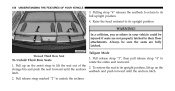
Tailgate Mode Stowed Third Row Seat To Unfold Third Row Seats 1. Pull up on the assist strap to rotate the entire seat rearward. 1. latch. 2. In a collision, you or ...
Tailgate Mode Stowed Third Row Seat To Unfold Third Row Seats 1. Pull up on the assist strap to rotate the entire seat rearward. 1. latch. 2. In a collision, you or ...
Owner Manual
Page 226
... can be placed without interfering with a console compartment lid in death or injury. NOTE: With all rear seats stowed or removed, 4 x 8 foot sheets of the rearmost position. The front seats must be stowed while driving. Cellular phones, music players, and other handheld electronic devices should be moved slightly forward of building material...
... can be placed without interfering with a console compartment lid in death or injury. NOTE: With all rear seats stowed or removed, 4 x 8 foot sheets of the rearmost position. The front seats must be stowed while driving. Cellular phones, music players, and other handheld electronic devices should be moved slightly forward of building material...
Owner Manual
Page 236
... the leveling system will provide a level maximum vehicle load capacity. Be sure the total load of the vehicle. riding vehicle under most passenger and cargo loading conditions. If the leveled vehicle is not moved for the leveling to the correct height. The roof rack does not ...increase the total load carrying capacity of cargo inside the vehicle Crossbar Stowed In Side Rail The crossbars and side rails are delivered stowed within the shock absorbers raises the rear of the vehicle to complete depending on vehicles equipped with a luggage...
... the leveling system will provide a level maximum vehicle load capacity. Be sure the total load of the vehicle. riding vehicle under most passenger and cargo loading conditions. If the leveled vehicle is not moved for the leveling to the correct height. The roof rack does not ...increase the total load carrying capacity of cargo inside the vehicle Crossbar Stowed In Side Rail The crossbars and side rails are delivered stowed within the shock absorbers raises the rear of the vehicle to complete depending on vehicles equipped with a luggage...
Owner Manual
Page 237
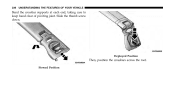
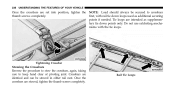
Loosening Crossbars 3 CAUTION! Use care when removing and handling the crossbars to prevent damage to the vehicle. Deploying the Crossbars To deploy the crossbars, completely loosen the thumb screws at both ends of the crossbar and lift the crossbar from its stowed position in use. UNDERSTANDING THE FEATURES OF YOUR VEHICLE 235 NOTE: • Crossbars are error-proofed and cannot be deployed or stowed in the incorrect positions. • To help control wind noise, stow the crossbars in the side rails when they are not in the side rail. Repeat with crossbar on the opposite side.
Loosening Crossbars 3 CAUTION! Use care when removing and handling the crossbars to prevent damage to the vehicle. Deploying the Crossbars To deploy the crossbars, completely loosen the thumb screws at both ends of the crossbar and lift the crossbar from its stowed position in use. UNDERSTANDING THE FEATURES OF YOUR VEHICLE 235 NOTE: • Crossbars are error-proofed and cannot be deployed or stowed in the incorrect positions. • To help control wind noise, stow the crossbars in the side rails when they are not in the side rail. Repeat with crossbar on the opposite side.
Owner Manual
Page 238
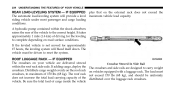
236 UNDERSTANDING THE FEATURES OF YOUR VEHICLE Bend the crossbar supports at each end, taking care to keep hand clear of pivoting joint. Stowed Position Slide the thumb screw down. Deployed Position Then, position the crossbars across the roof.
236 UNDERSTANDING THE FEATURES OF YOUR VEHICLE Bend the crossbar supports at each end, taking care to keep hand clear of pivoting joint. Stowed Position Slide the thumb screw down. Deployed Position Then, position the crossbars across the roof.
Owner Manual
Page 240
... crossbars thumb screws completely. 238 UNDERSTANDING THE FEATURES OF YOUR VEHICLE Once the crossbars are set into position, tighten the NOTE: Load should always be stowed in either rail nest. Once the crossbars are identical and can be secured to keep hand clear of pivoting joint. Tie loops are intended as... the tie loops. Rail Tie Loops Do not use ratcheting mechanisms with rail tie down loops used as supplementary tie down points only. Crossbars are stowed, tighten the thumb screws completely.
... crossbars thumb screws completely. 238 UNDERSTANDING THE FEATURES OF YOUR VEHICLE Once the crossbars are set into position, tighten the NOTE: Load should always be stowed in either rail nest. Once the crossbars are identical and can be secured to keep hand clear of pivoting joint. Tie loops are intended as... the tie loops. Rail Tie Loops Do not use ratcheting mechanisms with rail tie down loops used as supplementary tie down points only. Crossbars are stowed, tighten the thumb screws completely.

Owner Manual
Page 423
..., follow the requirements and recommendations in this section you will find safety tips and information on your vehicle handles. STARTING AND OPERATING 421 Loading CAUTION! Stow all loose items securely before parts on limits to the type of the specified GVWR, you can shorten the life of towing you must redistribute...
..., follow the requirements and recommendations in this section you will find safety tips and information on your vehicle handles. STARTING AND OPERATING 421 Loading CAUTION! Stow all loose items securely before parts on limits to the type of the specified GVWR, you can shorten the life of towing you must redistribute...
Owner Manual
Page 442
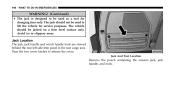
Jack Location The jack, jack handle and winch handle tools are stowed behind the rear left side trim panel in the rear cargo area. Turn the two cover latches to lift the vehicle for changing tires only. Avoid ice or slippery areas. Jack And Tool Location Remove the pouch containing the scissors jack, jack handle, and tools. The jack should be jacked on a firm level surface only. 440 WHAT TO DO IN EMERGENCIES WARNING! (Continued) • The jack is designed to be used to release the cover. The vehicle should not be used as a tool for service purposes.
Jack Location The jack, jack handle and winch handle tools are stowed behind the rear left side trim panel in the rear cargo area. Turn the two cover latches to lift the vehicle for changing tires only. Avoid ice or slippery areas. Jack And Tool Location Remove the pouch containing the scissors jack, jack handle, and tools. The jack should be jacked on a firm level surface only. 440 WHAT TO DO IN EMERGENCIES WARNING! (Continued) • The jack is designed to be used to release the cover. The vehicle should not be used as a tool for service purposes.
Owner Manual
Page 443
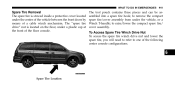
The "spare tire drive" nut is stowed inside a protective cover located under the center of the vehicle between the front doors by means of a cable winch mechanism. To Access Spare Tire Winch ...
The "spare tire drive" nut is stowed inside a protective cover located under the center of the vehicle between the front doors by means of a cable winch mechanism. To Access Spare Tire Winch ...
