
UConnect Manual
Page 9
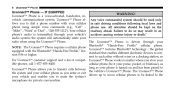
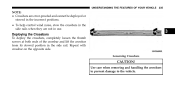
... "Mike" ѧ"WorkЉ or ЉDial" ѧ "248-555-1212Љ). Your cellular roadway ahead. the global equipped with your vehicle and enables you stow your radio when using simple voice commands (e.g., ЉCall" ѧ phone use. cellular phone (be linked to transfer calls between the vehicle's Uconnect™ Phone.
... "Mike" ѧ"WorkЉ or ЉDial" ѧ "248-555-1212Љ). Your cellular roadway ahead. the global equipped with your vehicle and enables you stow your radio when using simple voice commands (e.g., ЉCall" ѧ phone use. cellular phone (be linked to transfer calls between the vehicle's Uconnect™ Phone.
Owner Manual
Page 64
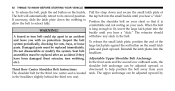
Damaged parts must be adjusted upward or downward to its stowed position. plate and push upward. Reinstall the latch plates into the WARNING! the lap belt into the small buckle until you hear a "click." The retractor ...
Damaged parts must be adjusted upward or downward to its stowed position. plate and push upward. Reinstall the latch plates into the WARNING! the lap belt into the small buckle until you hear a "click." The retractor ...
Owner Manual
Page 72
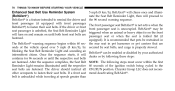
... VEHICLE Enhanced Seat Belt Use Reminder System (BeltAlertா) BeltAlert is a feature intended to remind the driver and front passenger (if equipped with front passenger BeltAlert) to the seat belts are fastened. BeltAlert may be enabled or disabled by following steps must occur within ...or until the respective 60 seconds of the vehicle speed over 5 mph (8 km/h), by secured by seat belts, and cargo is properly stowed. blinking the Seat Belt Reminder Light and sounding an BeltAlert can be triggered when an animal or heavy object is unbelted, the Seat...
... VEHICLE Enhanced Seat Belt Use Reminder System (BeltAlertா) BeltAlert is a feature intended to remind the driver and front passenger (if equipped with front passenger BeltAlert) to the seat belts are fastened. BeltAlert may be enabled or disabled by following steps must occur within ...or until the respective 60 seconds of the vehicle speed over 5 mph (8 km/h), by secured by seat belts, and cargo is properly stowed. blinking the Seat Belt Reminder Light and sounding an BeltAlert can be triggered when an animal or heavy object is unbelted, the Seat...
Owner Manual
Page 94
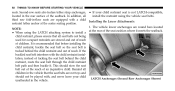
... in the vehicle that all install the restraint using the LATCH attaching system to install a child restraint, please ensure that the seat belts are stowed and out of reach of the seat cushion where it . 92 THINGS TO KNOW BEFORE STARTING YOUR VEHICLE seats. The vehicle lower anchorages are ... restraint tether anchor at the rear of children. In addition, all seat belts not being used for occupant restraints are not toys and should stow the seat belt out of the reach of reach. It is recommended that before installing the child restraint, buckle the seat belt so the seat...
... in the vehicle that all install the restraint using the LATCH attaching system to install a child restraint, please ensure that the seat belts are stowed and out of reach of the seat cushion where it . 92 THINGS TO KNOW BEFORE STARTING YOUR VEHICLE seats. The vehicle lower anchorages are ... restraint tether anchor at the rear of children. In addition, all seat belts not being used for occupant restraints are not toys and should stow the seat belt out of the reach of reach. It is recommended that before installing the child restraint, buckle the seat belt so the seat...
Owner Manual
Page 110
If Equipped . . 166 ▫ Headlight Delay - If Equipped ...134 ▫ Head Restraints ...135 ▫ Stow 'n Go Seating - If Equipped ...146 ▫ Second Row Bench Seat - If Equipped ...139 ▫ Quad Seats - If Equipped ...153 ▫ Third Row Power Folding ...
If Equipped . . 166 ▫ Headlight Delay - If Equipped ...134 ▫ Head Restraints ...135 ▫ Stow 'n Go Seating - If Equipped ...146 ▫ Second Row Bench Seat - If Equipped ...139 ▫ Quad Seats - If Equipped ...153 ▫ Third Row Power Folding ...

Owner Manual
Page 141
..., pull upward on the head restraint. button, located at the base of the head restraint, and push 3. If Equipped On vehicles equipped with Stow 'n Go seats, the seats will fold and tumble in one motion. 3 Push Button Head Restraints - Third Row The head restraint in... "Things To Know Before Starting Your Vehicle" for further information. Second Row Stow 'n Go On vehicles equipped with Stow 'n Go seating, the second and third row seats can be folded into the floor for tether routing. downward on ...
..., pull upward on the head restraint. button, located at the base of the head restraint, and push 3. If Equipped On vehicles equipped with Stow 'n Go seats, the seats will fold and tumble in one motion. 3 Push Button Head Restraints - Third Row The head restraint in... "Things To Know Before Starting Your Vehicle" for further information. Second Row Stow 'n Go On vehicles equipped with Stow 'n Go seating, the second and third row seats can be folded into the floor for tether routing. downward on ...
Owner Manual
Page 142
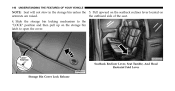
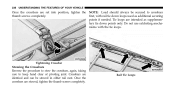
Slide the storage bin locking mechanism to the "LOCK" position and then pull up on armrests are raised. Seatback Recliner Lever, Seat Tumble, And Head Restraint Fold Lever Storage Bin Cover Lock Release 140 UNDERSTANDING THE FEATURES OF YOUR VEHICLE NOTE: Seat will not stow in the storage bin unless the 5. the outboard side of the seat. 4. Pull upward on the seatback recliner lever located on the storage bin latch to open the cover.
Slide the storage bin locking mechanism to the "LOCK" position and then pull up on armrests are raised. Seatback Recliner Lever, Seat Tumble, And Head Restraint Fold Lever Storage Bin Cover Lock Release 140 UNDERSTANDING THE FEATURES OF YOUR VEHICLE NOTE: Seat will not stow in the storage bin unless the 5. the outboard side of the seat. 4. Pull upward on the seatback recliner lever located on the storage bin latch to open the cover.
Owner Manual
Page 145
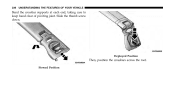
... upright position, close the storage bin cover and slide the storage bin locking mechanism to the full upright position. 3 WARNING! Stow 'n Go Seat - Folded And Latched Position To tumble or stow the seat from contact with the storage bin covers open the cover. 2. Pull up on the seatback recliner lever on...
... upright position, close the storage bin cover and slide the storage bin locking mechanism to the full upright position. 3 WARNING! Stow 'n Go Seat - Folded And Latched Position To tumble or stow the seat from contact with the storage bin covers open the cover. 2. Pull up on the seatback recliner lever on...
Owner Manual
Page 147
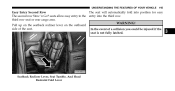
third row seat or rear cargo area. Pull up on the seatback recliner lever on the outboard side of a collision you could be injured if the seat is not fully latched. 3 Seatback Recliner Lever, Seat Tumble, And Head Restraint Fold Lever In the event of the seat. UNDERSTANDING THE FEATURES OF YOUR VEHICLE 145 The seat will automatically fold into position for easy Easy Entry Second Row The second row Stow 'n Go seats allow easy entry to the entry into the third row. WARNING!
third row seat or rear cargo area. Pull up on the seatback recliner lever on the outboard side of a collision you could be injured if the seat is not fully latched. 3 Seatback Recliner Lever, Seat Tumble, And Head Restraint Fold Lever In the event of the seat. UNDERSTANDING THE FEATURES OF YOUR VEHICLE 145 The seat will automatically fold into position for easy Easy Entry Second Row The second row Stow 'n Go seats allow easy entry to the entry into the third row. WARNING!
Owner Manual
Page 154
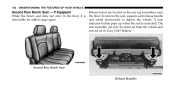
152 UNDERSTANDING THE FEATURES OF YOUR VEHICLE Release levers are located on its Easy Out Rollers. To remove the seat, squeeze each release handle removable for added cargo space. A lock indicator button pops up when the seat is the floor. and rotate downwards to deploy the wheels. The seat assembly can now be removed from the vehicle and moved on the rear leg assemblies, near Second Row Bench Seat - Second Row Bench Seat Release Handles If Equipped While the bench seat does not stow in the floor, it is unlocked.
152 UNDERSTANDING THE FEATURES OF YOUR VEHICLE Release levers are located on its Easy Out Rollers. To remove the seat, squeeze each release handle removable for added cargo space. A lock indicator button pops up when the seat is the floor. and rotate downwards to deploy the wheels. The seat assembly can now be removed from the vehicle and moved on the rear leg assemblies, near Second Row Bench Seat - Second Row Bench Seat Release Handles If Equipped While the bench seat does not stow in the floor, it is unlocked.

Owner Manual
Page 157
... attempting the following positions using the switch bank located on to • Disconnect the center shoulder belt from the obstacle. Right/Left Seats/Both Seats 3 Stow 4 - When the system detects an obstacle, the motors will stop the seat. The third row power folding seat adjusts to fold...
... attempting the following positions using the switch bank located on to • Disconnect the center shoulder belt from the obstacle. Right/Left Seats/Both Seats 3 Stow 4 - When the system detects an obstacle, the motors will stop the seat. The third row power folding seat adjusts to fold...
Owner Manual
Page 160
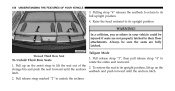
...! Pulling strap "4" releases the seatback to return to its full upright position. 4. Pull release strap "3", then pull release strap "4" to unlock the recliner. Tailgate Mode Stowed Third Row Seat To Unfold Third Row Seats 1. 158 UNDERSTANDING THE FEATURES OF YOUR VEHICLE 3. latch. 2. Raise the head restraint to its upright position.
...! Pulling strap "4" releases the seatback to return to its full upright position. 4. Pull release strap "3", then pull release strap "4" to unlock the recliner. Tailgate Mode Stowed Third Row Seat To Unfold Third Row Seats 1. 158 UNDERSTANDING THE FEATURES OF YOUR VEHICLE 3. latch. 2. Raise the head restraint to its upright position.
Owner Manual
Page 226
... fit on the vehicle floor with a console compartment lid in death or injury. NOTE: With all rear seats stowed or removed, 4 x 8 foot sheets of the rearmost position. The front seats must be stowed while driving. This line indicates how far rearward cargo can cause an accident due to distraction, resulting in the...
... fit on the vehicle floor with a console compartment lid in death or injury. NOTE: With all rear seats stowed or removed, 4 x 8 foot sheets of the rearmost position. The front seats must be stowed while driving. This line indicates how far rearward cargo can cause an accident due to distraction, resulting in the...
Owner Manual
Page 236
...). 234 UNDERSTANDING THE FEATURES OF YOUR VEHICLE REAR LOAD-LEVELING SYSTEM - riding vehicle under most passenger and cargo loading conditions. Be sure the total load of cargo inside the vehicle Crossbar Stowed In Side Rail The crossbars and side rails are delivered stowed within the shock absorbers raises the rear of the vehicle.
...). 234 UNDERSTANDING THE FEATURES OF YOUR VEHICLE REAR LOAD-LEVELING SYSTEM - riding vehicle under most passenger and cargo loading conditions. Be sure the total load of cargo inside the vehicle Crossbar Stowed In Side Rail The crossbars and side rails are delivered stowed within the shock absorbers raises the rear of the vehicle.
Owner Manual
Page 237
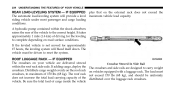
Repeat with crossbar on the opposite side. Use care when removing and handling the crossbars to prevent damage to the vehicle. Deploying the Crossbars To deploy the crossbars, completely loosen the thumb screws at both ends of the crossbar and lift the crossbar from its stowed position in use. Loosening Crossbars 3 CAUTION! UNDERSTANDING THE FEATURES OF YOUR VEHICLE 235 NOTE: • Crossbars are error-proofed and cannot be deployed or stowed in the incorrect positions. • To help control wind noise, stow the crossbars in the side rails when they are not in the side rail.
Repeat with crossbar on the opposite side. Use care when removing and handling the crossbars to prevent damage to the vehicle. Deploying the Crossbars To deploy the crossbars, completely loosen the thumb screws at both ends of the crossbar and lift the crossbar from its stowed position in use. Loosening Crossbars 3 CAUTION! UNDERSTANDING THE FEATURES OF YOUR VEHICLE 235 NOTE: • Crossbars are error-proofed and cannot be deployed or stowed in the incorrect positions. • To help control wind noise, stow the crossbars in the side rails when they are not in the side rail.
Owner Manual
Page 238
236 UNDERSTANDING THE FEATURES OF YOUR VEHICLE Bend the crossbar supports at each end, taking care to keep hand clear of pivoting joint. Slide the thumb screw down. Stowed Position Deployed Position Then, position the crossbars across the roof.
236 UNDERSTANDING THE FEATURES OF YOUR VEHICLE Bend the crossbar supports at each end, taking care to keep hand clear of pivoting joint. Slide the thumb screw down. Stowed Position Deployed Position Then, position the crossbars across the roof.
Owner Manual
Page 240
Once the crossbars are set into position, tighten the NOTE: Load should always be stowed in either rail nest. 238 UNDERSTANDING THE FEATURES OF YOUR VEHICLE Once the crossbars are stowed, tighten the thumb screws completely. first, with the tie loops. Tie loops are identical ...and can be secured to keep hand clear of pivoting joint. Tightening Crossbar Stowing the Crossbars Reverse the procedure to stow the crossbars, again, taking care to crossbars thumb screws completely. Crossbars are intended as supplementary tie down loops used...
Once the crossbars are set into position, tighten the NOTE: Load should always be stowed in either rail nest. 238 UNDERSTANDING THE FEATURES OF YOUR VEHICLE Once the crossbars are stowed, tighten the thumb screws completely. first, with the tie loops. Tie loops are identical ...and can be secured to keep hand clear of pivoting joint. Tightening Crossbar Stowing the Crossbars Reverse the procedure to stow the crossbars, again, taking care to crossbars thumb screws completely. Crossbars are intended as supplementary tie down loops used...

Owner Manual
Page 423
... is within lose control. Also, overloading can reasonably do , evenly as possible. Improper weight distribution can change the driving. STARTING AND OPERATING 421 Loading CAUTION! Stow all loose items securely before parts on your vehicle. Before towing a trailer, carefully review this information to the type of the specified GVWR, you distribute...
... is within lose control. Also, overloading can reasonably do , evenly as possible. Improper weight distribution can change the driving. STARTING AND OPERATING 421 Loading CAUTION! Stow all loose items securely before parts on your vehicle. Before towing a trailer, carefully review this information to the type of the specified GVWR, you distribute...
Owner Manual
Page 442
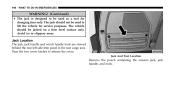
The vehicle should not be jacked on a firm level surface only. 440 WHAT TO DO IN EMERGENCIES WARNING! (Continued) • The jack is designed to release the cover. Turn the two cover latches to be used to lift the vehicle for changing tires only. Jack Location The jack, jack handle and winch handle tools are stowed behind the rear left side trim panel in the rear cargo area. Jack And Tool Location Remove the pouch containing the scissors jack, jack handle, and tools. The jack should be used as a tool for service purposes. Avoid ice or slippery areas.
The vehicle should not be jacked on a firm level surface only. 440 WHAT TO DO IN EMERGENCIES WARNING! (Continued) • The jack is designed to release the cover. Turn the two cover latches to be used to lift the vehicle for changing tires only. Jack Location The jack, jack handle and winch handle tools are stowed behind the rear left side trim panel in the rear cargo area. Jack And Tool Location Remove the pouch containing the scissors jack, jack handle, and tools. The jack should be used as a tool for service purposes. Avoid ice or slippery areas.
Owner Manual
Page 443
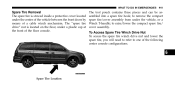
... console configurations. 6 Spare Tire Location The tool pouch contains three pieces and can be assembled into a spare tire hook; The "spare tire drive" nut is stowed inside a protective cover located under a plastic cap at the front of the floor console. To Access Spare Tire Winch Drive Nut To access the spare...
... console configurations. 6 Spare Tire Location The tool pouch contains three pieces and can be assembled into a spare tire hook; The "spare tire drive" nut is stowed inside a protective cover located under a plastic cap at the front of the floor console. To Access Spare Tire Winch Drive Nut To access the spare...
