
Owner Manual
Page 114
...; Umbrella Holder ...220 ▫ Second Row Seat Storage Bins - If Equipped ...234 Ⅵ Roof Luggage Rack - 112 UNDERSTANDING THE FEATURES OF YOUR VEHICLE ▫ Smoker's Package Kit - If Equipped ...229 Ⅵ Cargo Area Features ...231 ▫ Rechargeable Flashlight ...231 Ⅵ Rear Window Features ...233 ▫ Rear Window Defroster ...233 Ⅵ Rear...
...; Umbrella Holder ...220 ▫ Second Row Seat Storage Bins - If Equipped ...234 Ⅵ Roof Luggage Rack - 112 UNDERSTANDING THE FEATURES OF YOUR VEHICLE ▫ Smoker's Package Kit - If Equipped ...229 Ⅵ Cargo Area Features ...231 ▫ Rechargeable Flashlight ...231 Ⅵ Rear Window Features ...233 ▫ Rear Window Defroster ...233 Ⅵ Rear...

Owner Manual
Page 209
Sunroof Fully Closed Press the switch forward and release to ensure that the sunroof is connected directly to the battery. switch and the passenger-side power outlet is fully closed. The knob and element must be used. driver-side power outlet is turned to the LOCK position...switch is turned to the LOCK position. The driver-side power outlet will also operate a conventional cigar lighter unit (if equipped with an optional Smoker's Package). 3 ELECTRICAL POWER OUTLETS - IF EQUIPPED Instrument Panel Outlets Two 12 Volt (13 Amp) power outlets are located on the NOTE: To ensure proper ...
Sunroof Fully Closed Press the switch forward and release to ensure that the sunroof is connected directly to the battery. switch and the passenger-side power outlet is fully closed. The knob and element must be used. driver-side power outlet is turned to the LOCK position...switch is turned to the LOCK position. The driver-side power outlet will also operate a conventional cigar lighter unit (if equipped with an optional Smoker's Package). 3 ELECTRICAL POWER OUTLETS - IF EQUIPPED Instrument Panel Outlets Two 12 Volt (13 Amp) power outlets are located on the NOTE: To ensure proper ...
Owner Manual
Page 219
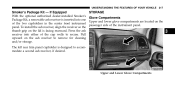
... cupholders in the center front instrument panel. UNDERSTANDING THE FEATURES OF YOUR VEHICLE 217 Smoker's Package Kit - Pull upward on the lid is facing rearward. STORAGE Glove Compartments Upper and lower glove compartments are located on the passenger side of the cup wells to accommodate a second ash receiver, if desired. The left...
... cupholders in the center front instrument panel. UNDERSTANDING THE FEATURES OF YOUR VEHICLE 217 Smoker's Package Kit - Pull upward on the lid is facing rearward. STORAGE Glove Compartments Upper and lower glove compartments are located on the passenger side of the cup wells to accommodate a second ash receiver, if desired. The left...

Owner Manual
Page 428
... for safe towing of trailers weighing over 2,000 lbs (907 kg) with the optional Trailer Tow Prep Package. Class Class Class Class Duty Refer to assist you in selecting the correct trailer hitch for package content. The following chart provides the industry standard for the maximum trailer weight a given trailer hitch class...
... for safe towing of trailers weighing over 2,000 lbs (907 kg) with the optional Trailer Tow Prep Package. Class Class Class Class Duty Refer to assist you in selecting the correct trailer hitch for package content. The following chart provides the industry standard for the maximum trailer weight a given trailer hitch class...

Owner Manual
Page 435
STARTING AND OPERATING 433 The Trailer Tow Package may include a four-pin or a seven-pin wiring harness. Refer to a trailer connector. Female Pins 2 - Left Stop/Turn 6 - The electrical connections are all complete to the vehicle but you must mate the harness to the following four-pin connector and seven-pin connector illustrations. 5 Four-Pin Connector 1 - Male Pin 3 - NOTE: Do not cut or splice wiring into the vehicles wiring harness. Ground 4 - Right Stop/Turn Park 5 - Use a factory approved trailer harness and connector.
STARTING AND OPERATING 433 The Trailer Tow Package may include a four-pin or a seven-pin wiring harness. Refer to a trailer connector. Female Pins 2 - Left Stop/Turn 6 - The electrical connections are all complete to the vehicle but you must mate the harness to the following four-pin connector and seven-pin connector illustrations. 5 Four-Pin Connector 1 - Male Pin 3 - NOTE: Do not cut or splice wiring into the vehicles wiring harness. Ground 4 - Right Stop/Turn Park 5 - Use a factory approved trailer harness and connector.

Owner Manual
Page 497
... using abrasive compounds and power buffing • It is considered the responsibility of the doors and rocker panels be sure that such materials are well packaged and sealed. 7 The cost of such repairs is important that the drain holes in the lower edges that may diminish the gloss or thin out...
... using abrasive compounds and power buffing • It is considered the responsibility of the doors and rocker panels be sure that such materials are well packaged and sealed. 7 The cost of such repairs is important that the drain holes in the lower edges that may diminish the gloss or thin out...

User Guide
Page 55
...) 22 sq ft (2.0 sq m) 7,000 lbs (3 175 kg) 22 sq ft (2.0 sq m) 9,000 lbs (4 082 kg) 40 sq ft (3.72 sq m) 3.6L Automatic (with Tow Package) 40 sq ft (3.72 sq m) 40 sq ft (3.72 sq m) 9,000 lbs (4 082 kg) 9,000 lbs (4 082 kg) *Vehicles equipped with Fold-in-Floor seating...
...) 22 sq ft (2.0 sq m) 7,000 lbs (3 175 kg) 22 sq ft (2.0 sq m) 9,000 lbs (4 082 kg) 40 sq ft (3.72 sq m) 3.6L Automatic (with Tow Package) 40 sq ft (3.72 sq m) 40 sq ft (3.72 sq m) 9,000 lbs (4 082 kg) 9,000 lbs (4 082 kg) *Vehicles equipped with Fold-in-Floor seating...