
UConnect Manual
Page 27
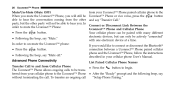
... mute the Uconnect™ Phone: • Press the button. • Following the beep, say ЉMute.Љ In order to un-mute the Uconnect™ phone: • Press the button. • Following the beep, say ЉMute off.Љ Advanced Phone Connectivity from your ...
... mute the Uconnect™ Phone: • Press the button. • Following the beep, say ЉMute.Љ In order to un-mute the Uconnect™ phone: • Press the button. • Following the beep, say ЉMute off.Љ Advanced Phone Connectivity from your ...
UConnect Manual
Page 28
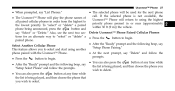
... Phone Pairing.Љ This feature allows you ЉSetup Select PhoneЉ and follow the prompts. • Press the button to priority phone present in order from the highest to begin . button and phone being played, and then choose the phone you to select and start using the highest all paired...
... Phone Pairing.Љ This feature allows you ЉSetup Select PhoneЉ and follow the prompts. • Press the button to priority phone present in order from the highest to begin . button and phone being played, and then choose the phone you to select and start using the highest all paired...

UConnect Manual
Page 69
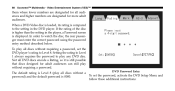
Select Channel/Screen 2 and HDD in order for the swivel screen (Screen 2) to top left of the screen. Video Entertainment System (VES)™ Channel/Screen 1, touch the 2 soft-key and choose an Third Row Swivel Screen (if equipped) audio source. 68 Uconnect™ Multimedia - To exit touch the back arrow soft-key at the • The third row screen or Screen 2 has the ability to work. lower and swivel to face forward. • While the swivel screen is facing forward, the second row screen or Screen 1 must be fully open in the MEDIA column.
Select Channel/Screen 2 and HDD in order for the swivel screen (Screen 2) to top left of the screen. Video Entertainment System (VES)™ Channel/Screen 1, touch the 2 soft-key and choose an Third Row Swivel Screen (if equipped) audio source. 68 Uconnect™ Multimedia - To exit touch the back arrow soft-key at the • The third row screen or Screen 2 has the ability to work. lower and swivel to face forward. • While the swivel screen is facing forward, the second row screen or Screen 1 must be fully open in the MEDIA column.

UConnect Manual
Page 84
..., or as a CD-ROM containing MP3 or WMA files. Recorded Discs The VES™ DVD player will play CD-R and CD-RW discs recorded in order for the disc to play DVD-Video content recorded to account for the player, the disc will not play and will also play . DVD Audio...
..., or as a CD-ROM containing MP3 or WMA files. Recorded Discs The VES™ DVD player will play CD-R and CD-RW discs recorded in order for the disc to play DVD-Video content recorded to account for the player, the disc will not play and will also play . DVD Audio...
UConnect Manual
Page 89
In order to the setting in the player, a Password screen is compared to watch the disc, the rear passenger must enter the correct password using the password entry method described below. Not all DVD discs encode a Rating, so it is still possible that discs ...
In order to the setting in the player, a Password screen is compared to watch the disc, the rear passenger must enter the correct password using the password entry method described below. Not all DVD discs encode a Rating, so it is still possible that discs ...

Owner Manual
Page 2
... therefore. This manual illustrates and describes the operation of features and equipment that are slower, and your reflexes are no longer available or were not ordered on this manual that are either standard or optional on products previously manufactured. VEHICLES SOLD IN CANADA With respect to any Vehicles Sold in Canada...
... therefore. This manual illustrates and describes the operation of features and equipment that are slower, and your reflexes are no longer available or were not ordered on this manual that are either standard or optional on products previously manufactured. VEHICLES SOLD IN CANADA With respect to any Vehicles Sold in Canada...
Owner Manual
Page 6
..., and various customer-oriented documents. Following the instructions and recommendations in the vehicle for a description of the should be used on the items of equipment ordered, certain descriptions and illustrations may be stored in this Owner's Manual:
..., and various customer-oriented documents. Following the instructions and recommendations in the vehicle for a description of the should be used on the items of equipment ordered, certain descriptions and illustrations may be stored in this Owner's Manual:
Owner Manual
Page 33
...-minute cycle, press and release • Any engine warning lights come on the UNLOCK button on the RKE transmitter to the ON/RUN position. in order to ON/RUN position. Refer to the ON/RUN position, otherwise the engine will also cancel if any of the following occur: 2 • The engine...
...-minute cycle, press and release • Any engine warning lights come on the UNLOCK button on the RKE transmitter to the ON/RUN position. in order to ON/RUN position. Refer to the ON/RUN position, otherwise the engine will also cancel if any of the following occur: 2 • The engine...

Owner Manual
Page 44
... windows do not fully open the front and rear windows together to close the door. Pull outward on the ears or a helicopter-type sound in order to minimize the buffeting. Rocking the handle backstopping several inches above the window sill. If the buffeting occurs with the windows down, or the sunroof...
... windows do not fully open the front and rear windows together to close the door. Pull outward on the ears or a helicopter-type sound in order to minimize the buffeting. Rocking the handle backstopping several inches above the window sill. If the buffeting occurs with the windows down, or the sunroof...
Owner Manual
Page 69
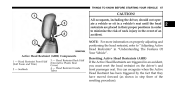
NOTE: For more information on the driver's and front passenger seat. Seatback 3 - Head Restraint Front Half (Soft Foam and Trim) 2 - You can recognize when the Active Head Restraint has been triggered by the fact that ... three of an accident. Head Restraint Guide Tubes 2 Resetting Active Head Restraints (AHR) If the Active Head Restraints are placed in their proper positions in order to "Adjusting Active Head Restraints" in the event of the resetting procedure). THINGS TO KNOW BEFORE STARTING YOUR VEHICLE 67 CAUTION! Head Restraint Back Half...
NOTE: For more information on the driver's and front passenger seat. Seatback 3 - Head Restraint Front Half (Soft Foam and Trim) 2 - You can recognize when the Active Head Restraint has been triggered by the fact that ... three of an accident. Head Restraint Guide Tubes 2 Resetting Active Head Restraints (AHR) If the Active Head Restraints are placed in their proper positions in order to "Adjusting Active Head Restraints" in the event of the resetting procedure). THINGS TO KNOW BEFORE STARTING YOUR VEHICLE 67 CAUTION! Head Restraint Back Half...

Owner Manual
Page 175
... will be used in the intermittent when not using the system. Place the multifunction lever in the OFF position NOTE: Rear window wipers function in order to feature. UNDERSTANDING THE FEATURES OF YOUR VEHICLE 173 Mist Feature Press the end of the multifunction lever inward (toward the steering column) to the...
... will be used in the intermittent when not using the system. Place the multifunction lever in the OFF position NOTE: Rear window wipers function in order to feature. UNDERSTANDING THE FEATURES OF YOUR VEHICLE 173 Mist Feature Press the end of the multifunction lever inward (toward the steering column) to the...

Owner Manual
Page 181
... desired vehicle set the system or cause it . You could lose control and have an accident. The Cruise Indicator Light will illuminate. CANCEL 2 - NOTE: In order to ensure proper operation, the Electronic Speed Control System has been designed to go faster than you want. Always leave the system OFF when you...
... desired vehicle set the system or cause it . You could lose control and have an accident. The Cruise Indicator Light will illuminate. CANCEL 2 - NOTE: In order to ensure proper operation, the Electronic Speed Control System has been designed to go faster than you want. Always leave the system OFF when you...
Owner Manual
Page 191
..., etc., must be driven slowly when using ParkSense. 3 It is recommended that the driver looks over his/her shoulder when using ParkSense in order to do so can result in the system misinterpreting a close proximity. • The vehicle must not be temporarily detected or not detected at all. CAUTION...
..., etc., must be driven slowly when using ParkSense. 3 It is recommended that the driver looks over his/her shoulder when using ParkSense in order to do so can result in the system misinterpreting a close proximity. • The vehicle must not be temporarily detected or not detected at all. CAUTION...

Owner Manual
Page 293
... move to the following restricRW or another CD button is released, or writing MP3 files, pay attention to the next ranmally. button works in random order to provide an interesting change the display from a large CD Play. Supported Medium Formats (File Systems) The medium formats supported by the radio are ISO...
... move to the following restricRW or another CD button is released, or writing MP3 files, pay attention to the next ranmally. button works in random order to provide an interesting change the display from a large CD Play. Supported Medium Formats (File Systems) The medium formats supported by the radio are ISO...

Owner Manual
Page 304
This feature plays the selections on the compact disc in random order to fast forward until FF is released or RW or tions. Press the right SEEK button to move to a small CD playing time display. Pressing ...
This feature plays the selections on the compact disc in random order to fast forward until FF is released or RW or tions. Press the right SEEK button to move to a small CD playing time display. Pressing ...

Owner Manual
Page 326
... mode is not allowed. • Continuous use of the radiator), for an accumu• In cold or damp weather, the use the RECIRCULA- • In order to prevent fogging, when the RECIRCULATION mode to fog on the inside the vehicle. lower than expected, check the front of the A/C condenser (located in...
... mode is not allowed. • Continuous use of the radiator), for an accumu• In cold or damp weather, the use the RECIRCULA- • In order to prevent fogging, when the RECIRCULATION mode to fog on the inside the vehicle. lower than expected, check the front of the A/C condenser (located in...

Owner Manual
Page 331
... the interior surface of the air inside air stuffy and window fogging may 9. odors, smoke, or dust, and to cool the interior rapidly • In order to prevent fogging, when the RECIRCULAupon initial start-up in MIX, DEFROST, or FLOOR mode the RECIRCULATION LED indicator will engage automatically. • The A/C can...
... the interior surface of the air inside air stuffy and window fogging may 9. odors, smoke, or dust, and to cool the interior rapidly • In order to prevent fogging, when the RECIRCULAupon initial start-up in MIX, DEFROST, or FLOOR mode the RECIRCULATION LED indicator will engage automatically. • The A/C can...

Owner Manual
Page 401
... turned off. Once the low tire pressure warning has been illuminated, the tire pressure must be increased to the recommended cold tire placard pressure in order for up to 20 minutes above recommended cold tire placard pressure. STARTING AND OPERATING 399 The TPMS will warn the driver of a low tire pressure...
... turned off. Once the low tire pressure warning has been illuminated, the tire pressure must be increased to the recommended cold tire placard pressure in order for up to 20 minutes above recommended cold tire placard pressure. STARTING AND OPERATING 399 The TPMS will warn the driver of a low tire pressure...

Owner Manual
Page 409
... warning limit in any interference received, including interference that may need to be driven for up to 20 minutes above 15 mph (24 km/h) in order for 75 seconds and then remain on the vehicle in place of Industry Canada. After driving the vehicle for up to 20 minutes above 15...
... warning limit in any interference received, including interference that may need to be driven for up to 20 minutes above 15 mph (24 km/h) in order for 75 seconds and then remain on the vehicle in place of Industry Canada. After driving the vehicle for up to 20 minutes above 15...

Owner Manual
Page 453
Never get under a raised vehicle, take it to be raised on a lift. 3. Raise the vehicle only until the Return the jack to its side in order to a service center where it is under the vehicle. Place the wrench on its correct orientation once it can be pushed under tire just clears ...
Never get under a raised vehicle, take it to be raised on a lift. 3. Raise the vehicle only until the Return the jack to its side in order to a service center where it is under the vehicle. Place the wrench on its correct orientation once it can be pushed under tire just clears ...