

UConnect Manual
Page 5
... video games or audio devices. Uconnect™ Phone Whether it's a trip cross-country or just to the corner allows you to audio over the wireless headphones and play your fingertips. This • Uconnect™ User's Manual consists of the follow systems: • Uconnect™ Phone equipped), listen to dial a phone number...
... video games or audio devices. Uconnect™ Phone Whether it's a trip cross-country or just to the corner allows you to audio over the wireless headphones and play your fingertips. This • Uconnect™ User's Manual consists of the follow systems: • Uconnect™ Phone equipped), listen to dial a phone number...
UConnect Manual
Page 43
... View Sirius Backseat TV™ ...61 ▫ Play Video Games ...64 ▫ Replacing The Batteries ...75 ▫ Unwired Stereo Headphone Lifetime Limited Warranty ...75 ▫ Listen To An Audio Source While a Video Is Playing ...66 Ⅵ System Information ...77 ▫ ... Controls And Indicators ...69 ▫ Remote Control Storage ...72 ▫ Locking The Remote Control ...73 ▫ Replacing The Batteries ...73 Ⅵ Headphones Operation ...73 ▫ Controls ...74 ▫ Shared Modes ...77 ▫ Information Mode Display ...78 ▫ Numeric Keypad Menu ...79 ▫ ...
... View Sirius Backseat TV™ ...61 ▫ Play Video Games ...64 ▫ Replacing The Batteries ...75 ▫ Unwired Stereo Headphone Lifetime Limited Warranty ...75 ▫ Listen To An Audio Source While a Video Is Playing ...66 Ⅵ System Information ...77 ▫ ... Controls And Indicators ...69 ▫ Remote Control Storage ...72 ▫ Locking The Remote Control ...73 ▫ Replacing The Batteries ...73 Ⅵ Headphones Operation ...73 ▫ Controls ...74 ▫ Shared Modes ...77 ▫ Information Mode Display ...78 ▫ Numeric Keypad Menu ...79 ▫ ...

UConnect Manual
Page 46
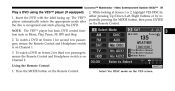
... turn on and playback begins. • For Dual Video Screen System, Channel 1 on the Remote Control and Headphones refers to Screen 2 (third row). ALL VEHICLES EXCEPT CARAVAN/TOWN & COUNTRY (IF • With the ignition switch in the ON or ACC position, EQUIPPED) turn on the radio by pressing the ...button on the Remote Control and Headphones refers to Screen 1 (second row) and Channel 2 on the Remote • The ...
... turn on and playback begins. • For Dual Video Screen System, Channel 1 on the Remote Control and Headphones refers to Screen 2 (third row). ALL VEHICLES EXCEPT CARAVAN/TOWN & COUNTRY (IF • With the ignition switch in the ON or ACC position, EQUIPPED) turn on the radio by pressing the ...button on the Remote Control and Headphones refers to Screen 1 (second row) and Channel 2 on the Remote • The ...

UConnect Manual
Page 47
... number (1-6) where the DVD is recognized and displays the menu screen or starts playing the first tract. 3. Ensure the VES™ Remote Control and the Headphone switch is on the peatedly pressing the MODE button, then press ENTER radio faceplate (Touch-Screen). Insert the DVD with the label facing up. on...
... number (1-6) where the DVD is recognized and displays the menu screen or starts playing the first tract. 3. Ensure the VES™ Remote Control and the Headphone switch is on the peatedly pressing the MODE button, then press ENTER radio faceplate (Touch-Screen). Insert the DVD with the label facing up. on...
UConnect Manual
Page 49
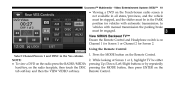
... System (VES)™ NOTE: View SIRIUS Backseat TV™ • To view a DVD on the radio press the RADIO/MEDIA Ensure the Remote Control and Headphone switch is on hard-key, on the Remote Control. not available in all states/provinces, and the vehicle must be stopped, and the shifter must...
... System (VES)™ NOTE: View SIRIUS Backseat TV™ • To view a DVD on the radio press the RADIO/MEDIA Ensure the Remote Control and Headphone switch is on hard-key, on the Remote Control. not available in all states/provinces, and the vehicle must be stopped, and the shifter must...

UConnect Manual
Page 52
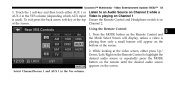
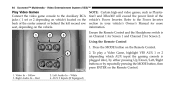
.... Right Audio In - Red 2. Left Audio In - White 4. Refer to follow the standard color coding for more information. Video In - Ensure the Remote Control and Headphone switch is on the Remote Control. 3 1. Press the MODE button on Channel 1. Yellow 3. AUX 2 Inputs (If Equipped) Video Entertainment System (VES)™ 51 Play Video...
.... Right Audio In - Red 2. Left Audio In - White 4. Refer to follow the standard color coding for more information. Video In - Ensure the Remote Control and Headphone switch is on the Remote Control. 3 1. Press the MODE button on Channel 1. Yellow 3. AUX 2 Inputs (If Equipped) Video Entertainment System (VES)™ 51 Play Video...
UConnect Manual
Page 54
... Up/ Down/Left/Right on the Remote Control to an Audio Source on Channel 2 while a Video is playing on Channel 1 Ensure the Remote Control and Headphone switch is used).
... Up/ Down/Left/Right on the Remote Control to an Audio Source on Channel 2 while a Video is playing on Channel 1 Ensure the Remote Control and Headphone switch is used).
UConnect Manual
Page 56
... the screen and the audio could be heard on Channel 1, then Channel 2 is closed Select Channel/Screen 2 and HDD in the Headphones. • Audio can be heard through the headphones even when the Video Screen is for Single Video Screen System video is playing on Channel 1, touch the 2 soft-key and •...
... the screen and the audio could be heard on Channel 1, then Channel 2 is closed Select Channel/Screen 2 and HDD in the Headphones. • Audio can be heard through the headphones even when the Video Screen is for Single Video Screen System video is playing on Channel 1, touch the 2 soft-key and •...

UConnect Manual
Page 57
... The radio peatedly pressing the MODE button, then press ENTER. To watch a DVD on Screen 2 for second row passengers, ensure the Remote Control and Headphone switch is on • The Remote Control Channel 2. • The Touch-Screen Radio (If Equipped) Using the ...Remote Control. While looking at Screen 1 or 2, highlight DISC by re2. automatically selects the appropriate mode after the disc is on Channel 1. Play a DVD using the Touch-Screen Radio 1. CARAVAN...
... The radio peatedly pressing the MODE button, then press ENTER. To watch a DVD on Screen 2 for second row passengers, ensure the Remote Control and Headphone switch is on • The Remote Control Channel 2. • The Touch-Screen Radio (If Equipped) Using the ...Remote Control. While looking at Screen 1 or 2, highlight DISC by re2. automatically selects the appropriate mode after the disc is on Channel 1. Play a DVD using the Touch-Screen Radio 1. CARAVAN...
UConnect Manual
Page 60
...DISC by either pressing Up/Down/Left/Right buttons or by re1. To watch a DVD on Screen 2 for second row passengers, ensure the Remote Control and Headphone switch is on the Remote Control. Video Entertainment System (VES)™ 59 2. Insert the DVD with the label facing up...Press the MODE button on Channel 2. the disc is on the Remote Control. To watch a DVD on Screen 1 for third row passengers, ensure the Remote Control and Headphone switch is recognized and starts playing the DVD. Uconnect™ Multimedia - Using the Remote Control 1. Play a DVD using the VES&#...
...DISC by either pressing Up/Down/Left/Right buttons or by re1. To watch a DVD on Screen 2 for second row passengers, ensure the Remote Control and Headphone switch is on the Remote Control. Video Entertainment System (VES)™ 59 2. Insert the DVD with the label facing up...Press the MODE button on Channel 2. the disc is on the Remote Control. To watch a DVD on Screen 1 for third row passengers, ensure the Remote Control and Headphone switch is recognized and starts playing the DVD. Uconnect™ Multimedia - Using the Remote Control 1. Play a DVD using the VES&#...
UConnect Manual
Page 62
View SIRIUS Backseat TV™ Ensure the Remote Control and Headphone switch is not available in all states/provinces, and the vehicle must be stopped, and the shifter must be engaged. Press the MODE button on ...
View SIRIUS Backseat TV™ Ensure the Remote Control and Headphone switch is not available in all states/provinces, and the vehicle must be stopped, and the shifter must be engaged. Press the MODE button on ...
UConnect Manual
Page 65
Ensure the Remote Control and the Headphone switch is plugged into), by either pressing Up/Down/Left/Right buttons or by repeatedly pressing the MODE button, then press ENTER on Channel 1 for ...
Ensure the Remote Control and the Headphone switch is plugged into), by either pressing Up/Down/Left/Right buttons or by repeatedly pressing the MODE button, then press ENTER on Channel 1 for ...
UConnect Manual
Page 67
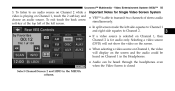
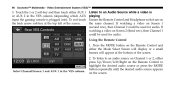
... the screen. Select Channel/Screen 1 and AUX 1 in the VES column (depending which AUX input the gaming console is playing Ensure the Remote Control and Headphone switch are on Screen 1 (second row), then Channel 2 could be used for audio. 66 Uconnect™ Multimedia - If watching a video on the same channel. Using...
... the screen. Select Channel/Screen 1 and AUX 1 in the VES column (depending which AUX input the gaming console is playing Ensure the Remote Control and Headphone switch are on Screen 1 (second row), then Channel 2 could be used for audio. 66 Uconnect™ Multimedia - If watching a video on the same channel. Using...
UConnect Manual
Page 70
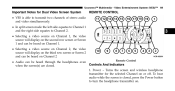
... Controls And Indicators when the screen(s) are closed , press the Power button to turn the headphone transmitter on or off. Turns the screen and wireless headphone transmitter for Dual Video Screen System • VES is closed . 1. Video Entertainment System (VES)™ 69 Important Notes for the selected Channel on . Uconnect™ ...
... Controls And Indicators when the screen(s) are closed , press the Power button to turn the headphone transmitter on or off. Turns the screen and wireless headphone transmitter for Dual Video Screen System • VES is closed . 1. Video Entertainment System (VES)™ 69 Important Notes for the selected Channel on . Uconnect™ ...

UConnect Manual
Page 72
... a DVD disc. When listening to a mode is selected and the disc is loaded in menu mode, press to the previous 14. Press to mute the headphone audio output return to access the DVD Setup menu. (see the display settings section) or the DVD Setup menu. tunable station. See the Mode Selection...
... a DVD disc. When listening to a mode is selected and the disc is loaded in menu mode, press to the previous 14. Press to mute the headphone audio output return to access the DVD Setup menu. (see the display settings section) or the DVD Setup menu. tunable station. See the Mode Selection...
UConnect Manual
Page 74
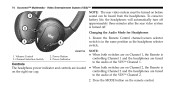
...). coverage to allow them All remote control functionality can be able to the polarity diagram shown. If no audio is turned on and in the headphones. remote, then slide the battery cover downward. 3 To replace the batteries: channel. Video Entertainment System (VES)™ 73 Locking the Remote Control...is on the back of the VES™. If audio is still not heard, check that the channel is not muted and the headphone channel selector switch is active. operation of the charged batteries are installed in the down Replacing The Batteries The remote control requires two...
...). coverage to allow them All remote control functionality can be able to the polarity diagram shown. If no audio is turned on and in the headphones. remote, then slide the battery cover downward. 3 To replace the batteries: channel. Video Entertainment System (VES)™ 73 Locking the Remote Control...is on the back of the VES™. If audio is still not heard, check that the channel is not muted and the headphone channel selector switch is active. operation of the charged batteries are installed in the down Replacing The Batteries The remote control requires two...
UConnect Manual
Page 75
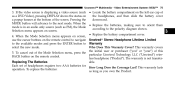
... rear video system must be turned on the remote control. Changing the Audio Mode for Headphones 1. Volume Control 3. to the audio of the VES™ Channel 2. 2. Power Indicator Controls The headphone power indicator and controls are located • When both switches are on Channel 1, the... Remote is controlling Channel 1 and the headphones are tuned on Channel 2, the Remote is controlling Channel 2 and the headphones are tuned to the audio of the VES™ Channel 1. 1. Ensure the Remote Control channel/screen...
... rear video system must be turned on the remote control. Changing the Audio Mode for Headphones 1. Volume Control 3. to the audio of the VES™ Channel 2. 2. Power Indicator Controls The headphone power indicator and controls are located • When both switches are on Channel 1, the... Remote is controlling Channel 1 and the headphones are tuned on Channel 2, the Remote is controlling Channel 2 and the headphones are tuned to the audio of the VES™ Channel 1. 1. Ensure the Remote Control channel/screen...
UConnect Manual
Page 76
...1033;) wireBACK button on screen. • Replace the battery compartment cover. 4. Pressing the downward. This warranty covers select the new mode. less headphone (ЉProductЉ). Each set of the screen. If the video screen is displaying a video source (such • Locate the battery compartment... only source (such as a DVD Video), pressing DISPLAY shows the status on the remote control to navigate Unwiredா Stereo Headphone Lifetime Limited to the available modes and press the ENTER button to the polarity diagram shown. Selection menu appears on the remote control...
...1033;) wireBACK button on screen. • Replace the battery compartment cover. 4. Pressing the downward. This warranty covers select the new mode. less headphone (ЉProductЉ). Each set of the screen. If the video screen is displaying a video source (such • Locate the battery compartment... only source (such as a DVD Video), pressing DISPLAY shows the status on the remote control to navigate Unwiredா Stereo Headphone Lifetime Limited to the available modes and press the ENTER button to the polarity diagram shown. Selection menu appears on the remote control...
UConnect Manual
Page 77
... model. If you . You may not What Will Unwired Do? This warranty does not cover any questions or comments regarding your Unwired wireless headphones, please phone 1-888-2933332 or email [email protected]. UNWIRED TECHNOLOGY IS NOT LIABLE FOR ANY INJURIES OR DAMAGES TO PERSONS OR PROPERTY RESULTING FROM...
... model. If you . You may not What Will Unwired Do? This warranty does not cover any questions or comments regarding your Unwired wireless headphones, please phone 1-888-2933332 or email [email protected]. UNWIRED TECHNOLOGY IS NOT LIABLE FOR ANY INJURIES OR DAMAGES TO PERSONS OR PROPERTY RESULTING FROM...
UConnect Manual
Page 78
...The VES™ can access the radio functions. When the radio and VES™ are in the headphones and vehicle program all radio modes (FM, AM, and SAT). 1-888-293-3332. to the headphones and the radio to output VES™ audio The VES™ has the ability to control the following... - When in shared disc or satellite video mode both the each other. Video Entertainment System (VES)™ 77 You may register your Unwired wireless headphones changed to those modes mode, but not change stations until the radio mode is heard in modes: the same (shared) mode, a VES™ icon ...
...The VES™ can access the radio functions. When the radio and VES™ are in the headphones and vehicle program all radio modes (FM, AM, and SAT). 1-888-293-3332. to the headphones and the radio to output VES™ audio The VES™ has the ability to control the following... - When in shared disc or satellite video mode both the each other. Video Entertainment System (VES)™ 77 You may register your Unwired wireless headphones changed to those modes mode, but not change stations until the radio mode is heard in modes: the same (shared) mode, a VES™ icon ...
