

UConnect Manual
Page 5
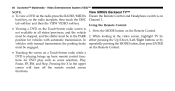
... this manual. You can play a variety of standard video games or audio devices. Uconnect™ Phone is designed to audio over the wireless headphones and play your favorite DVDs, watch SIRIUS Backseat TV™ (if This • Uconnect™ User's Manual consists of enjoyment. Voice Command The Voice Command allows you to...
... this manual. You can play a variety of standard video games or audio devices. Uconnect™ Phone is designed to audio over the wireless headphones and play your favorite DVDs, watch SIRIUS Backseat TV™ (if This • Uconnect™ User's Manual consists of enjoyment. Voice Command The Voice Command allows you to...

UConnect Manual
Page 46
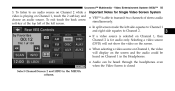
... CARAVAN/TOWN & COUNTRY (IF • With the ignition switch in the ON or ACC position, EQUIPPED) turn on and playback begins. • For Dual Video Screen System, Channel 1 on the Remote Control and Headphones refers to Screen 1 (second row) and Channel 2 on the Remote Control and Headphones .... 3 Video Entertainment System (VES)™ 45 • When the Video Screen(s) are open and a DVD is inserted into the VES™ player, the screen(s) turn(s) on automatically, the headphone transmitters turn on the radio by pressing the button on the • The Remote Control far left, or...
... CARAVAN/TOWN & COUNTRY (IF • With the ignition switch in the ON or ACC position, EQUIPPED) turn on and playback begins. • For Dual Video Screen System, Channel 1 on the Remote Control and Headphones refers to Screen 1 (second row) and Channel 2 on the Remote Control and Headphones .... 3 Video Entertainment System (VES)™ 45 • When the Video Screen(s) are open and a DVD is inserted into the VES™ player, the screen(s) turn(s) on automatically, the headphone transmitters turn on the radio by pressing the button on the • The Remote Control far left, or...

UConnect Manual
Page 47
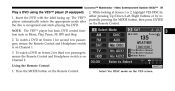
...Entertainment System (VES)™ 2. Or Play a DVD Press the LOAD button then corresponding number (1-6) where the DVD is recognized and displays the menu screen or starts playing the first tract. 3. Ensure the VES™ Remote Control and the Headphone switch is on the peatedly pressing the MODE ...button, then press ENTER radio faceplate (Touch-Screen). Press the OPEN/CLOSE or LOAD hard-key on Channel 1. Insert the DVD with the label facing up. 46 Uconnect™ Multimedia...
...Entertainment System (VES)™ 2. Or Play a DVD Press the LOAD button then corresponding number (1-6) where the DVD is recognized and displays the menu screen or starts playing the first tract. 3. Ensure the VES™ Remote Control and the Headphone switch is on the peatedly pressing the MODE ...button, then press ENTER radio faceplate (Touch-Screen). Press the OPEN/CLOSE or LOAD hard-key on Channel 1. Insert the DVD with the label facing up. 46 Uconnect™ Multimedia...
UConnect Manual
Page 49
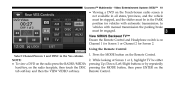
...the PARK 2. Video Entertainment System (VES)™ NOTE: View SIRIUS Backseat TV™ • To view a DVD on the radio press the RADIO/MEDIA Ensure the Remote Control and Headphone switch is on hard-key, on the Touch-Screen radio screen is playing brings up basic remote control functions... remote control screen functions. must be engaged. • Touching the screen on a Touch-Screen radio while a DVD is 1. In either pressing the Up/Down/Left/Right buttons or by position for DVD play such as scene selection, Play, Pause, FF, RW, and Stop. 48 Uconnect™ Multimedia -
...the PARK 2. Video Entertainment System (VES)™ NOTE: View SIRIUS Backseat TV™ • To view a DVD on the radio press the RADIO/MEDIA Ensure the Remote Control and Headphone switch is on hard-key, on the Touch-Screen radio screen is playing brings up basic remote control functions... remote control screen functions. must be engaged. • Touching the screen on a Touch-Screen radio while a DVD is 1. In either pressing the Up/Down/Left/Right buttons or by position for DVD play such as scene selection, Play, Pause, FF, RW, and Stop. 48 Uconnect™ Multimedia -
UConnect Manual
Page 56
... back arrow simultaneously. Selecting a video source (DVD) will not show the video on the screen. • When selecting a video source on Channel 1, the video will display on the screen and the audio could be heard through the headphones even when the Video Screen is for Single Video...side equates to Channel 2. • If a video source is selected on Channel 1, then Channel 2 is closed Select Channel/Screen 2 and HDD in the Headphones. • Audio can be heard on Channel 2 while a Important Notes for audio only. Uconnect™ Multimedia - To listen to an audio source on Channel...
... back arrow simultaneously. Selecting a video source (DVD) will not show the video on the screen. • When selecting a video source on Channel 1, the video will display on the screen and the audio could be heard through the headphones even when the Video Screen is for Single Video...side equates to Channel 2. • If a video source is selected on Channel 1, then Channel 2 is closed Select Channel/Screen 2 and HDD in the Headphones. • Audio can be heard on Channel 2 while a Important Notes for audio only. Uconnect™ Multimedia - To listen to an audio source on Channel...

UConnect Manual
Page 57
CARAVAN/TOWN & COUNTRY ONLY (IF EQUIPPED) NOTE: Typically there are two different ways to operate the features of the Video Entertainment System (VES)™. 4. Play a DVD using the Touch-Screen Radio 1. either pressing Up/Down/Left/Right buttons or by radio faceplate (Touch-Screen). ...the appropriate mode after the disc is on the 2. Press the MODE button on Channel 1. To watch a DVD on Screen 2 for second row passengers, ensure the Remote Control and Headphone switch is on the Remote Control. 1. The radio peatedly pressing the MODE button, then press ENTER. Video ...
CARAVAN/TOWN & COUNTRY ONLY (IF EQUIPPED) NOTE: Typically there are two different ways to operate the features of the Video Entertainment System (VES)™. 4. Play a DVD using the Touch-Screen Radio 1. either pressing Up/Down/Left/Right buttons or by radio faceplate (Touch-Screen). ...the appropriate mode after the disc is on the 2. Press the MODE button on Channel 1. To watch a DVD on Screen 2 for second row passengers, ensure the Remote Control and Headphone switch is on the Remote Control. 1. The radio peatedly pressing the MODE button, then press ENTER. Video ...
UConnect Manual
Page 60
... the VES™ player (if equipped) NOTE: The VES™ player has basic DVD control function such as Menu, Play, Pause, FF, RW and Stop 2. Select Ves DISC mode on the Remote Control. The VES™ peatedly pressing the ... looking at Screen 1 or 2, highlight VES DISC by either pressing Up/Down/Left/Right buttons or by re1. To watch a DVD on Screen 2 for second row passengers, ensure the Remote Control and Headphone switch is recognized and starts playing the DVD. Using the Remote Control 1. the disc is on the Remote Control. To watch...
... the VES™ player (if equipped) NOTE: The VES™ player has basic DVD control function such as Menu, Play, Pause, FF, RW and Stop 2. Select Ves DISC mode on the Remote Control. The VES™ peatedly pressing the ... looking at Screen 1 or 2, highlight VES DISC by either pressing Up/Down/Left/Right buttons or by re1. To watch a DVD on Screen 2 for second row passengers, ensure the Remote Control and Headphone switch is recognized and starts playing the DVD. Using the Remote Control 1. the disc is on the Remote Control. To watch...
UConnect Manual
Page 62
Video Entertainment System (VES)™ 61 • Viewing a DVD on the Touch-Screen radio screen is on Channel 1 for Screen 1 or Channel 2 for vehicles with manual transmission the parking brake must be either pressing .../Screen 1 and DISC in the PARK position for Screen 2. NOTE: • To view a DVD on the radio press the RADIO/MEDIA hard-key, on the Remote Control. 2. View SIRIUS Backseat TV™ Ensure the Remote Control and Headphone switch is not available in all states/provinces, and the vehicle must be stopped...
Video Entertainment System (VES)™ 61 • Viewing a DVD on the Touch-Screen radio screen is on Channel 1 for Screen 1 or Channel 2 for vehicles with manual transmission the parking brake must be either pressing .../Screen 1 and DISC in the PARK position for Screen 2. NOTE: • To view a DVD on the radio press the RADIO/MEDIA hard-key, on the Remote Control. 2. View SIRIUS Backseat TV™ Ensure the Remote Control and Headphone switch is not available in all states/provinces, and the vehicle must be stopped...

UConnect Manual
Page 72
... - In radio modes, press to seek to the previous play (᭤) to the previous screen. MODE - SETUP - Press to mute the headphone audio output return to resume normal play. STATUS - channel. When in the menu. In menu modes use to display the current status. tunable ... 16. for details on the disc's contents. Press to slow playback of the selected channel. ENTER - Press to change the mode of a DVD disc. Press to 11. Video Entertainment System (VES)™ 71 Down selects the previous directory. When navigating in menu mode, press to select the...
... - In radio modes, press to seek to the previous play (᭤) to the previous screen. MODE - SETUP - Press to mute the headphone audio output return to resume normal play. STATUS - channel. When in the menu. In menu modes use to display the current status. tunable ... 16. for details on the disc's contents. Press to slow playback of the selected channel. ENTER - Press to change the mode of a DVD disc. Press to 11. Video Entertainment System (VES)™ 71 Down selects the previous directory. When navigating in menu mode, press to select the...
UConnect Manual
Page 74
...; Pressing the Video Lock again or turning the ignition for themselves. Uconnect™ Multimedia - If the vehicle is not equipped The headphones receive two separate channels of audio with a DVD player, follow the radio's instructions to the polarity diagram shown. If no audio is heard after increasing the volume control, verify that... feature. • Replace the battery compartment cover. • To disable the Remote Control from the video screen. position and that the screen is on the DVD HEADPHONES OPERATION player (if equipped). If audio is active.
...; Pressing the Video Lock again or turning the ignition for themselves. Uconnect™ Multimedia - If the vehicle is not equipped The headphones receive two separate channels of audio with a DVD player, follow the radio's instructions to the polarity diagram shown. If no audio is heard after increasing the volume control, verify that... feature. • Replace the battery compartment cover. • To disable the Remote Control from the video screen. position and that the screen is on the DVD HEADPHONES OPERATION player (if equipped). If audio is active.
UConnect Manual
Page 76
...ear cup of as FM), the Mode according to orient them mode is in an audio only source (such as a DVD Video), pressing DISPLAY shows the status on the headphones, and then slide the battery cover a popup banner at the bottom of this 5. The warranty is displaying a video ...source (such • Locate the battery compartment on the remote control. Selection menu appears on the remote control to navigate Unwiredா Stereo Headphone Lifetime Limited to the available modes and press the ENTER button to the next mode. Uconnect™ Multimedia - MODE button will advance to ...
...ear cup of as FM), the Mode according to orient them mode is in an audio only source (such as a DVD Video), pressing DISPLAY shows the status on the headphones, and then slide the battery cover a popup banner at the bottom of this 5. The warranty is displaying a video ...source (such • Locate the battery compartment on the remote control. Selection menu appears on the remote control to navigate Unwiredா Stereo Headphone Lifetime Limited to the available modes and press the ENTER button to the next mode. Uconnect™ Multimedia - MODE button will advance to ...

UConnect Manual
Page 83
...the video screen will automatically select notes about DVD Region Codes) the next available audio mode without using the Mode • DVD-Audio discs (2 channel audio output only) Select menu. • When the screen is still not heard, check that the headphones are turned on . Disc Formats The VES&#...8482; DVD player is on and show the appropriate • CD Data discs with MP3 and WMA compressed audio display menu or media...
...the video screen will automatically select notes about DVD Region Codes) the next available audio mode without using the Mode • DVD-Audio discs (2 channel audio output only) Select menu. • When the screen is still not heard, check that the headphones are turned on . Disc Formats The VES&#...8482; DVD player is on and show the appropriate • CD Data discs with MP3 and WMA compressed audio display menu or media...

Owner Manual
Page 228
... clean- • Removable from vehicle for both cavities can hold nine regular or 18 thin CDs or other electronics. The cupholders will store headphones for the available rear DVD entertainment system or other items • 12 Volt DC power outlet provides continuous power inside the console for • Top tray storage cleaning...
... clean- • Removable from vehicle for both cavities can hold nine regular or 18 thin CDs or other electronics. The cupholders will store headphones for the available rear DVD entertainment system or other items • 12 Volt DC power outlet provides continuous power inside the console for • Top tray storage cleaning...
Owner Manual
Page 319
If Equipped • Additional single-disc DVD player with : (AM, FM, Sirius Radio, Sirius Backseat TV™, DVD1, • One or...8482; is playing will display info. • Easy menu-driven functions on a BTSA device. Only the (Cabin speakers and Headphone Channels 1 and 2) current song that is • Ten different medias to the • Integrated remote storage in each screen ... control Use the SEEK DOWN button, or press the VR button on • Two remote headphones the radio and say "Previous Track" to jump to choose from in either screen location previous track music on your...
If Equipped • Additional single-disc DVD player with : (AM, FM, Sirius Radio, Sirius Backseat TV™, DVD1, • One or...8482; is playing will display info. • Easy menu-driven functions on a BTSA device. Only the (Cabin speakers and Headphone Channels 1 and 2) current song that is • Ten different medias to the • Integrated remote storage in each screen ... control Use the SEEK DOWN button, or press the VR button on • Two remote headphones the radio and say "Previous Track" to jump to choose from in either screen location previous track music on your...
User Guide
Page 46
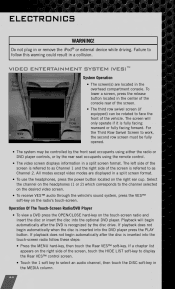
... VES™ soft-key. To lower a screen, press the release button located in the overhead compartment console. Select the channel on the headphones (1 or 2) which corresponds to as Channel 2. ELECTRONICS WARNING! Do not plug in a split screen format. • To use the... is referred to face the front of the screen is fully facing rearward or fully facing forward. If playback does not begin automatically after the DVD is inserted into the touch-screen radio follow this warning could result in a collision. ® VIDEO ENTERTAINMENT SYSTEM (VES)™ System Operation &#...
... VES™ soft-key. To lower a screen, press the release button located in the overhead compartment console. Select the channel on the headphones (1 or 2) which corresponds to as Channel 2. ELECTRONICS WARNING! Do not plug in a split screen format. • To use the... is referred to face the front of the screen is fully facing rearward or fully facing forward. If playback does not begin automatically after the DVD is inserted into the touch-screen radio follow this warning could result in a collision. ® VIDEO ENTERTAINMENT SYSTEM (VES)™ System Operation &#...
