

UConnect Manual
Page 5
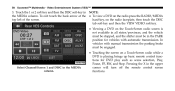
...; (if Uconnect™ Phone Whether it's a trip cross-country or just to the corner allows you to use the system in a safe Video Entertainment System (VES)™ is a voice-activated, hands-free, in this manual carefully before • Uconnect™ Multimedia - It tem (...and play your vehicle provide access to and effective manner. give your fingertips. This • Uconnect™ User's Manual consists of standard video games or audio devices. Ensure that all persons read this manual. Uconnect™ Phone is designed to information, entertainment and technology. "...
...; (if Uconnect™ Phone Whether it's a trip cross-country or just to the corner allows you to use the system in a safe Video Entertainment System (VES)™ is a voice-activated, hands-free, in this manual carefully before • Uconnect™ Multimedia - It tem (...and play your vehicle provide access to and effective manner. give your fingertips. This • Uconnect™ User's Manual consists of standard video games or audio devices. Ensure that all persons read this manual. Uconnect™ Phone is designed to information, entertainment and technology. "...

UConnect Manual
Page 42
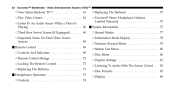
... ...56 ▫ View Sirius Backseat TV™ ...48 ▫ Play a DVD Using The VES™ Player ▫ Play Video Games ...51 (If Equipped) ...59 Video Entertainment System (VES)™ CONTENTS Ⅵ Uconnect™ Multimedia - Video Entertainment System (VES)™...44 ▫ Getting Started ...44 ▫ Listen To An Audio Source On Channel 2 While...
... ...56 ▫ View Sirius Backseat TV™ ...48 ▫ Play a DVD Using The VES™ Player ▫ Play Video Games ...51 (If Equipped) ...59 Video Entertainment System (VES)™ CONTENTS Ⅵ Uconnect™ Multimedia - Video Entertainment System (VES)™...44 ▫ Getting Started ...44 ▫ Listen To An Audio Source On Channel 2 While...
UConnect Manual
Page 43
...)™ ▫ View Sirius Backseat TV™ ...61 ▫ Play Video Games ...64 ▫ Replacing The Batteries ...75 ▫ Unwired Stereo Headphone Lifetime Limited Warranty ...75 ▫ Listen To An Audio Source While a Video Is Playing ...66 Ⅵ System Information ...77 ▫ Third Row Swivel... Screen (If Equipped) ...68 ▫ Important Notes For Dual Video Screen System ...69 Ⅵ Remote Control ...69 ▫ Controls And Indicators ...69 ▫ Remote Control Storage ...72 ▫ Locking...
...)™ ▫ View Sirius Backseat TV™ ...61 ▫ Play Video Games ...64 ▫ Replacing The Batteries ...75 ▫ Unwired Stereo Headphone Lifetime Limited Warranty ...75 ▫ Listen To An Audio Source While a Video Is Playing ...66 Ⅵ System Information ...77 ▫ Third Row Swivel... Screen (If Equipped) ...68 ▫ Important Notes For Dual Video Screen System ...69 Ⅵ Remote Control ...69 ▫ Controls And Indicators ...69 ▫ Remote Control Storage ...72 ▫ Locking...

UConnect Manual
Page 45
... System (VES)™ Uconnect™ Multimedia - Video Entertainment System (VES)™ Getting Started • Screen(s) located in the overhead console : Unfold the overhead LCD screen(s) by pushing the button in the center ... on the rear of the overhead console behind the screen(s). On Caravan and Town and Country vehicles with Dual Screen Systems refer to the Dual Video Screen section for more information. • Screen located in the center of the center armrest and pull the DVD screen up to its upright position...
... System (VES)™ Uconnect™ Multimedia - Video Entertainment System (VES)™ Getting Started • Screen(s) located in the overhead console : Unfold the overhead LCD screen(s) by pushing the button in the center ... on the rear of the overhead console behind the screen(s). On Caravan and Town and Country vehicles with Dual Screen Systems refer to the Dual Video Screen section for more information. • Screen located in the center of the center armrest and pull the DVD screen up to its upright position...

UConnect Manual
Page 46
...(s) turn(s) on automatically, the headphone transmitters turn on the radio by pressing the button on the Remote Control and Headphones refers to the Dual Video Screen section for more information. ALL VEHICLES EXCEPT CARAVAN/TOWN & COUNTRY (IF • With the ignition switch in the ON or ACC position..., EQUIPPED) turn on and playback begins. • For Dual Video Screen System, Channel 1 on the Remote Control and Headphones refers to Screen 1 (second row) and Channel 2 on the Remote • The Touch-Screen...
...(s) turn(s) on automatically, the headphone transmitters turn on the radio by pressing the button on the Remote Control and Headphones refers to the Dual Video Screen section for more information. ALL VEHICLES EXCEPT CARAVAN/TOWN & COUNTRY (IF • With the ignition switch in the ON or ACC position..., EQUIPPED) turn on and playback begins. • For Dual Video Screen System, Channel 1 on the Remote Control and Headphones refers to Screen 1 (second row) and Channel 2 on the Remote • The Touch-Screen...

UConnect Manual
Page 47
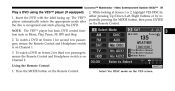
... Ensure the VES™ Remote Control and the Headphone switch is on the peatedly pressing the MODE button, then press ENTER radio faceplate (Touch-Screen). Video Entertainment System (VES)™ 2. Or Play a DVD Press the LOAD button then corresponding number (1-6) where the DVD is recognized and displays the menu ...or starts playing the first tract. 3. NOTE: The VES™ system will retain the last setting when turned off. While looking at the video screen, highlight DISC by either pressing Up/Down/Left/Right buttons or by re1. Insert the DVD with the label facing up. Using the Remote...
... Ensure the VES™ Remote Control and the Headphone switch is on the peatedly pressing the MODE button, then press ENTER radio faceplate (Touch-Screen). Video Entertainment System (VES)™ 2. Or Play a DVD Press the LOAD button then corresponding number (1-6) where the DVD is recognized and displays the menu ...or starts playing the first tract. 3. NOTE: The VES™ system will retain the last setting when turned off. While looking at the video screen, highlight DISC by either pressing Up/Down/Left/Right buttons or by re1. Insert the DVD with the label facing up. Using the Remote...

UConnect Manual
Page 48
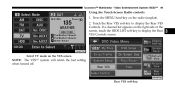
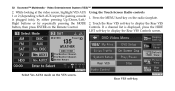
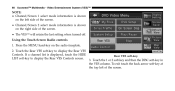
Press the MENU hard-key on the right side of the screen. 3 Select Channel/Screen 1 and DISC in the MEDIA column. Touch the Rear VES soft-key to display the Rear VES Controls screen. 3. If a channel list appears on the radio faceplate. 2. Touch the 1 soft-key and then the DISC soft-key in the MEDIA column. Video Entertainment System (VES)™ 47 Using the Touch-Screen Radio controls 1. To exit touch the back arrow soft-key at the top left of the screen, touch the HIDE LIST soft-key to display the Rear VES Controls. Uconnect™ Multimedia - Rear VES soft-key.
Press the MENU hard-key on the right side of the screen. 3 Select Channel/Screen 1 and DISC in the MEDIA column. Touch the Rear VES soft-key to display the Rear VES Controls screen. 3. If a channel list appears on the radio faceplate. 2. Touch the 1 soft-key and then the DISC soft-key in the MEDIA column. Video Entertainment System (VES)™ 47 Using the Touch-Screen Radio controls 1. To exit touch the back arrow soft-key at the top left of the screen, touch the HIDE LIST soft-key to display the Rear VES Controls. Uconnect™ Multimedia - Rear VES soft-key.
UConnect Manual
Page 49
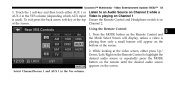
Using the Remote Control • Viewing a DVD on the Remote Control. While looking at the video screen, highlight TV by vehicles with automatic transmission. Press the MODE button on the Touch-Screen radio screen ...must be engaged. • Touching the screen on a Touch-Screen radio while a DVD is on hard-key, on the Remote Control. Video Entertainment System (VES)™ NOTE: View SIRIUS Backseat TV™ • To view a DVD on the radio press the RADIO/MEDIA ...then touch the DISC Channel 1. 48 Uconnect™ Multimedia - tab soft-key and then the VIEW VIDEO soft-key.
Using the Remote Control • Viewing a DVD on the Remote Control. While looking at the video screen, highlight TV by vehicles with automatic transmission. Press the MODE button on the Touch-Screen radio screen ...must be engaged. • Touching the screen on a Touch-Screen radio while a DVD is on hard-key, on the Remote Control. Video Entertainment System (VES)™ NOTE: View SIRIUS Backseat TV™ • To view a DVD on the radio press the RADIO/MEDIA ...then touch the DISC Channel 1. 48 Uconnect™ Multimedia - tab soft-key and then the VIEW VIDEO soft-key.
UConnect Manual
Page 50
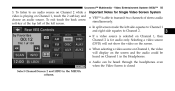
Touch the Rear VES soft-key to display the Rear VES Controls screen 3 Select TV mode on the VES screen NOTE: The VES™ system will retain the last setting when turned off. Uconnect™ Multimedia - Press the MENU hard-key on the right side of the screen, touch the HIDE LIST soft-key to display the Rear VES Controls. Video Entertainment System (VES)™ 49 Using the Touch-Screen Radio controls 1. If a channel list appears on the radio faceplate. 2. Rear VES soft-key.
Touch the Rear VES soft-key to display the Rear VES Controls screen 3 Select TV mode on the VES screen NOTE: The VES™ system will retain the last setting when turned off. Uconnect™ Multimedia - Press the MENU hard-key on the right side of the screen, touch the HIDE LIST soft-key to display the Rear VES Controls. Video Entertainment System (VES)™ 49 Using the Touch-Screen Radio controls 1. If a channel list appears on the radio faceplate. 2. Rear VES soft-key.
UConnect Manual
Page 51
... Alaska. Touch the 1 soft-key and then the TV soft-key in the RADIO column. touch the TV tab soft-key and then the VIEW VIDEO soft-key. • Viewing a SIRIUS Backseat TV ™ on the radio faceplate, then the top left of the screen. Select Channel/Screen 1 and TV ...in the NOTE: RADIO column. Video Entertainment System (VES)™ 3. In vehicles with manual transmission the parking brake must be engaged. • SIRIUS Backseat TV™ is not available in the...
... Alaska. Touch the 1 soft-key and then the TV soft-key in the RADIO column. touch the TV tab soft-key and then the VIEW VIDEO soft-key. • Viewing a SIRIUS Backseat TV ™ on the radio faceplate, then the top left of the screen. Select Channel/Screen 1 and TV ...in the NOTE: RADIO column. Video Entertainment System (VES)™ 3. In vehicles with manual transmission the parking brake must be engaged. • SIRIUS Backseat TV™ is not available in the...

UConnect Manual
Page 52
... is on left side behind the second row seat. Yellow 3. AUX 2 Inputs (If Equipped) Uconnect™ Multimedia - Video Entertainment System (VES)™ 51 Play Video Games Connect the video game console to the Auxiliary RCA input jacks (1 set or 2 depending on vehicle) located on the back of the vehicle... input, be sure to the Power Inverter section in your vehicle's Owner's Manual for the VES™ jacks: NOTE: Certain high-end video games, such as Playstation3 and XBox360 will exceed the power limit of the center console or on Channel 1. Refer to follow the standard color...
... is on left side behind the second row seat. Yellow 3. AUX 2 Inputs (If Equipped) Uconnect™ Multimedia - Video Entertainment System (VES)™ 51 Play Video Games Connect the video game console to the Auxiliary RCA input jacks (1 set or 2 depending on vehicle) located on the back of the vehicle... input, be sure to the Power Inverter section in your vehicle's Owner's Manual for the VES™ jacks: NOTE: Certain high-end video games, such as Playstation3 and XBox360 will exceed the power limit of the center console or on Channel 1. Refer to follow the standard color...
UConnect Manual
Page 53
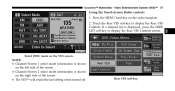
...display the Rear VES Controls screen. Using the Touch-Screen Radio controls 1. Press the MENU hard-key on the VES screen. Rear VES soft-key. Video Entertainment System (VES)™ 2. If a channel list is plugged into), by either pressing Up/Down/Left/ Right buttons or by repeatedly pressing the ...MODE button, then press ENTER on the Remote Control. While looking at the video screen, highlight VES AUX 1 or 2 (depending which AUX input the gaming console is displayed, press the HIDE LIST soft-key to display the...
...display the Rear VES Controls screen. Using the Touch-Screen Radio controls 1. Press the MENU hard-key on the VES screen. Rear VES soft-key. Video Entertainment System (VES)™ 2. If a channel list is plugged into), by either pressing Up/Down/Left/ Right buttons or by repeatedly pressing the ...MODE button, then press ENTER on the Remote Control. While looking at the video screen, highlight VES AUX 1 or 2 (depending which AUX input the gaming console is displayed, press the HIDE LIST soft-key to display the...
UConnect Manual
Page 54
...remote until the desired audio source appears on Channel 2. Press the MODE button on the Remote Control and the Mode Select Screen will display, unless a video is used). Touch the 1 soft-key and then touch either press Up/ Down/Left/Right on the Remote Control to an Audio Source on Channel... 2 while a Video is playing on Channel 1 Ensure the Remote Control and Headphone switch is on the screen. 3 Select Channel/Screen 1 and AUX 1 in the VES column (...
...remote until the desired audio source appears on Channel 2. Press the MODE button on the Remote Control and the Mode Select Screen will display, unless a video is used). Touch the 1 soft-key and then touch either press Up/ Down/Left/Right on the Remote Control to an Audio Source on Channel... 2 while a Video is playing on Channel 1 Ensure the Remote Control and Headphone switch is on the screen. 3 Select Channel/Screen 1 and AUX 1 in the VES column (...

UConnect Manual
Page 55
Select FM mode on the radio faceplate. Press the MENU hard-key on the VES screen Using the Touch-Screen Radio controls 1. Video Entertainment System (VES)™ 2. If a channel list is displayed, press the HIDE LIST soft-key to display the Rear VES Controls. Rear VES soft-key. Touch the Rear VES soft-key to display the Rear VES Controls screen. 54 Uconnect™ Multimedia -
Select FM mode on the radio faceplate. Press the MENU hard-key on the VES screen Using the Touch-Screen Radio controls 1. Video Entertainment System (VES)™ 2. If a channel list is displayed, press the HIDE LIST soft-key to display the Rear VES Controls. Rear VES soft-key. Touch the Rear VES soft-key to display the Rear VES Controls screen. 54 Uconnect™ Multimedia -
UConnect Manual
Page 56
...the top left of stereo audio choose an audio source. Video Entertainment System (VES)™ 55 3. Selecting a video source (DVD) will not show the video on the screen. • When selecting a video source on Channel 1, the video will display on the screen and the audio could be ...equates to an audio source on Channel 2 while a Important Notes for Single Video Screen System video is playing on Channel 1 in the MEDIA column. 3 Uconnect™ Multimedia - To listen to Channel 2. • If a video source is selected on Channel 1, then Channel 2 is closed Select Channel/Screen...
...the top left of stereo audio choose an audio source. Video Entertainment System (VES)™ 55 3. Selecting a video source (DVD) will not show the video on the screen. • When selecting a video source on Channel 1, the video will display on the screen and the audio could be ...equates to an audio source on Channel 2 while a Important Notes for Single Video Screen System video is playing on Channel 1 in the MEDIA column. 3 Uconnect™ Multimedia - To listen to Channel 2. • If a video source is selected on Channel 1, then Channel 2 is closed Select Channel/Screen...

UConnect Manual
Page 57
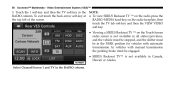
... or by radio faceplate (Touch-Screen). CARAVAN/TOWN & COUNTRY ONLY (IF EQUIPPED) NOTE: Typically there are two different ways to operate the features of the Video Entertainment System (VES)™. 4. 56 Uconnect™ Multimedia - To watch a DVD on Screen 2 for second row passengers, ensure the Remote Control and Headphone switch is... Control Channel 2. • The Touch-Screen Radio (If Equipped) Using the Remote Control. Press the OPEN/CLOSE or LOAD hard-key on the Remote Control. 1. Video Entertainment System (VES)™ DUAL...
... or by radio faceplate (Touch-Screen). CARAVAN/TOWN & COUNTRY ONLY (IF EQUIPPED) NOTE: Typically there are two different ways to operate the features of the Video Entertainment System (VES)™. 4. 56 Uconnect™ Multimedia - To watch a DVD on Screen 2 for second row passengers, ensure the Remote Control and Headphone switch is... Control Channel 2. • The Touch-Screen Radio (If Equipped) Using the Remote Control. Press the OPEN/CLOSE or LOAD hard-key on the Remote Control. 1. Video Entertainment System (VES)™ DUAL...
UConnect Manual
Page 58
...; Multimedia - Press the MENU hard-key on the right side of the screen. • The VES™ will retain the last setting when turned off. Video Entertainment System (VES)™ 57 Using the Touch-Screen Radio controls 1.
...; Multimedia - Press the MENU hard-key on the right side of the screen. • The VES™ will retain the last setting when turned off. Video Entertainment System (VES)™ 57 Using the Touch-Screen Radio controls 1.
UConnect Manual
Page 59
... (VES)™ 3. tab soft-key and then the VIEW VIDEO soft-key. • Viewing a DVD on the Touch-Screen radio screen is playing brings up basic remote control functions for DVD play such as scene ...
... (VES)™ 3. tab soft-key and then the VIEW VIDEO soft-key. • Viewing a DVD on the Touch-Screen radio screen is playing brings up basic remote control functions for DVD play such as scene ...
UConnect Manual
Page 60
... button on Channel 2. While looking at Screen 1 or 2, highlight VES DISC by either pressing Up/Down/Left/Right buttons or by re1. Uconnect™ Multimedia - Video Entertainment System (VES)™ 59 2. Using the Remote Control 1.
... button on Channel 2. While looking at Screen 1 or 2, highlight VES DISC by either pressing Up/Down/Left/Right buttons or by re1. Uconnect™ Multimedia - Video Entertainment System (VES)™ 59 2. Using the Remote Control 1.
UConnect Manual
Page 61
Rear VES soft-key. 3. Touch the 1 or 2 soft-key and then the DISC soft-key in the VES column. Video Entertainment System (VES)™ NOTE: • Channel/Screen 1 select mode information is shown on the left of the screen. • The VES™ will retain ...
Rear VES soft-key. 3. Touch the 1 or 2 soft-key and then the DISC soft-key in the VES column. Video Entertainment System (VES)™ NOTE: • Channel/Screen 1 select mode information is shown on the left of the screen. • The VES™ will retain ...
