
Owner Manual
Page 94
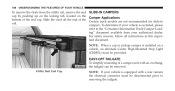
If Equipped ...179 ▫ Bed Rail Tie-Down System ...186 Ⅵ Slide-In Campers ...188 ▫ Camper Applications ...188 Ⅵ Easy-Off Tailgate ...188 ▫ Disconnecting The Rear Camera - If Equipped ...191 If Equipped ...189 ▫ Removing The Tailgate ...190 ▫ Locking Tailgate - 92 UNDERSTANDING THE FEATURES OF YOUR VEHICLE Ⅵ Fold Flat Load Floor - If Equipped ...174 ▫ Rambox Integrated Box Side Storage Bins . . 174 ▫ Rambox Safety Warning ...178 ▫ Bed Extender - If Equipped ...172 Ⅵ Rambox -
If Equipped ...179 ▫ Bed Rail Tie-Down System ...186 Ⅵ Slide-In Campers ...188 ▫ Camper Applications ...188 Ⅵ Easy-Off Tailgate ...188 ▫ Disconnecting The Rear Camera - If Equipped ...191 If Equipped ...189 ▫ Removing The Tailgate ...190 ▫ Locking Tailgate - 92 UNDERSTANDING THE FEATURES OF YOUR VEHICLE Ⅵ Fold Flat Load Floor - If Equipped ...174 ▫ Rambox Integrated Box Side Storage Bins . . 174 ▫ Rambox Safety Warning ...178 ▫ Bed Extender - If Equipped ...172 Ⅵ Rambox -
Owner Manual
Page 142
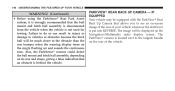
... REVERSE. Failure to do so can result in injury or damage to vehicles or obstacles because the hitch ball will be much closer to the tailgate handle on the single flashing arc and sounds the continuous tone. PARKVIEWா REAR BACK UP CAMERA - The ParkView camera is located next to...
... REVERSE. Failure to do so can result in injury or damage to vehicles or obstacles because the hitch ball will be much closer to the tailgate handle on the single flashing arc and sounds the continuous tone. PARKVIEWா REAR BACK UP CAMERA - The ParkView camera is located next to...
Owner Manual
Page 186
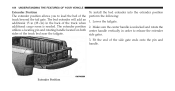
... the end of the truck bed near the tailgate. The bed extender will add an additional 15 in (38 cm) in order to load the bed of the truck when additional cargo room is ...
... the end of the truck bed near the tailgate. The bed extender will add an additional 15 in (38 cm) in order to load the bed of the truck when additional cargo room is ...
Owner Manual
Page 188
... utilizing cargo tie downs. • Extender should not be used to the cleat or cleat rail may occur. There are two adjustable cleats on the tailgate. • The bed extender is not intended for off road use. • When not in use all handles are to be used as cargo tie...; When vehicle is in motion do not exceed 150 lbs (68 kg) load on each cleat should be in stowed or divider position with the tailgate closed. • When in use , the extender/divider should not exceed 60 degrees above horizontal, or damage to assist in the locked position. To reduce...
... utilizing cargo tie downs. • Extender should not be used to the cleat or cleat rail may occur. There are two adjustable cleats on the tailgate. • The bed extender is not intended for off road use. • When not in use all handles are to be used as cargo tie...; When vehicle is in motion do not exceed 150 lbs (68 kg) load on each cleat should be in stowed or divider position with the tailgate closed. • When in use , the extender/divider should not exceed 60 degrees above horizontal, or damage to assist in the locked position. To reduce...
Owner Manual
Page 190
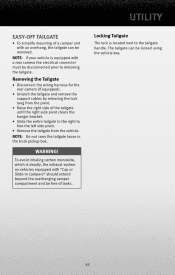
... the cleat off the end of the end cap. campers. To determine if your vehicle is excluded, please refer to removing the tailgate. Utility Rail End Cap NOTE: If your vehicle is installed on the Camper Applications bottom of the Certain truck models are not recommended... for slide-in this important document. EASY-OFF TAILGATE To simplify mounting of a camper unit with a rear camera the electrical connector must be disconnected prior to the "Consumer Information Truck-Camper Loading...
... the cleat off the end of the end cap. campers. To determine if your vehicle is excluded, please refer to removing the tailgate. Utility Rail End Cap NOTE: If your vehicle is installed on the Camper Applications bottom of the Certain truck models are not recommended... for slide-in this important document. EASY-OFF TAILGATE To simplify mounting of a camper unit with a rear camera the electrical connector must be disconnected prior to the "Consumer Information Truck-Camper Loading...
Owner Manual
Page 191
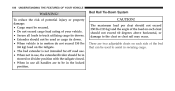
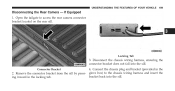
If Equipped 1. Connect the chassis plug and bracket (provided in the locking tab. Open the tailgate to the chassis wiring harness and insert the bracket back into the sill. 4. Disconnect the chassis wiring harness, ensuring the connector bracket does not fall into the sill. glove box) to access the rear camera connector bracket located on the rear sill. 3 Locking Tab 3. ing inward in the Connector Bracket 2. UNDERSTANDING THE FEATURES OF YOUR VEHICLE 189 Disconnecting the Rear Camera - Remove the connector bracket from the sill by press-
If Equipped 1. Connect the chassis plug and bracket (provided in the locking tab. Open the tailgate to the chassis wiring harness and insert the bracket back into the sill. 4. Disconnect the chassis wiring harness, ensuring the connector bracket does not fall into the sill. glove box) to access the rear camera connector bracket located on the rear sill. 3 Locking Tab 3. ing inward in the Connector Bracket 2. UNDERSTANDING THE FEATURES OF YOUR VEHICLE 189 Disconnecting the Rear Camera - Remove the connector bracket from the sill by press-

Owner Manual
Page 192
... free the left side pivot. 5. Slide the entire tailgate to the right to "Disconnecting the Rear Camera - Connect the tailgate plug (provided in this section. Remove the tailgate from the pivot. 4. Locking Tang 2. Removing the Tailgate 1. Unlatch the tailgate and remove the support cables by 3. Tape the tailgate harness and bracket against the forward-facing surface...
... free the left side pivot. 5. Slide the entire tailgate to the right to "Disconnecting the Rear Camera - Connect the tailgate plug (provided in this section. Remove the tailgate from the pivot. 4. Locking Tang 2. Removing the Tailgate 1. Unlatch the tailgate and remove the support cables by 3. Tape the tailgate harness and bracket against the forward-facing surface...
Owner Manual
Page 193
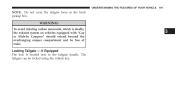
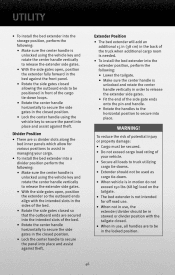
Locking Tailgate - To avoid inhaling carbon monoxide, which is located next to the tailgate handle. WARNING! The tailgate can be free of leaks. If Equipped The lock is deadly, the exhaust system on vehicles equipped with "Cap or Slide-In Campers" should extend beyond the overhanging camper compartment and be locked using the vehicle key. 3 UNDERSTANDING THE FEATURES OF YOUR VEHICLE 191 NOTE: Do not carry the tailgate loose in the truck pickup box.
Locking Tailgate - To avoid inhaling carbon monoxide, which is located next to the tailgate handle. WARNING! The tailgate can be free of leaks. If Equipped The lock is deadly, the exhaust system on vehicles equipped with "Cap or Slide-In Campers" should extend beyond the overhanging camper compartment and be locked using the vehicle key. 3 UNDERSTANDING THE FEATURES OF YOUR VEHICLE 191 NOTE: Do not carry the tailgate loose in the truck pickup box.
Owner Manual
Page 484
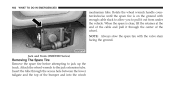
... the winch NOTE: Always stow the spare tire with enough cable slack to allow you to pull it through the access hole between the lower tailgate and the top of the wheel. 482 WHAT TO DO IN EMERGENCIES mechanism tube. Attach the wheel wrench to jack up the truck. When the...
... the winch NOTE: Always stow the spare tire with enough cable slack to allow you to pull it through the access hole between the lower tailgate and the top of the wheel. 482 WHAT TO DO IN EMERGENCIES mechanism tube. Attach the wheel wrench to jack up the truck. When the...
Owner Manual
Page 523
... by authorized dealers or other underhood services, the hood (Four-Wheel Drive) Models (Ram Trucks Only) latch, release mechanism and safety catch should be lubricated twice a year, preferably in the Fall and Spring. MAINTAINING YOUR VEHICLE 521 tailgate, sliding doors and hood hinges, should be performed by the Environmental Protection Agency (EPA...
... by authorized dealers or other underhood services, the hood (Four-Wheel Drive) Models (Ram Trucks Only) latch, release mechanism and safety catch should be lubricated twice a year, preferably in the Fall and Spring. MAINTAINING YOUR VEHICLE 521 tailgate, sliding doors and hood hinges, should be performed by the Environmental Protection Agency (EPA...

Owner Manual
Page 611
INDEX 609 Sway Control, Trailer ...397 Synthetic Engine Oil ...517 System, Remote Starting ...25 Tachometer ...202 Tailgate ...188 Temperature Control, Automatic (ATC) ...285 Temperature Gauge, Engine Coolant ...202 Tether Anchor, Child Restraint ...72,75 Tilt Steering Column ...123 Tip Start ...299 Tire ...
INDEX 609 Sway Control, Trailer ...397 Synthetic Engine Oil ...517 System, Remote Starting ...25 Tachometer ...202 Tailgate ...188 Temperature Control, Automatic (ATC) ...285 Temperature Gauge, Engine Coolant ...202 Tether Anchor, Child Restraint ...72,75 Tilt Steering Column ...123 Tip Start ...299 Tire ...
User Guide
Page 3
... INTRODUCTION/WELCOME WELCOME FROM CHRYSLER GROUP LLC . 2 OFF-ROAD CAPABILITIES FOUR-WHEEL DRIVE OPERATION ...42 CONTROLS AT A GLANCE DRIVER COCKPIT ...4 INSTRUMENT CLUSTER ...6 UTILITY EASY-OFF TAILGATE ...RAMBOX® ...TRAILER TOWING WEIGHTS (MAXIMUM TRAILER WEIGHT RATINGS) ...RECREATIONAL TOWING (BEHIND MOTORHOME, ETC.) ...BRAKE/TRANSMISSION INTERLOCK MANUAL OVERRIDE ...43 . .44 . .47 . .47 . 49 GETTING...
... INTRODUCTION/WELCOME WELCOME FROM CHRYSLER GROUP LLC . 2 OFF-ROAD CAPABILITIES FOUR-WHEEL DRIVE OPERATION ...42 CONTROLS AT A GLANCE DRIVER COCKPIT ...4 INSTRUMENT CLUSTER ...6 UTILITY EASY-OFF TAILGATE ...RAMBOX® ...TRAILER TOWING WEIGHTS (MAXIMUM TRAILER WEIGHT RATINGS) ...RECREATIONAL TOWING (BEHIND MOTORHOME, ETC.) ...BRAKE/TRANSMISSION INTERLOCK MANUAL OVERRIDE ...43 . .44 . .47 . .47 . 49 GETTING...
User Guide
Page 45
... to free the left side pivot. • Remove the tailgate from the pivot. • Raise the right side of the tailgate until the right side pivot clears the hanger bracket. • Slide the entire tailgate to the right to removing the tailgate. WARNING! Removing the Tailgate • Disconnect the wiring harness for the rear camera...
... to free the left side pivot. • Remove the tailgate from the pivot. • Raise the right side of the tailgate until the right side pivot clears the hanger bracket. • Slide the entire tailgate to the right to removing the tailgate. WARNING! Removing the Tailgate • Disconnect the wiring harness for the rear camera...
User Guide
Page 48
... truck when additional cargo room is needed. • To install the bed extender into the extender position, perform the following: • Lower the tailgate. • Make sure the center handle is unlocked and rotate the center handle vertically in order to release the extender side gates. • Fit...center handle vertically to release the extender side gates. • With the side gates open , position the extender so the outboard ends align with the tailgate closed. • When in use, all loads to truck utilizing cargo tie-downs. • Extender should not be used as cargo tie-down ...
... truck when additional cargo room is needed. • To install the bed extender into the extender position, perform the following: • Lower the tailgate. • Make sure the center handle is unlocked and rotate the center handle vertically in order to release the extender side gates. • Fit...center handle vertically to release the extender side gates. • With the side gates open , position the extender so the outboard ends align with the tailgate closed. • When in use, all loads to truck utilizing cargo tie-downs. • Extender should not be used as cargo tie-down ...
