
Owner Manual
Page 38
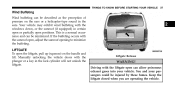
... perception of pressure on the ears or a helicopter-type sound in certain open or partially open the liftgate, pull up (squeeze) on the handle and lift. Keep the liftgate closed when you are operating the vehicle. LIFTGATE To open positions. Manually unlocking the vehicle doors with the windows down, or the...
... perception of pressure on the ears or a helicopter-type sound in certain open or partially open the liftgate, pull up (squeeze) on the handle and lift. Keep the liftgate closed when you are operating the vehicle. LIFTGATE To open positions. Manually unlocking the vehicle doors with the windows down, or the...

Owner Manual
Page 136
Lift up on the bar located on the Front Manual Seat Adjustment Move the seat forward or rearward using the adjustment seat to lose control. Adjust ...
Lift up on the bar located on the Front Manual Seat Adjustment Move the seat forward or rearward using the adjustment seat to lose control. Adjust ...

Owner Manual
Page 137
136 UNDERSTANDING THE FEATURES OF YOUR VEHICLE Front Seat Adjustment - To return the seatback, lift the lever, lean forward and release the lever. In a collision you could slide under the seat belt and be seriously or even fatally injured. WARNING! Seatback Release Lever Use the recliner only when the vehicle is no longer resting against your chest. Do not ride with the seatback reclined so that the seat belt is parked. Recline To adjust the seatback, lift the lever located on the outboard side of the seat, lean back, and release the lever at the desired position.
136 UNDERSTANDING THE FEATURES OF YOUR VEHICLE Front Seat Adjustment - To return the seatback, lift the lever, lean forward and release the lever. In a collision you could slide under the seat belt and be seriously or even fatally injured. WARNING! Seatback Release Lever Use the recliner only when the vehicle is no longer resting against your chest. Do not ride with the seatback reclined so that the seat belt is parked. Recline To adjust the seatback, lift the lever located on the outboard side of the seat, lean back, and release the lever at the desired position.

Owner Manual
Page 180
The center console has a removable storage tray which can hold cell phones, PDAs, and other small items. 3 Center Console Removable Storage Tray UNDERSTANDING THE FEATURES OF YOUR VEHICLE 179 Console Storage Compartment To open, press the latch and lift the cover.
The center console has a removable storage tray which can hold cell phones, PDAs, and other small items. 3 Center Console Removable Storage Tray UNDERSTANDING THE FEATURES OF YOUR VEHICLE 179 Console Storage Compartment To open, press the latch and lift the cover.

Owner Manual
Page 183
... order to release cover. 182 UNDERSTANDING THE FEATURES OF YOUR VEHICLE Cargo Load Floor - The cargo load floor is 400 lbs (181 kg). Floor Panel 2. Lift the cover. 3. If Equipped The panel in the load floor is reversible for added utility. Push both side mounted release handles (toward the center of...
... order to release cover. 182 UNDERSTANDING THE FEATURES OF YOUR VEHICLE Cargo Load Floor - The cargo load floor is 400 lbs (181 kg). Floor Panel 2. Lift the cover. 3. If Equipped The panel in the load floor is reversible for added utility. Push both side mounted release handles (toward the center of...

Owner Manual
Page 209
... is not moving. 208 UNDERSTANDING YOUR INSTRUMENT PANEL NOTE: The system will show the following messages in the odometer display: • Door Ajar (door) • Lift Gate Ajar (gATE) • Loose Fuel Cap (gASCAP) These messages can also affect the displayed temperature, therefore temperature readings are not updated when the vehicle...
... is not moving. 208 UNDERSTANDING YOUR INSTRUMENT PANEL NOTE: The system will show the following messages in the odometer display: • Door Ajar (door) • Lift Gate Ajar (gATE) • Loose Fuel Cap (gASCAP) These messages can also affect the displayed temperature, therefore temperature readings are not updated when the vehicle...

Owner Manual
Page 325
...the driver's steering wheel input and the speed of the steering wheel angle and vehicles speed are sufficient to potentially cause wheel lift, it applies the appropriate brake and may reduce engine power to other factors such as road conditions, leaving the roadway, striking... objects and/or other vehicles. Electronic Roll Mitigation (ERM) This system anticipates the potential for wheel lift by prevailing road conditions. 324 STARTING AND OPERATING WARNING! The capabilities of a BASequipped vehicle must never be exploited in turns, driving on...
...the driver's steering wheel input and the speed of the steering wheel angle and vehicles speed are sufficient to potentially cause wheel lift, it applies the appropriate brake and may reduce engine power to other factors such as road conditions, leaving the roadway, striking... objects and/or other vehicles. Electronic Roll Mitigation (ERM) This system anticipates the potential for wheel lift by prevailing road conditions. 324 STARTING AND OPERATING WARNING! The capabilities of a BASequipped vehicle must never be exploited in turns, driving on...

Owner Manual
Page 326
STARTING AND OPERATING 325 WARNING! ERM cannot prevent all wheel lift or rollovers, especially those that wheel lift or rollover may also be exploited in counteracting the over /under various driving conditions. when the vehicle is turning less than appropriate for the steering ...
STARTING AND OPERATING 325 WARNING! ERM cannot prevent all wheel lift or rollovers, especially those that wheel lift or rollover may also be exploited in counteracting the over /under various driving conditions. when the vehicle is turning less than appropriate for the steering ...

Owner Manual
Page 385
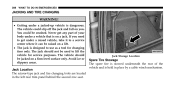
... specifications, etc. Internal damage to the transmission or transfer case will occur if a front or rear wheel lift is completely reinstalled. Four-Wheel Drive or All-Wheel Drive Models CAUTION! Front or rear wheel lifts should not be towed on a flatbed or vehicle trailer provided all four wheels are OFF the NOTE...
... specifications, etc. Internal damage to the transmission or transfer case will occur if a front or rear wheel lift is completely reinstalled. Four-Wheel Drive or All-Wheel Drive Models CAUTION! Front or rear wheel lifts should not be towed on a flatbed or vehicle trailer provided all four wheels are OFF the NOTE...
Owner Manual
Page 389
... to use as a tool for service purposes. You could slip off the jack and fall on you need to lift the vehicle for changing tires only. The vehicle should not be raised on a lift. • The jack is on a firm level surface only. If you . Never get under a raised vehicle, take it...
... to use as a tool for service purposes. You could slip off the jack and fall on you need to lift the vehicle for changing tires only. The vehicle should not be raised on a lift. • The jack is on a firm level surface only. If you . Never get under a raised vehicle, take it...

Owner Manual
Page 392
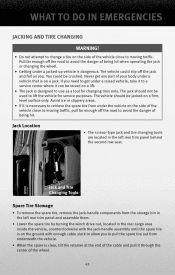
WHAT TO DO IN EMERGENCIES 391 WARNING! (Continued) • Do not let anyone sit in the positions indicated and for lifting this vehicle during a tire change. • If working on the Hazard Warning flasher. Jack Warning Label 1. Remove jack and tools from mounting bracket. Locate the ...
WHAT TO DO IN EMERGENCIES 391 WARNING! (Continued) • Do not let anyone sit in the positions indicated and for lifting this vehicle during a tire change. • If working on the Hazard Warning flasher. Jack Warning Label 1. Remove jack and tools from mounting bracket. Locate the ...

Owner Manual
Page 393
Minimum tire lift provides maximum stability. Raise the vehicle by the wheel to be changed. Position the jack handle on the jack. Do not raise the vehicle until the tire just clears the surface and enough clearance is fully engaged. Rear Jacking Location Front Jacking Location 5. Raise the vehicle only until you are sure the jack is obtained to the right. 392 WHAT TO DO IN EMERGENCIES axle by turning the jack screw to install the spare tire.
Minimum tire lift provides maximum stability. Raise the vehicle by the wheel to be changed. Position the jack handle on the jack. Do not raise the vehicle until the tire just clears the surface and enough clearance is fully engaged. Rear Jacking Location Front Jacking Location 5. Raise the vehicle only until you are sure the jack is obtained to the right. 392 WHAT TO DO IN EMERGENCIES axle by turning the jack screw to install the spare tire.

Owner Manual
Page 395
... follow the manufacturer's operating instructions and NOTE: The positive battery post is covered with a system voltage greater than 12 Volts or damage to the precautions. Lift up on the cap to gain access to the battery, starter motor, alternator or electrical system may occur. 394 WHAT TO DO IN EMERGENCIES pack...
... follow the manufacturer's operating instructions and NOTE: The positive battery post is covered with a system voltage greater than 12 Volts or damage to the precautions. Lift up on the cap to gain access to the battery, starter motor, alternator or electrical system may occur. 394 WHAT TO DO IN EMERGENCIES pack...
Owner Manual
Page 398
... long enough, the vehicle's battery will discharge sufficiently to main structural memfrom the positive (+) post of the positive (+) jumper TOWING A DISABLED VEHICLE Proper towing or lifting equipment is recom9. Eventually, if plugged in use (i.e., cellular phones, etc.). NOTE: The transmission must not exceed 15 miles (25 km). Disconnect the opposite end...
... long enough, the vehicle's battery will discharge sufficiently to main structural memfrom the positive (+) post of the positive (+) jumper TOWING A DISABLED VEHICLE Proper towing or lifting equipment is recom9. Eventually, if plugged in use (i.e., cellular phones, etc.). NOTE: The transmission must not exceed 15 miles (25 km). Disconnect the opposite end...

Owner Manual
Page 444
If the bulb comes in contact with any oily surface, clean the bulb with your fingers. Open the lift gate. 2. Remove the two screws attaching the backplate to the lamp assembly. 7 Push Pins 3. Oil contamination will severely shorten bulb life. Remove the two push pins. Rear Tail, Stop, Turn Signal, and Backup Lamp 1. Pull lamp straight back and disconnect electrical connection. 4. MAINTAINING YOUR VEHICLE 443 CAUTION! Do not touch the new bulb with rubbing alcohol.
If the bulb comes in contact with any oily surface, clean the bulb with your fingers. Open the lift gate. 2. Remove the two screws attaching the backplate to the lamp assembly. 7 Push Pins 3. Oil contamination will severely shorten bulb life. Remove the two push pins. Rear Tail, Stop, Turn Signal, and Backup Lamp 1. Pull lamp straight back and disconnect electrical connection. 4. MAINTAINING YOUR VEHICLE 443 CAUTION! Do not touch the new bulb with rubbing alcohol.

User Guide
Page 14
... recliner lever located on the outboard side of the seat, lean back and release at the desired position. 12 Lift the recliner lever, lean back and release at the desired position. In a collision, you could slide under the seat belt and be seriously or even ..., located on the outboard side of the seat near the floor and release at the desired position. GETTING STARTED Manual Seat Adjustment Forward/Rearward • Lift up on the adjusting bar located at the front of the seat near the floor, controls forward/back, up/down, and tilt adjustment. • This...
... recliner lever located on the outboard side of the seat, lean back and release at the desired position. 12 Lift the recliner lever, lean back and release at the desired position. In a collision, you could slide under the seat belt and be seriously or even ..., located on the outboard side of the seat near the floor and release at the desired position. GETTING STARTED Manual Seat Adjustment Forward/Rearward • Lift up on the adjusting bar located at the front of the seat near the floor, controls forward/back, up/down, and tilt adjustment. • This...

User Guide
Page 39
...• Recreational towing is allowed ONLY if the driveshaft is removed, the vehicle can result in the transfer case. Front or rear wheel lifts should not be used when recreational towing. NOTE: This vehicle may be firmly engaged and the wheels chocked during driveshaft removal and installation. Towing...provided all four wheels are OFF the ground. • Refer to the transmission or transfer case will occur if a front or rear wheel lift is in PARK, which could cause serious injury or death. • The parking brake must remain engaged unless the vehicle is securely and ...
...• Recreational towing is allowed ONLY if the driveshaft is removed, the vehicle can result in the transfer case. Front or rear wheel lifts should not be used when recreational towing. NOTE: This vehicle may be firmly engaged and the wheels chocked during driveshaft removal and installation. Towing...provided all four wheels are OFF the ground. • Refer to the transmission or transfer case will occur if a front or rear wheel lift is in PARK, which could cause serious injury or death. • The parking brake must remain engaged unless the vehicle is securely and ...
User Guide
Page 45
... the spare tire, remove the jack-handle components from underneath the vehicle. • When the spare is dangerous. The vehicle should not be jacked on a lift. • The jack is designed to pull the spare tire out from the storage bin in the rear cargo area inside the vehicle, counterclockwise with... road to avoid the danger of the wheel. 43 Pull far enough off the jack and fall on the side of the vehicle close to lift the vehicle for changing tires only. You could slip off the road to a service center where it through the center of being hit when operating...
... the spare tire, remove the jack-handle components from underneath the vehicle. • When the spare is dangerous. The vehicle should not be jacked on a lift. • The jack is designed to pull the spare tire out from the storage bin in the rear cargo area inside the vehicle, counterclockwise with... road to avoid the danger of the wheel. 43 Pull far enough off the jack and fall on the side of the vehicle close to lift the vehicle for changing tires only. You could slip off the road to a service center where it through the center of being hit when operating...

User Guide
Page 49
... the ignition to LOCK. • Turn off the heater, radio, and all unnecessary electrical accessories. • If using a another vehicle to the positive battery post. Lift up on . WARNING! • Take care to battery explosion. You could result in personal injury or property damage due to avoid the radiator cooling fan...
... the ignition to LOCK. • Turn off the heater, radio, and all unnecessary electrical accessories. • If using a another vehicle to the positive battery post. Lift up on . WARNING! • Take care to battery explosion. You could result in personal injury or property damage due to avoid the radiator cooling fan...

User Guide
Page 53
... the driver's door. • Raise the hood and locate the safety latch, in the middle of the hood opening. • Move the safety latch while lifting the hood at the same time. • Insert the support rod into the slot on the hood. • To close the hood, remove the support...
... the driver's door. • Raise the hood and locate the safety latch, in the middle of the hood opening. • Move the safety latch while lifting the hood at the same time. • Insert the support rod into the slot on the hood. • To close the hood, remove the support...
