Owner's Manual
Page 20
... will turn off the horn after 15 minutes, and then the system will prevent the lost key from starting , sound the horn intermittently, flash the headlights and taillights, and flash the Vehicle Security Light in the instrument cluster. 18 THINGS TO KNOW BEFORE STARTING YOUR VEHICLE The new integrated key is...
... will turn off the horn after 15 minutes, and then the system will prevent the lost key from starting , sound the horn intermittently, flash the headlights and taillights, and flash the Vehicle Security Light in the instrument cluster. 18 THINGS TO KNOW BEFORE STARTING YOUR VEHICLE The new integrated key is...
Owner's Manual
Page 25
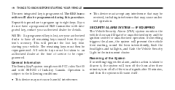
... acknowledge the signal. Refer to sound. Then, press the PANIC button while still holding the LOCK button. 2. Illuminated Approach - If Equipped This feature activates the headlights for up to 90 seconds when the doors are unlocked with the Security Alarm activated will cause the alarm to "Illumin Approach," under "Personal Settings...
... acknowledge the signal. Refer to sound. Then, press the PANIC button while still holding the LOCK button. 2. Illuminated Approach - If Equipped This feature activates the headlights for up to 90 seconds when the doors are unlocked with the Security Alarm activated will cause the alarm to "Illumin Approach," under "Personal Settings...

Owner's Manual
Page 26
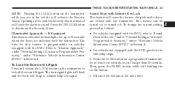
... the ignition switch to deactivate the Security Alarm. Press the UNLOCK button to the ACC or ON position while the Panic Alarm is on, the headlights and park lights will flash, the horn will cause the alarm to the radio frequency noises emitted by the system. Test the feature while outside...
... the ignition switch to deactivate the Security Alarm. Press the UNLOCK button to the ACC or ON position while the Panic Alarm is on, the headlights and park lights will flash, the horn will cause the alarm to the radio frequency noises emitted by the system. Test the feature while outside...

Owner's Manual
Page 86
... Open And Close The Hood ...144 Lights ...146 ▫ Exterior And Interior Lighting Control ...146 ▫ Headlights And Parking Lights ...146 ▫ Automatic Headlights - If Equipped ...147 ▫ Headlights With Wipers (Available With Auto Headlights Only) ...147 ▫ Headlight Time Delay - If Equipped ...147 ▫ Daytime Running Lights (DRL) - If Equipped ...148 ▫ Lights-On...
... Open And Close The Hood ...144 Lights ...146 ▫ Exterior And Interior Lighting Control ...146 ▫ Headlights And Parking Lights ...146 ▫ Automatic Headlights - If Equipped ...147 ▫ Headlights With Wipers (Available With Auto Headlights Only) ...147 ▫ Headlight Time Delay - If Equipped ...147 ▫ Daytime Running Lights (DRL) - If Equipped ...148 ▫ Lights-On...

Owner's Manual
Page 87
... To Pass ...150 ▫ Interior Lights ...151 Windshield Wipers And Washers ...153 ▫ Intermittent Wiper System ...155 ▫ Mist Feature ...155 ▫ Headlights With Wipers (Available With Auto Headlights Only) ...156 ▫ Windshield Washers ...156 ▫ Adding Washer Fluid ...157 Tilt/Telescoping Steering Column - If Equipped ...157 Electronic Speed Control - If Equipped...
... To Pass ...150 ▫ Interior Lights ...151 Windshield Wipers And Washers ...153 ▫ Intermittent Wiper System ...155 ▫ Mist Feature ...155 ▫ Headlights With Wipers (Available With Auto Headlights Only) ...156 ▫ Windshield Washers ...156 ▫ Adding Washer Fluid ...157 Tilt/Telescoping Steering Column - If Equipped ...157 Electronic Speed Control - If Equipped...

Owner's Manual
Page 90
A two-point pivot system allows for horizontal and vertical mirror adjustment. Annoying headlight glare can be adjusted while set in the day position (toward the rear of the vehicle). Manual Rearview Mirror The mirror should be reduced by moving the small control under the mirror to center on the view through the rear window. 88 UNDERSTANDING THE FEATURES OF YOUR VEHICLE MIRRORS Inside Day/Night Mirror Adjust the mirror to the night position (toward the windshield).
A two-point pivot system allows for horizontal and vertical mirror adjustment. Annoying headlight glare can be adjusted while set in the day position (toward the rear of the vehicle). Manual Rearview Mirror The mirror should be reduced by moving the small control under the mirror to center on the view through the rear window. 88 UNDERSTANDING THE FEATURES OF YOUR VEHICLE MIRRORS Inside Day/Night Mirror Adjust the mirror to the night position (toward the windshield).

Owner's Manual
Page 91
... cleaning solution directly onto the mirror. UNDERSTANDING THE FEATURES OF YOUR VEHICLE 89 Automatic Dimming Inside Mirror - If Equipped This mirror automatically adjusts for annoying headlight glare from the inside mirror. Apply the solution onto a clean cloth and wipe the mirror clean. CAUTION!
... cleaning solution directly onto the mirror. UNDERSTANDING THE FEATURES OF YOUR VEHICLE 89 Automatic Dimming Inside Mirror - If Equipped This mirror automatically adjusts for annoying headlight glare from the inside mirror. Apply the solution onto a clean cloth and wipe the mirror clean. CAUTION!

Owner's Manual
Page 148
146 UNDERSTANDING THE FEATURES OF YOUR VEHICLE LIGHTS Exterior and Interior Lighting Control The multifunction lever on the left side of the steering column controls the operation of the multifunction lever to the second detent for parking light operation. Headlight Switch Turn the end of the lever to the first detent for headlight operation. Headlights and Parking Lights Turn the end of the headlights, parking lights, turn signal lights, instrument panel lights, instrument panel light dimming, interior lights, and fog lights (if equipped).
146 UNDERSTANDING THE FEATURES OF YOUR VEHICLE LIGHTS Exterior and Interior Lighting Control The multifunction lever on the left side of the steering column controls the operation of the multifunction lever to the second detent for parking light operation. Headlight Switch Turn the end of the lever to the first detent for headlight operation. Headlights and Parking Lights Turn the end of the headlights, parking lights, turn signal lights, instrument panel lights, instrument panel light dimming, interior lights, and fog lights (if equipped).

Owner's Manual
Page 149
...turning the ignition switch to the LOCK position. UNDERSTANDING THE FEATURES OF YOUR VEHICLE 147 Automatic Headlights - If Equipped This system automatically turns the headlights on or off according to "Headlights With Wipers," under "Personal Settings (Customer Programmable Features)" under "Electronic Vehicle Information Center"... mode. To activate the delay, turn the ignition switch to the LOCK position. This means the headlights will turn OFF the headlights within 45 seconds. Headlight Time Delay - If Equipped This feature is also on or off when the wipers are turned ON...
...turning the ignition switch to the LOCK position. UNDERSTANDING THE FEATURES OF YOUR VEHICLE 147 Automatic Headlights - If Equipped This system automatically turns the headlights on or off according to "Headlights With Wipers," under "Personal Settings (Customer Programmable Features)" under "Electronic Vehicle Information Center"... mode. To activate the delay, turn the ignition switch to the LOCK position. This means the headlights will turn OFF the headlights within 45 seconds. Headlight Time Delay - If Equipped This feature is also on or off when the wipers are turned ON...

Owner's Manual
Page 150
...end of the multifunction lever. Fog Lights - If Equipped To activate the front fog lights, turn ON the parking lights or the low beam headlights and pull out on as Daytime Running Lights (DRL) and operate at DRL (lower) intensity, whenever the ignition is ON, the engine is ... in the normal manner. If you turn off , and the shift lever is turned to the LOCK position, a chime will sound to "Headlight Off Delay," under "Personal Settings (Customer Programmable Features)," under "Electronic Vehicle Information Center (EVIC)" in any position except PARK. Lights-On Reminder If...
...end of the multifunction lever. Fog Lights - If Equipped To activate the front fog lights, turn ON the parking lights or the low beam headlights and pull out on as Daytime Running Lights (DRL) and operate at DRL (lower) intensity, whenever the ignition is ON, the engine is ... in the normal manner. If you turn off , and the shift lever is turned to the LOCK position, a chime will sound to "Headlight Off Delay," under "Personal Settings (Customer Programmable Features)," under "Electronic Vehicle Information Center (EVIC)" in any position except PARK. Lights-On Reminder If...

Owner's Manual
Page 151
Turn Signal Control Selecting high beam headlights will turn signal lights. 3 Front Fog Light NOTE: The front fog lights will only operate with the headlights on the instrument panel will flash to show proper operation of the front and rear turn off the front fog lights. UNDERSTANDING THE FEATURES OF YOUR VEHICLE 149 Turn Signals Move the multifunction lever upward or downward and the corresponding turn signal indicator on low beam.
Turn Signal Control Selecting high beam headlights will turn signal lights. 3 Front Fog Light NOTE: The front fog lights will only operate with the headlights on the instrument panel will flash to show proper operation of the front and rear turn off the front fog lights. UNDERSTANDING THE FEATURES OF YOUR VEHICLE 149 Turn Signals Move the multifunction lever upward or downward and the corresponding turn signal indicator on low beam.
Owner's Manual
Page 152
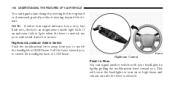
...flash rate, check for service. This will cause the headlights to light when the lever is released. Highbeam Control Flash to Pass You can signal a lane change by lightly pulling the multifunction lever toward you, to switch the headlights back to HIGH beam. Pull the Lever toward you... to switch the headlights to LOW beam. Highbeam/Lowbeam Select Switch Push the multifunction lever away from you . 150 UNDERSTANDING ...
...flash rate, check for service. This will cause the headlights to light when the lever is released. Highbeam Control Flash to Pass You can signal a lane change by lightly pulling the multifunction lever toward you, to switch the headlights back to HIGH beam. Pull the Lever toward you... to switch the headlights to LOW beam. Highbeam/Lowbeam Select Switch Push the multifunction lever away from you . 150 UNDERSTANDING ...

Owner's Manual
Page 154
... controls the operation of the interior lights and the brightness of the instrument panel lights. Dimmer Control Instrument Panel Dimming With the parking lights or headlights on because a door is part of the multifunction lever. 152 UNDERSTANDING THE FEATURES OF YOUR VEHICLE Battery Saver Feature To protect the battery, the interior...
... controls the operation of the interior lights and the brightness of the instrument panel lights. Dimmer Control Instrument Panel Dimming With the parking lights or headlights on because a door is part of the multifunction lever. 152 UNDERSTANDING THE FEATURES OF YOUR VEHICLE Battery Saver Feature To protect the battery, the interior...

Owner's Manual
Page 155
... Parade Mode (Daytime Brightness Feature) Rotate the Dimmer Control to the first detent to brighten the odometer and radio display when the parking lights or headlights are open. The interior lights will not activate until the ignition switch is located on during daylight conditions. Interior Light ON Rotate the Dimmer Control...
... Parade Mode (Daytime Brightness Feature) Rotate the Dimmer Control to the first detent to brighten the odometer and radio display when the parking lights or headlights are open. The interior lights will not activate until the ignition switch is located on during daylight conditions. Interior Light ON Rotate the Dimmer Control...

Owner's Manual
Page 158
... the multifunction lever (on or off through the Electronic Vehicle Information Center (EVIC) (if equipped). 156 UNDERSTANDING THE FEATURES OF YOUR VEHICLE Headlights with Wipers (Available with Wipers feature can be turned on the left side of the steering column) is placed in the (A) AUTO position.... In addition, the headlights will turn on approximately 10 seconds after releasing the lever and then resume the intermittent interval previously selected. If you activate the washer while...
... the multifunction lever (on or off through the Electronic Vehicle Information Center (EVIC) (if equipped). 156 UNDERSTANDING THE FEATURES OF YOUR VEHICLE Headlights with Wipers (Available with Wipers feature can be turned on the left side of the steering column) is placed in the (A) AUTO position.... In addition, the headlights will turn on approximately 10 seconds after releasing the lever and then resume the intermittent interval previously selected. If you activate the washer while...

Owner's Manual
Page 209
... fuel level drops to Section 7 and follow the warnings under the Cooling System Pressure Cap paragraph. 5. High Beam Indicator Light This light shows that the headlights are ON. (See page 148 for more information.) 7. Speedometer Shows the vehicle speed. 4 Turn Signal Indicator Light The left side of the steering column toward...
... fuel level drops to Section 7 and follow the warnings under the Cooling System Pressure Cap paragraph. 5. High Beam Indicator Light This light shows that the headlights are ON. (See page 148 for more information.) 7. Speedometer Shows the vehicle speed. 4 Turn Signal Indicator Light The left side of the steering column toward...
Owner's Manual
Page 233
... and release the RESET button until "ON" or "OFF" appears. "HEADLAMP OFF DELAY" When this feature is selected, the driver can choose to have the headlights remain on for 0, 30, 60, or 90 seconds after the wipers are locked or unlocked with or without the sound horn on lock feature selected... (RKE) UNLOCK button. To make your selection, press and release the RESET button until "0," "30," "60," or "90" appears. "HEADLAMPS WITH WIPERS" (Available with Auto Headlights Only) When ON is selected, and the multifunction lever is placed in the AUTO position, the...
... and release the RESET button until "ON" or "OFF" appears. "HEADLAMP OFF DELAY" When this feature is selected, the driver can choose to have the headlights remain on for 0, 30, 60, or 90 seconds after the wipers are locked or unlocked with or without the sound horn on lock feature selected... (RKE) UNLOCK button. To make your selection, press and release the RESET button until "0," "30," "60," or "90" appears. "HEADLAMPS WITH WIPERS" (Available with Auto Headlights Only) When ON is selected, and the multifunction lever is placed in the AUTO position, the...

Owner's Manual
Page 234
... until "U.S." or "METRIC" appears. "NAV TURN BY TURN" - If Equipped When ON is turned OFF. Opening a vehicle door will cancel this feature is selected, the headlights will appear in the display as the vehicle approaches a designated turn off when the wipers are turned OFF if they were turned ON by -Turn..." The EVIC, odometer, and navigation system (if equipped) can be changed between English and Metric units of measure. 232 UNDERSTANDING YOUR INSTRUMENT PANEL ON. The headlights will also turn within a programmed route.
... until "U.S." or "METRIC" appears. "NAV TURN BY TURN" - If Equipped When ON is turned OFF. Opening a vehicle door will cancel this feature is selected, the headlights will appear in the display as the vehicle approaches a designated turn off when the wipers are turned OFF if they were turned ON by -Turn..." The EVIC, odometer, and navigation system (if equipped) can be changed between English and Metric units of measure. 232 UNDERSTANDING YOUR INSTRUMENT PANEL ON. The headlights will also turn within a programmed route.
Owner's Manual
Page 313
... foot is controlled automatically and it will decrease as the engine warms up. The engine block heater cord is bundled under the hood between the headlight assembly and the Totally Integrated Power Module (Fuse Box) on the brake pedal. 5 WARNING! Remember to the 110-115 Volt electrical cord could cause electrocution...
... foot is controlled automatically and it will decrease as the engine warms up. The engine block heater cord is bundled under the hood between the headlight assembly and the Totally Integrated Power Module (Fuse Box) on the brake pedal. 5 WARNING! Remember to the 110-115 Volt electrical cord could cause electrocution...

Owner's Manual
Page 418
... ...452 ▫ Cleaning The Cupholders ...457 Fuses (Totally Integrated Power Module) ...457 Vehicle Storage ...464 Replacement Bulbs ...465 Bulb Replacement ...466 ▫ Low Beam Headlight, High Beam Headlight, Front Turn Signal/Park Light, Side Marker Light ...466 ▫ Front Fog Light ...467 ▫ Tail/Stop Light, Rear Turn Signal Light, Tail Light...
... ...452 ▫ Cleaning The Cupholders ...457 Fuses (Totally Integrated Power Module) ...457 Vehicle Storage ...464 Replacement Bulbs ...465 Bulb Replacement ...466 ▫ Low Beam Headlight, High Beam Headlight, Front Turn Signal/Park Light, Side Marker Light ...466 ▫ Front Fog Light ...467 ▫ Tail/Stop Light, Rear Turn Signal Light, Tail Light...
