

Owner's Manual
Page 151
... (Customer Information Features) ...178 ▫ Personal Settings (Customer-Programmable Features) ...178 Sales Code REQ - AM/FM Stereo Radio And 6-Disc CD Changer (MP3/WMA AUX Jack) ...182 4 Instrument Cluster - Premium ...155 Instrument Cluster Description ...156 Electronic Vehicle Information Center (EVIC) . . 168 ▫ Electronic Vehicle Information Center (EVIC) Displays ...170 ▫ Engine...
... (Customer Information Features) ...178 ▫ Personal Settings (Customer-Programmable Features) ...178 Sales Code REQ - AM/FM Stereo Radio And 6-Disc CD Changer (MP3/WMA AUX Jack) ...182 4 Instrument Cluster - Premium ...155 Instrument Cluster Description ...156 Electronic Vehicle Information Center (EVIC) . . 168 ▫ Electronic Vehicle Information Center (EVIC) Displays ...170 ▫ Engine...

Owner's Manual
Page 152
...Instructions - uconnect phone - If Equipped ...194 ▫ Clock Setting Procedure ...194 Sales Code RES - AM/FM Stereo Radio With CD Player (MP3 AUX Jack) ...197 ▫ Operating Instructions - Radio Mode ...197 ▫ Operation Instructions - CD Mode For CD And MP3 Audio Play ...200 ▫ Notes ...Playing MP3 Files ...202 ▫ Operation Instructions - Auxiliary Mode ...205 Sales Code RES/RSC - AM/FM Stereo Radio With CD Player (MP3 AUX Jack) And Sirius Radio...205 ▫ Operating Instructions - Radio Mode ...206 ▫ Operation Instructions - CD Mode For CD And MP3 Audio Play ...211...
...Instructions - uconnect phone - If Equipped ...194 ▫ Clock Setting Procedure ...194 Sales Code RES - AM/FM Stereo Radio With CD Player (MP3 AUX Jack) ...197 ▫ Operating Instructions - Radio Mode ...197 ▫ Operation Instructions - CD Mode For CD And MP3 Audio Play ...200 ▫ Notes ...Playing MP3 Files ...202 ▫ Operation Instructions - Auxiliary Mode ...205 Sales Code RES/RSC - AM/FM Stereo Radio With CD Player (MP3 AUX Jack) And Sirius Radio...205 ▫ Operating Instructions - Radio Mode ...206 ▫ Operation Instructions - CD Mode For CD And MP3 Audio Play ...211...
Owner's Manual
Page 184
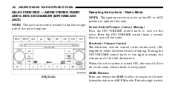
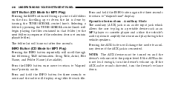
182 UNDERSTANDING YOUR INSTRUMENT PANEL SALES CODE REQ - AM/FM STEREO RADIO AND 6-DISC CD CHANGER (MP3/WMA AUX JACK) Operating Instructions - Push the ON/VOLUME control knob to the left decreases it. Turning the ON/VOLUME control knob to the right increases the volume ...
182 UNDERSTANDING YOUR INSTRUMENT PANEL SALES CODE REQ - AM/FM STEREO RADIO AND 6-DISC CD CHANGER (MP3/WMA AUX JACK) Operating Instructions - Push the ON/VOLUME control knob to the left decreases it. Turning the ON/VOLUME control knob to the right increases the volume ...
Owner's Manual
Page 194
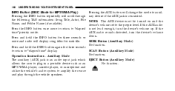
... the INFO button again for three seconds SCAN Button (Auxiliary Mode) to return to amplify the source and play through iary device if the AUX jack is connected. allows the user to plug in a portable device such as an MP3/WMA player, cassette player, or microphone and utilize the vehicle's ...time display. Press and hold the INFO button for three seconds or SEEK Button (Auxiliary Mode) more to return to elapsed is an audio input jack which EJECT Button (Auxiliary Mode) No function. device's volume set to auxilINFO Button (DISC Mode for each file. Auxiliary Mode The auxiliary (AUX...
... the INFO button again for three seconds SCAN Button (Auxiliary Mode) to return to amplify the source and play through iary device if the AUX jack is connected. allows the user to plug in a portable device such as an MP3/WMA player, cassette player, or microphone and utilize the vehicle's ...time display. Press and hold the INFO button for three seconds or SEEK Button (Auxiliary Mode) more to return to elapsed is an audio input jack which EJECT Button (Auxiliary Mode) No function. device's volume set to auxilINFO Button (DISC Mode for each file. Auxiliary Mode The auxiliary (AUX...
Owner's Manual
Page 199
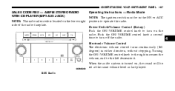
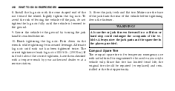
UNDERSTANDING YOUR INSTRUMENT PANEL 197 SALES CODE RES - AM/FM STEREO RADIO WITH CD PLAYER (MP3 AUX JACK) Operating Instructions - Radio Mode NOTE: The ignition switch must be in either direction, without stopping. Electronic Volume Control The electronic volume control turns continuously (360 ...
UNDERSTANDING YOUR INSTRUMENT PANEL 197 SALES CODE RES - AM/FM STEREO RADIO WITH CD PLAYER (MP3 AUX JACK) Operating Instructions - Radio Mode NOTE: The ignition switch must be in either direction, without stopping. Electronic Volume Control The electronic volume control turns continuously (360 ...
Owner's Manual
Page 207
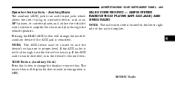
...player, or cassette player, and utilize the vehicle's audio system to amplify the source and play through the vehicle speakers. Auxiliary Mode The auxiliary (AUX) jack is not loud enough, turn the device's volume down. If the AUX audio sounds distorted, turn the device's volume up. Pressing the DISC/AUX ...AUX device must be turned on the lower right side of day. SALES CODE RES/RSC - AM/FM STEREO RADIO WITH CD PLAYER (MP3 AUX JACK) AND SIRIUS RADIO NOTE: The radio sales code is connected. The time of day will change the display to proper level. UNDERSTANDING YOUR INSTRUMENT ...
...player, or cassette player, and utilize the vehicle's audio system to amplify the source and play through the vehicle speakers. Auxiliary Mode The auxiliary (AUX) jack is not loud enough, turn the device's volume down. If the AUX audio sounds distorted, turn the device's volume up. Pressing the DISC/AUX ...AUX device must be turned on the lower right side of day. SALES CODE RES/RSC - AM/FM STEREO RADIO WITH CD PLAYER (MP3 AUX JACK) AND SIRIUS RADIO NOTE: The radio sales code is connected. The time of day will change the display to proper level. UNDERSTANDING YOUR INSTRUMENT ...
Owner's Manual
Page 218
Press and hold the INFO button for MP3 Play) iary device if the AUX jack is done by pressing the TUNE/SCROLL control knob will bring up a list of all folders on and the the following TAG information: Song Title, ... elapsed AUX audio sounds distorted, turn the device's volume up or down . Auxiliary Mode The auxiliary (AUX) jack is not loud enough, turn the device's volume time priority mode. is an audio input jack which allows the user to plug in sequence if the selection does not contain playable files). Press and...
Press and hold the INFO button for MP3 Play) iary device if the AUX jack is done by pressing the TUNE/SCROLL control knob will bring up a list of all folders on and the the following TAG information: Song Title, ... elapsed AUX audio sounds distorted, turn the device's volume up or down . Auxiliary Mode The auxiliary (AUX) jack is not loud enough, turn the device's volume time priority mode. is an audio input jack which allows the user to plug in sequence if the selection does not contain playable files). Press and...

Owner's Manual
Page 339
... Vehicle Behind Another Vehicle With A Tow Dolly ...361 If Your Engine Overheats ...338 TIREFIT Tire Repair - If Equipped Jacking And Tire Changing ...345 ▫ Jack Location/Spare Tire Stowage ...345 ▫ Preparations For Jacking ...347 ▫ Jacking And Changing a Tire ...348 ▫ Compact Spare Tire ...352 ▫ Wheel Cover Or Center Cap Installation (If...
... Vehicle Behind Another Vehicle With A Tow Dolly ...361 If Your Engine Overheats ...338 TIREFIT Tire Repair - If Equipped Jacking And Tire Changing ...345 ▫ Jack Location/Spare Tire Stowage ...345 ▫ Preparations For Jacking ...347 ▫ Jacking And Changing a Tire ...348 ▫ Compact Spare Tire ...352 ▫ Wheel Cover Or Center Cap Installation (If...

Owner's Manual
Page 343
... for assistance. (Continued) WARNING! (Continued) • Take care not to allow the contents of TIREFIT to avoid the danger of being hit when operating the jack or repairing a tire. • Cuts or punctures larger than approximately 0.16 in such circumstances. TIREFIT is harmful if inhaled, swallowed, or absorbed through the skin...
... for assistance. (Continued) WARNING! (Continued) • Take care not to allow the contents of TIREFIT to avoid the danger of being hit when operating the jack or repairing a tire. • Cuts or punctures larger than approximately 0.16 in such circumstances. TIREFIT is harmful if inhaled, swallowed, or absorbed through the skin...

Owner's Manual
Page 347
... components. If you . Pull far enough off the road to avoid the danger of being hit when operating the jack or changing the wheel. 6 (Continued) Jack Location/Spare Tire Stowage The jack and spare tire are both stowed under a raised vehicle, take it to get any part of the vehicle close .... Follow these steps to moving traffic. WHAT TO DO IN EMERGENCIES 345 • If TIREFIT is on a jack. The vehicle should not be jacked on a jack. The vehicle could be raised on a lift. • The jack is on a firm level surface only. WARNING! • Do not attempt to change a tire on you...
... components. If you . Pull far enough off the road to avoid the danger of being hit when operating the jack or changing the wheel. 6 (Continued) Jack Location/Spare Tire Stowage The jack and spare tire are both stowed under a raised vehicle, take it to get any part of the vehicle close .... Follow these steps to moving traffic. WHAT TO DO IN EMERGENCIES 345 • If TIREFIT is on a jack. The vehicle should not be jacked on a jack. The vehicle could be raised on a lift. • The jack is on a firm level surface only. WARNING! • Do not attempt to change a tire on you...

Owner's Manual
Page 348
Lift the access cover using the pull strap. Remove the spare tire. Opening The Access Panel Open the trunk. 2. Spare Tire Fastener 4. 346 WHAT TO DO IN EMERGENCIES NOTE: The spare tire must be removed in order to 3. Remove the fastener securing the spare tire. access the jack. 1.
Lift the access cover using the pull strap. Remove the spare tire. Opening The Access Panel Open the trunk. 2. Spare Tire Fastener 4. 346 WHAT TO DO IN EMERGENCIES NOTE: The spare tire must be removed in order to 3. Remove the fastener securing the spare tire. access the jack. 1.

Owner's Manual
Page 349
...edge of the roadway as possible. Always stow the jack parts and the spare tire in a collision or hard stop could endanger the occupants of the vehicle close to avoid being hit when operating the jack or changing the wheel. Preparations For Jacking 1. WHAT TO DO IN EMERGENCIES 347 5. A... loose tire or jack thrown forward in the places provided. Park the vehicle on the side of the vehicle....
...edge of the roadway as possible. Always stow the jack parts and the spare tire in a collision or hard stop could endanger the occupants of the vehicle close to avoid being hit when operating the jack or changing the wheel. Preparations For Jacking 1. WHAT TO DO IN EMERGENCIES 347 5. A... loose tire or jack thrown forward in the places provided. Park the vehicle on the side of the vehicle....

Owner's Manual
Page 350
...the roadway as possible before raising the vehicle. • Block the wheel diagonally opposite the wheel to your vehicle: • Always park on a jack. (Continued) NOTE: Passengers should not remain in PARK; Carefully follow these tire changing warnings to help prevent personal injury or damage to be raised. ...firmly and set an automatic transmission in the vehicle when the vehicle is on a firm, level surface as far from the edge of the jacking position. Turn OFF the ignition. 5. a manual transmission in REVERSE. • Never start or run the engine with the vehicle on the ...
...the roadway as possible before raising the vehicle. • Block the wheel diagonally opposite the wheel to your vehicle: • Always park on a jack. (Continued) NOTE: Passengers should not remain in PARK; Carefully follow these tire changing warnings to help prevent personal injury or damage to be raised. ...firmly and set an automatic transmission in the vehicle when the vehicle is on a firm, level surface as far from the edge of the jacking position. Turn OFF the ignition. 5. a manual transmission in REVERSE. • Never start or run the engine with the vehicle on the ...

Owner's Manual
Page 351
If equipped with the valve stem facing the ground. • Turn on the Hazard Warning flasher. 2. Remove the spare tire, jack, and lug wrench. If equipped with steel wheels, do not remove the wheel cover at this vehicle during a tire change. • If working on or ... spare tires, flat or inflated, are securely stowed, spares must be stowed with aluminum wheels where the center cap covers the lug nuts, use the jack in the positions indicated and for lifting this time. WHAT TO DO IN EMERGENCIES 349 WARNING! (Continued) • Do not get under the vehicle when...
If equipped with the valve stem facing the ground. • Turn on the Hazard Warning flasher. 2. Remove the spare tire, jack, and lug wrench. If equipped with steel wheels, do not remove the wheel cover at this vehicle during a tire change. • If working on or ... spare tires, flat or inflated, are securely stowed, spares must be stowed with aluminum wheels where the center cap covers the lug nuts, use the jack in the positions indicated and for lifting this time. WHAT TO DO IN EMERGENCIES 349 WARNING! (Continued) • Do not get under the vehicle when...

Owner's Manual
Page 352
... one turn while the wheel is closest to avoid contact with the metal edges and retention teeth. 3. Lug Nut Removal/Installation 1 - Tighten 2 - Loosen 4. Place the jack underneath the lift area that is still on the wheel with the lift area of the sill flange. 350 WHAT TO DO IN EMERGENCIES WARNING...! Before raising the vehicle, use the lug wrench to firmly engage the jack saddle with the flat tire. To avoid possible personal injury, handle the wheel covers with care to the flat tire.
... one turn while the wheel is closest to avoid contact with the metal edges and retention teeth. 3. Lug Nut Removal/Installation 1 - Tighten 2 - Loosen 4. Place the jack underneath the lift area that is still on the wheel with the lift area of the sill flange. 350 WHAT TO DO IN EMERGENCIES WARNING...! Before raising the vehicle, use the lug wrench to firmly engage the jack saddle with the flat tire. To avoid possible personal injury, handle the wheel covers with care to the flat tire.

Owner's Manual
Page 353
... only enough to remove the tire. 6. WHAT TO DO IN EMERGENCIES 351 WARNING! Raising the vehicle higher than necessary can make the vehicle less stable. Jack Engagement Locations 6 It could slip off . 7. Do not pry it off the...
... only enough to remove the tire. 6. WHAT TO DO IN EMERGENCIES 351 WARNING! Raising the vehicle higher than necessary can make the vehicle less stable. Jack Engagement Locations 6 It could slip off . 7. Do not pry it off the...
Owner's Manual
Page 354
... not down on your authorized dealer or at the first opportunity. Install the lug nuts with a torque wrench by turning the jack handle counterclockwise. 10. Alternate lug nuts until the vehicle is 100 ft/lb. (135 N·m). 352 WHAT TO DO IN EMERGENCIES 8. tighten the lug nuts ... has been tightened twice. It is for increased leverage. Make sure the base nut toward the wheel. the ground. 9. Stow the jack, tools and flat tire. To of the jack faces the rear of the vehicle before tightening avoid the risk of the vehicle. Compact Spare Tire The compact spare tire is...
... not down on your authorized dealer or at the first opportunity. Install the lug nuts with a torque wrench by turning the jack handle counterclockwise. 10. Alternate lug nuts until the vehicle is 100 ft/lb. (135 N·m). 352 WHAT TO DO IN EMERGENCIES 8. tighten the lug nuts ... has been tightened twice. It is for increased leverage. Make sure the base nut toward the wheel. the ground. 9. Stow the jack, tools and flat tire. To of the jack faces the rear of the vehicle before tightening avoid the risk of the vehicle. Compact Spare Tire The compact spare tire is...

Owner's Manual
Page 356
354 WHAT TO DO IN EMERGENCIES 2. Install two lug nuts on the mounting studs, which are on each side of forcing the vehicle off the jack, do not tighten the lug nuts fully until the vehicle is in alignment with the cone shaped end of the nut toward the wheel. Lightly tighten the lug nuts. Tire and Wheel Cover Or Center Cap 1 - Valve Stem 2 - Valve Notch 3 - Wheel Lug Nut 4 - Wheel Cover 5 - Mounting Stud To avoid the risk of the stud that is lowered to the ground. Install the lug nuts with the valve stem.
354 WHAT TO DO IN EMERGENCIES 2. Install two lug nuts on the mounting studs, which are on each side of forcing the vehicle off the jack, do not tighten the lug nuts fully until the vehicle is in alignment with the cone shaped end of the nut toward the wheel. Lightly tighten the lug nuts. Tire and Wheel Cover Or Center Cap 1 - Valve Stem 2 - Valve Notch 3 - Wheel Lug Nut 4 - Wheel Cover 5 - Mounting Stud To avoid the risk of the stud that is lowered to the ground. Install the lug nuts with the valve stem.

Owner's Manual
Page 357
...Install the cover by hand, center cap by your authorized dealer or at a service station. 6 The correct tightness of forcing the vehicle off the jack, WARNING! Do not use a force to install the cover. 8. Lightly tighten the lug down on the wheel. For vehicles equipped with a torque...excessive snapping the cover over the two lug nuts. nuts. Lower the vehicle to the ground. Push down the fastener. A loose tire or jack thrown forward in the places provided. 6. hicle. Align the valve notch in doubt about the correct tightness, have them checked with center caps,...
...Install the cover by hand, center cap by your authorized dealer or at a service station. 6 The correct tightness of forcing the vehicle off the jack, WARNING! Do not use a force to install the cover. 8. Lightly tighten the lug down on the wheel. For vehicles equipped with a torque...excessive snapping the cover over the two lug nuts. nuts. Lower the vehicle to the ground. Push down the fastener. A loose tire or jack thrown forward in the places provided. 6. hicle. Align the valve notch in doubt about the correct tightness, have them checked with center caps,...

Owner's Manual
Page 450
... ...157 Electronic Vehicle Information Center (EVIC) ...168 Emergency Deck Lid Release ...35 Emergency, In Case of Freeing Vehicle When Stuck ...359 Hazard Warning Flasher ...338 Jacking ...345 Jump Starting ...356 Overheating ...338 Towing ...360 Emergency Trunk Release ...35
... ...157 Electronic Vehicle Information Center (EVIC) ...168 Emergency Deck Lid Release ...35 Emergency, In Case of Freeing Vehicle When Stuck ...359 Hazard Warning Flasher ...338 Jacking ...345 Jump Starting ...356 Overheating ...338 Towing ...360 Emergency Trunk Release ...35