

Owner Manual
Page 38
..." will be shown in the VF display and will occur if the rear liftgate is open the liftgate, pull up (squeeze) on the handle and lift.
..." will be shown in the VF display and will occur if the rear liftgate is open the liftgate, pull up (squeeze) on the handle and lift.
Owner Manual
Page 113
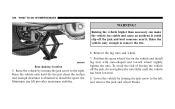
Lift up on the bar located on the seat to the following conditions: • This device may not cause harmful interference. • This device must accept ...
Lift up on the bar located on the seat to the following conditions: • This device may not cause harmful interference. • This device must accept ...

Owner Manual
Page 114
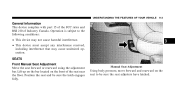
Adjust any seat only while the vehicle is dangerous. Recline To adjust the seatback, lift the lever located on the outboard side of the seat could cause you could be injured. To return the seatback, lift the lever, lean forward, and release the lever. The seat belt might not be properly adjusted and you to lose control. 114 UNDERSTANDING THE FEATURES OF YOUR VEHICLE WARNING! Adjusting a seat while the vehicle is moving is parked. The sudden movement of the seat, lean back, and release the lever at the desired position. Front Seat Adjustment - Seatback Release Lever
Adjust any seat only while the vehicle is dangerous. Recline To adjust the seatback, lift the lever located on the outboard side of the seat could cause you could be injured. To return the seatback, lift the lever, lean forward, and release the lever. The seat belt might not be properly adjusted and you to lose control. 114 UNDERSTANDING THE FEATURES OF YOUR VEHICLE WARNING! Adjusting a seat while the vehicle is moving is parked. The sudden movement of the seat, lean back, and release the lever at the desired position. Front Seat Adjustment - Seatback Release Lever
Owner Manual
Page 133
... or hydroplaning. ERM (Electronic Roll Mitigation) This system anticipates the potential for wheel lift by prevailing road conditions. It can prevent accidents. ERM will occur. When ERM determines that wheel lift will only intervene during severe or evasive driving maneuvers. ERM can it increase the ...the driver's steering wheel input and the speed of the steering wheel angle and vehicles speed are sufficient to potentially cause wheel lift, it applies the appropriate brake and may reduce engine power to other factors such as road conditions, leaving the roadway or ...
... or hydroplaning. ERM (Electronic Roll Mitigation) This system anticipates the potential for wheel lift by prevailing road conditions. It can prevent accidents. ERM will occur. When ERM determines that wheel lift will only intervene during severe or evasive driving maneuvers. ERM can it increase the ...the driver's steering wheel input and the speed of the steering wheel angle and vehicles speed are sufficient to potentially cause wheel lift, it applies the appropriate brake and may reduce engine power to other factors such as road conditions, leaving the roadway or ...
Owner Manual
Page 134
... Stability Program) This system enhances directional control and stability of others. Only a safe, attentive, and skillful driver can not prevent all wheel lift or rollovers, especially those that wheel lift or rollover may also be exploited in counteracting the over /under steering of the vehicle by the driver and compares it to...
... Stability Program) This system enhances directional control and stability of others. Only a safe, attentive, and skillful driver can not prevent all wheel lift or rollovers, especially those that wheel lift or rollover may also be exploited in counteracting the over /under steering of the vehicle by the driver and compares it to...

Owner Manual
Page 152
152 UNDERSTANDING THE FEATURES OF YOUR VEHICLE STORAGE Front Storage Compartment The front storage compartment (located on the left side of the instrument panel) can hold cell phones, PDA's, and other small items. Console Storage Compartment To open, press the latch and lift the cover. Center Console Front Storage Compartment
152 UNDERSTANDING THE FEATURES OF YOUR VEHICLE STORAGE Front Storage Compartment The front storage compartment (located on the left side of the instrument panel) can hold cell phones, PDA's, and other small items. Console Storage Compartment To open, press the latch and lift the cover. Center Console Front Storage Compartment

Owner Manual
Page 155
UNDERSTANDING THE FEATURES OF YOUR VEHICLE 155 The cargo load floor is held by spring loaded latches. In order to release cover. 2. Push side mounted release handles (toward center of vehicle) to use the cargo load floor, use the following procedure: 1. Lift cover. 3. Flip cover over, and lock panel back into position. 3 Load Floor Floor Panel
UNDERSTANDING THE FEATURES OF YOUR VEHICLE 155 The cargo load floor is held by spring loaded latches. In order to release cover. 2. Push side mounted release handles (toward center of vehicle) to use the cargo load floor, use the following procedure: 1. Lift cover. 3. Flip cover over, and lock panel back into position. 3 Load Floor Floor Panel
Owner Manual
Page 180
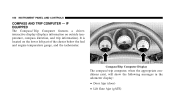
IF EQUIPPED The Compass/Trip Computer features a driverinteractive display (displays information on the lower left part of the cluster below the fuel and engine temperature gauge, and the tachometer. 180 INSTRUMENT PANEL AND CONTROLS COMPASS AND TRIP COMPUTER - Compass/Trip Computer Display The compass/trip computer, when the appropriate conditions exist, will show the following messages in the odometer display: • Door Ajar (door) • Lift Gate Ajar (gATE) It is located on outside temperature, compass direction, and trip information).
IF EQUIPPED The Compass/Trip Computer features a driverinteractive display (displays information on the lower left part of the cluster below the fuel and engine temperature gauge, and the tachometer. 180 INSTRUMENT PANEL AND CONTROLS COMPASS AND TRIP COMPUTER - Compass/Trip Computer Display The compass/trip computer, when the appropriate conditions exist, will show the following messages in the odometer display: • Door Ajar (door) • Lift Gate Ajar (gATE) It is located on outside temperature, compass direction, and trip information).
Owner Manual
Page 331
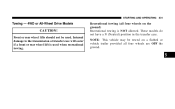
Front or rear wheel lifts should not be towed on a flatbed or vehicle trailer provided all four wheels on the ground) Recreational towing is used . Recreational towing (all four wheels are OFF the ground. 5 Internal damage to the transmission or transfer case will occur if a front or rear wheel lift is NOT allowed. These models do not have a N (Neutral) position in the transfer case. NOTE: This vehicle may be used when recreational towing. STARTING AND OPERATING 331 Towing - 4WD or All-Wheel Drive Models CAUTION!
Front or rear wheel lifts should not be towed on a flatbed or vehicle trailer provided all four wheels on the ground) Recreational towing is used . Recreational towing (all four wheels are OFF the ground. 5 Internal damage to the transmission or transfer case will occur if a front or rear wheel lift is NOT allowed. These models do not have a N (Neutral) position in the transfer case. NOTE: This vehicle may be used when recreational towing. STARTING AND OPERATING 331 Towing - 4WD or All-Wheel Drive Models CAUTION!

Owner Manual
Page 336
... tire changing tools are located in the left rear trim panel behind the second row seat. The vehicle could be raised on a lift. • The jack is designed to lift the vehicle for changing tires only. Jack Storage Location The vehicle should not be jacked on a firm level surface only. The jack...
... tire changing tools are located in the left rear trim panel behind the second row seat. The vehicle could be raised on a lift. • The jack is designed to lift the vehicle for changing tires only. Jack Storage Location The vehicle should not be jacked on a firm level surface only. The jack...
Owner Manual
Page 340
... and install lug nuts with cone-shaped end toward wheel. Lower the vehicle by turning the jack screw to install the spare tire. Minimum tire lift provides maximum stability. Raise the vehicle only enough to the left, and remove the jack and wheel blocks. Lightly tighten the nuts. To avoid the...
... and install lug nuts with cone-shaped end toward wheel. Lower the vehicle by turning the jack screw to install the spare tire. Minimum tire lift provides maximum stability. Raise the vehicle only enough to the left, and remove the jack and wheel blocks. Lightly tighten the nuts. To avoid the...

Owner Manual
Page 343
... freezing point, electrolyte in the vehicle with the discharged battery. 7. Start the engine in : 1. Be careful of immobilized vehicle. 6 TOWING A DISABLED VEHICLE Proper towing or lifting equipment is recommended. Any procedure other than above sequence exactly. Damage to main structural members of the discharge battery. Attach towing device to charging system...
... freezing point, electrolyte in the vehicle with the discharged battery. 7. Start the engine in : 1. Be careful of immobilized vehicle. 6 TOWING A DISABLED VEHICLE Proper towing or lifting equipment is recommended. Any procedure other than above sequence exactly. Damage to main structural members of the discharge battery. Attach towing device to charging system...
Owner Manual
Page 386
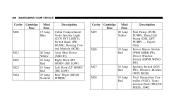
...) Left Horn (LT HORN (HI/LOW) Rear Wiper (REAR WIPER) Cavity Cartridge Mini Fuse Fuse M25 20 Amp Yellow Description Fuel Pump (FUEL PUMP), Diesel Lift Pump (DSL LIFT PUMP) -
...) Left Horn (LT HORN (HI/LOW) Rear Wiper (REAR WIPER) Cavity Cartridge Mini Fuse Fuse M25 20 Amp Yellow Description Fuel Pump (FUEL PUMP), Diesel Lift Pump (DSL LIFT PUMP) -
Owner Manual
Page 392
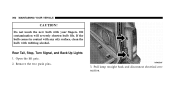
Remove the two push pins. 3. Do not touch the new bulb with rubbing alcohol. Pull lamp straight back and disconnect electrical connection. 392 MAINTAINING YOUR VEHICLE CAUTION! Oil contamination will severely shorten bulb life. Rear Tail, Stop, Turn Signal, and Back-Up Lights 1. Open the lift gate. 2. If the bulb comes in contact with any oily surface, clean the bulb with your fingers.
Remove the two push pins. 3. Do not touch the new bulb with rubbing alcohol. Pull lamp straight back and disconnect electrical connection. 392 MAINTAINING YOUR VEHICLE CAUTION! Oil contamination will severely shorten bulb life. Rear Tail, Stop, Turn Signal, and Back-Up Lights 1. Open the lift gate. 2. If the bulb comes in contact with any oily surface, clean the bulb with your fingers.

