
Owner Manual
Page 82
Non Functional ...160 Express ...146 ▫ Sunshade Operation ...146 ▫ Wind Buffeting ...146 ▫ Sunroof Maintenance ...147 Ⅵ Electrical Power Outlet ...147 ▫ Electrical Outlet Use With Engine Off ...148 Ⅵ Power Inverter ...149 Ⅵ Cup Holders ...151 Ⅵ Storage ...152 ▫ Front Storage Compartment ...152 ▫ Console Storage ...
Non Functional ...160 Express ...146 ▫ Sunshade Operation ...146 ▫ Wind Buffeting ...146 ▫ Sunroof Maintenance ...147 Ⅵ Electrical Power Outlet ...147 ▫ Electrical Outlet Use With Engine Off ...148 Ⅵ Power Inverter ...149 Ⅵ Cup Holders ...151 Ⅵ Storage ...152 ▫ Front Storage Compartment ...152 ▫ Console Storage ...

Owner Manual
Page 147
... the lighter in the heating position. 3 Front Power Outlet The front power outlet located in the lower portion of current for accessories designed for use . ELECTRICAL POWER OUTLET This vehicle has two auxiliary power outlets that it heats when pushed in and pops out automatically when ready for use with the...
... the lighter in the heating position. 3 Front Power Outlet The front power outlet located in the lower portion of current for accessories designed for use . ELECTRICAL POWER OUTLET This vehicle has two auxiliary power outlets that it heats when pushed in and pops out automatically when ready for use with the...
Owner Manual
Page 148
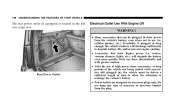
Electrical Outlet Use With Engine Off WARNING! • Many accessories that draw higher power (i.e. cellular phones, etc.). coolers, vacuum cleaners, lights, etc.), will discharge sufficiently to ...
Electrical Outlet Use With Engine Off WARNING! • Many accessories that draw higher power (i.e. cellular phones, etc.). coolers, vacuum cleaners, lights, etc.), will discharge sufficiently to ...

Owner Manual
Page 150
Power Inverter Switch NOTE: Due to build in use a 3-Prong Adaptor. • Do not insert any objects into the receptacles. • Do not touch with wet hands. • Close the lid when not in overload protection the inverter will shut down if the power rating is mishandled it may cause an electric shock and failure. To Avoid Serious Injury or Death: • Do not use . • If this outlet is exceeded. 150 UNDERSTANDING THE FEATURES OF YOUR VEHICLE WARNING!
Power Inverter Switch NOTE: Due to build in use a 3-Prong Adaptor. • Do not insert any objects into the receptacles. • Do not touch with wet hands. • Close the lid when not in overload protection the inverter will shut down if the power rating is mishandled it may cause an electric shock and failure. To Avoid Serious Injury or Death: • Do not use . • If this outlet is exceeded. 150 UNDERSTANDING THE FEATURES OF YOUR VEHICLE WARNING!

Owner Manual
Page 159
... the front of the rear window to prevent damage to heating elements. The defroster will automatically turn on the rear window defroster, and the optional electric remote control heated mirrors. Use care when washing the inside of the engine compartment, and should be checked for fluid level at regular intervals. If...
... the front of the rear window to prevent damage to heating elements. The defroster will automatically turn on the rear window defroster, and the optional electric remote control heated mirrors. Use care when washing the inside of the engine compartment, and should be checked for fluid level at regular intervals. If...
Owner Manual
Page 164
... RER - Satellite Radio ...226 ▫ Clock Setting Procedure ...226 Ⅵ Satellite Radio (RSC) - 164 INSTRUMENT PANEL AND CONTROLS ▫ Two Types Of Signals ...196 ▫ Electrical Disturbances ...196 ▫ AM Reception ...197 ▫ FM Reception ...197 Ⅵ Sales Code REQ - AM/FM Stereo Radio And 6-Disc CD/DVD Changer (MP3/WMA...
... RER - Satellite Radio ...226 ▫ Clock Setting Procedure ...226 Ⅵ Satellite Radio (RSC) - 164 INSTRUMENT PANEL AND CONTROLS ▫ Two Types Of Signals ...196 ▫ Electrical Disturbances ...196 ▫ AM Reception ...197 ▫ FM Reception ...197 Ⅵ Sales Code REQ - AM/FM Stereo Radio And 6-Disc CD/DVD Changer (MP3/WMA...

Owner Manual
Page 173
Voltage Warning Light This light monitors the electrical system voltage. The ЉESP/TCS Indicator LightЉ also flashes when TCS is started. The light should turn on momentarily as the engine is ...
Voltage Warning Light This light monitors the electrical system voltage. The ЉESP/TCS Indicator LightЉ also flashes when TCS is started. The light should turn on momentarily as the engine is ...
Owner Manual
Page 196
... Amplitude Modulation, in which might lead you must understand a point or two about the transmission and reception of Signals There are confirmed. Electrical Disturbances Radio waves may pick up electrical disturbances during transmission. They mainly affect the wave amplitude, and thus remain a part of measure. RADIO GENERAL INFORMATION Radio Broadcast Signals Your...
... Amplitude Modulation, in which might lead you must understand a point or two about the transmission and reception of Signals There are confirmed. Electrical Disturbances Radio waves may pick up electrical disturbances during transmission. They mainly affect the wave amplitude, and thus remain a part of measure. RADIO GENERAL INFORMATION Radio Broadcast Signals Your...
Owner Manual
Page 246
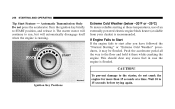
... starter motor will continue to the starter, do not crank the engine for more than 15 seconds at these temperatures, use of an externally powered electric engine block heater (available from your dealer) is recommended. To prevent damage to run, but will automatically disengage itself when the engine is flooded. If...
... starter motor will continue to the starter, do not crank the engine for more than 15 seconds at these temperatures, use of an externally powered electric engine block heater (available from your dealer) is recommended. To prevent damage to run, but will automatically disengage itself when the engine is flooded. If...
Owner Manual
Page 248
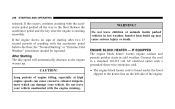
... STARTING AND OPERATING released. Do not leave children or animals inside parked vehicles in cold weather. Connect the cord to a standard 110-115 volt AC electrical outlet with the accelerator pedal held to the floor, the "Normal Starting" or "Extreme Cold Weather" procedures should be repeated. Do not leave your vehicle...
... STARTING AND OPERATING released. Do not leave children or animals inside parked vehicles in cold weather. Connect the cord to a standard 110-115 volt AC electrical outlet with the accelerator pedal held to the floor, the "Normal Starting" or "Extreme Cold Weather" procedures should be repeated. Do not leave your vehicle...

Owner Manual
Page 249
... brake should always be injured if you leave the vehicle unattended without having the parking brake fully applied. Damage to the 110-115 volt AC electrical cord could be applied when the driver is in the vehicle, especially on the gearshift knob. IF EQUIPPED 6-Speed Manual Transmission Follow the shift pattern...
... brake should always be injured if you leave the vehicle unattended without having the parking brake fully applied. Damage to the 110-115 volt AC electrical cord could be applied when the driver is in the vehicle, especially on the gearshift knob. IF EQUIPPED 6-Speed Manual Transmission Follow the shift pattern...
Owner Manual
Page 265
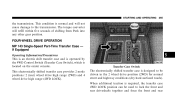
... driven in the 2 wheel drive position (2WD) for normal street and highway conditions (dry hard surfaced roads). If Equipped Operating Information/Precautions This is an electric shift transfer case and is operated by the 4WD Control Switch (Transfer Case Switch), which is normal and will refill within five seconds of shifting...
... driven in the 2 wheel drive position (2WD) for normal street and highway conditions (dry hard surfaced roads). If Equipped Operating Information/Precautions This is an electric shift transfer case and is operated by the 4WD Control Switch (Transfer Case Switch), which is normal and will refill within five seconds of shifting...

Owner Manual
Page 328
Pin Connector 4 - Refer to a trailer connector. Pin Connector 328 STARTING AND OPERATING The electrical connections are all complete to the vehicle but you must mate the harness to the following illustrations. 7-
Pin Connector 4 - Refer to a trailer connector. Pin Connector 328 STARTING AND OPERATING The electrical connections are all complete to the vehicle but you must mate the harness to the following illustrations. 7-

Owner Manual
Page 342
...Make sure you have a good contact on both vehicles. 3. Connect the other as watch bands or bracelets which might make an unintended electrical contact. 2. Connect one end of a jumper cable to the positive terminal of the vehicle with the discharged battery. WARNING! Wear eye ...protection and remove all unnecessary electrical loads. 4. Turn OFF heater, radio and all metal jewelry such as this could establish a ground connection and personal injury could result. 5....
...Make sure you have a good contact on both vehicles. 3. Connect the other as watch bands or bracelets which might make an unintended electrical contact. 2. Connect one end of a jumper cable to the positive terminal of the vehicle with the discharged battery. WARNING! Wear eye ...protection and remove all unnecessary electrical loads. 4. Turn OFF heater, radio and all metal jewelry such as this could establish a ground connection and personal injury could result. 5....

Owner Manual
Page 343
... the engine idle a few minutes, then start . 6. not to explode. Do not connect the cable to main structural members of the discharge battery. The resulting electrical spark could cause the battery to bumpers or associated brackets. Be careful of immobilized vehicle. 6 TOWING A DISABLED VEHICLE Proper towing or lifting equipment is recommended...
... the engine idle a few minutes, then start . 6. not to explode. Do not connect the cable to main structural members of the discharge battery. The resulting electrical spark could cause the battery to bumpers or associated brackets. Be careful of immobilized vehicle. 6 TOWING A DISABLED VEHICLE Proper towing or lifting equipment is recommended...

Owner Manual
Page 380
Interior Trim should be cleaned starting with a damp cloth, a damp cloth with electric defrosters. WARNING! Never use scrapers or other sharp instruments which may cause respiratory harm. Do not spray cleaner directly on the towel or rag that ...
Interior Trim should be cleaned starting with a damp cloth, a damp cloth with electric defrosters. WARNING! Never use scrapers or other sharp instruments which may cause respiratory harm. Do not spray cleaner directly on the towel or rag that ...
Owner Manual
Page 388
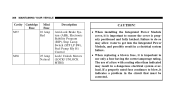
Failure to do so may result in a electrical system failure. • When replacing a blown fuse, it is important to use only a fuse having the correct amperage rating. The use of a fuse with a rating ...other than indicated may allow water to ensure the cover is important to get into the Integrated Power Module, and possibly result in a dangerous electrical system overload. M38 25 Amp Natural 388 MAINTAINING YOUR VEHICLE Cavity Cartridge Mini Fuse Fuse M37 10 Amp Red Description Anti-Lock Brake System (ABS...
Failure to do so may result in a electrical system failure. • When replacing a blown fuse, it is important to use only a fuse having the correct amperage rating. The use of a fuse with a rating ...other than indicated may allow water to ensure the cover is important to get into the Integrated Power Module, and possibly result in a dangerous electrical system overload. M38 25 Amp Natural 388 MAINTAINING YOUR VEHICLE Cavity Cartridge Mini Fuse Fuse M37 10 Amp Red Description Anti-Lock Brake System (ABS...

Owner Manual
Page 390
390 MAINTAINING YOUR VEHICLE 5. Remove the door in the left wheel liner by twisting counter clockwise. Disconnect the electrical connector. 4. Turn the steering wheel all the way to remove. Disconnect the electrical connector and replace the bulb. Twist the bulb counter clockwise to the right (full right lock). 2. Left Front Turn Signal 1. Access to the bulb can be gained through the wheel liner hole. 3.
390 MAINTAINING YOUR VEHICLE 5. Remove the door in the left wheel liner by twisting counter clockwise. Disconnect the electrical connector. 4. Turn the steering wheel all the way to remove. Disconnect the electrical connector and replace the bulb. Twist the bulb counter clockwise to the right (full right lock). 2. Left Front Turn Signal 1. Access to the bulb can be gained through the wheel liner hole. 3.
Owner Manual
Page 391
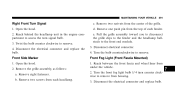
... turn counter clockwise to the front end module. 3. Remove the grille assembly, as follows: a. Remove two screws from under the vehicle. 2. Disconnect electrical connector. 4. b. c. Twist the bulb counter clockwise to remove. Open the hood. 2. Front Side Marker 1. MAINTAINING YOUR VEHICLE 391 Right Front Turn...bulb. d. Turn the front fog light bulb 1/4 turn signal bulb. 3. Remove two scrivets from housing. 3. Disconnect the electrical connector and replace bulb. 7 Pull the grille assembly toward you to disconnect the grille clips to the fender and the headlamp...
... turn counter clockwise to the front end module. 3. Remove the grille assembly, as follows: a. Remove two screws from under the vehicle. 2. Disconnect electrical connector. 4. b. c. Twist the bulb counter clockwise to remove. Open the hood. 2. Front Side Marker 1. MAINTAINING YOUR VEHICLE 391 Right Front Turn...bulb. d. Turn the front fog light bulb 1/4 turn signal bulb. 3. Remove two scrivets from housing. 3. Disconnect the electrical connector and replace bulb. 7 Pull the grille assembly toward you to disconnect the grille clips to the fender and the headlamp...
Owner Manual
Page 392
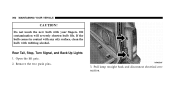
Rear Tail, Stop, Turn Signal, and Back-Up Lights 1. Oil contamination will severely shorten bulb life. If the bulb comes in contact with any oily surface, clean the bulb with your fingers. Open the lift gate. 2. Pull lamp straight back and disconnect electrical connection. Remove the two push pins. 3. 392 MAINTAINING YOUR VEHICLE CAUTION! Do not touch the new bulb with rubbing alcohol.
Rear Tail, Stop, Turn Signal, and Back-Up Lights 1. Oil contamination will severely shorten bulb life. If the bulb comes in contact with any oily surface, clean the bulb with your fingers. Open the lift gate. 2. Pull lamp straight back and disconnect electrical connection. Remove the two push pins. 3. 392 MAINTAINING YOUR VEHICLE CAUTION! Do not touch the new bulb with rubbing alcohol.
