Owner Manual
Page 33
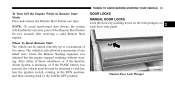
...one failed start, where the Remote Starting sequence was pressed, the vehicle must be started remotely up to the LOCK/OFF position. DOOR LOCKS MANUAL DOOR LOCKS Lock the doors by inserting a valid key into the ignition switch, rotating to the RUN position, and then rotating back to a maximum of the...disable the one time. When To Reset Remote Start The vehicle can be reset by pushing down on the lock plungers on each door trim panel. 2 Manual Door Lock Plunger THINGS TO KNOW BEFORE STARTING YOUR VEHICLE 31 To Turn Off the Engine While in Remote Start Mode Press and release ...
...one failed start, where the Remote Starting sequence was pressed, the vehicle must be started remotely up to the LOCK/OFF position. DOOR LOCKS MANUAL DOOR LOCKS Lock the doors by inserting a valid key into the ignition switch, rotating to the RUN position, and then rotating back to a maximum of the...disable the one time. When To Reset Remote Start The vehicle can be reset by pushing down on the lock plungers on each door trim panel. 2 Manual Door Lock Plunger THINGS TO KNOW BEFORE STARTING YOUR VEHICLE 31 To Turn Off the Engine While in Remote Start Mode Press and release ...
Owner Manual
Page 34
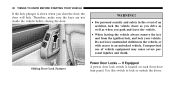
... severe personal injuries and death. WARNING! • For personal security and safety in the vehicle, or with access to lock or unlock the doors. If Equipped A power door lock switch is down when you park and leave the vehicle. • When leaving the vehicle always remove the key and from the ignition... lock, and lock your vehicle. 32 THINGS TO KNOW BEFORE STARTING YOUR VEHICLE If the lock plunger is located on each front door trim panel. Use this switch to an unlocked vehicle. Sliding...
... severe personal injuries and death. WARNING! • For personal security and safety in the vehicle, or with access to lock or unlock the doors. If Equipped A power door lock switch is down when you park and leave the vehicle. • When leaving the vehicle always remove the key and from the ignition... lock, and lock your vehicle. 32 THINGS TO KNOW BEFORE STARTING YOUR VEHICLE If the lock plunger is located on each front door trim panel. Use this switch to an unlocked vehicle. Sliding...
Owner Manual
Page 38
... on vehicles so equipped. Open 2 - Close The Unlock Doors Automatically On Exit feature can be changed. NOTE: Use the Lock Doors Automatically at 15 mph (24 km/h) and Unlock Doors Automatically On Exit features in the EVIC, Customer Programmable Features section on the driver's door trim panel let the driver operate the two vent windows...
... on vehicles so equipped. Open 2 - Close The Unlock Doors Automatically On Exit feature can be changed. NOTE: Use the Lock Doors Automatically at 15 mph (24 km/h) and Unlock Doors Automatically On Exit features in the EVIC, Customer Programmable Features section on the driver's door trim panel let the driver operate the two vent windows...
Owner Manual
Page 39
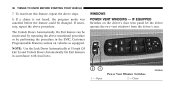
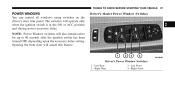
...Driver's Master Power Window Switches 2 Driver's Power Window Switches 1 - Left Front 4 - Right Front Right Rear 3 - Opening the front door will operate only when the ignition switch is in the ON or ACC position and during power accessory delay. Left Rear 2 - The switches will... cancel this feature. THINGS TO KNOW BEFORE STARTING YOUR VEHICLE 37 POWER WINDOWS You can control all windows using switches on the driver's door trim panel. NOTE: Power Window switches will also remain active for up to 90 seconds after the ignition switch has been turned OFF, depending upon...
...Driver's Master Power Window Switches 2 Driver's Power Window Switches 1 - Left Front 4 - Right Front Right Rear 3 - Opening the front door will operate only when the ignition switch is in the ON or ACC position and during power accessory delay. Left Rear 2 - The switches will... cancel this feature. THINGS TO KNOW BEFORE STARTING YOUR VEHICLE 37 POWER WINDOWS You can control all windows using switches on the driver's door trim panel. NOTE: Power Window switches will also remain active for up to 90 seconds after the ignition switch has been turned OFF, depending upon...
Owner Manual
Page 40
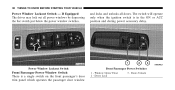
... the ignition switch is a single switch on the front passenger's door trim panel which operates the passenger door window 38 THINGS TO KNOW BEFORE STARTING YOUR VEHICLE Power Window Lockout Switch - Doors Lock 3 - Window Open/Close 2 - Power Window Lockout Switch Front Passenger Power Switches 1 - Doors Unlock Front Passenger Power Window Switch There is in the...
... the ignition switch is a single switch on the front passenger's door trim panel which operates the passenger door window 38 THINGS TO KNOW BEFORE STARTING YOUR VEHICLE Power Window Lockout Switch - Doors Lock 3 - Window Open/Close 2 - Power Window Lockout Switch Front Passenger Power Switches 1 - Doors Unlock Front Passenger Power Window Switch There is in the...
Owner Manual
Page 44
... fully closed prior to open latch that the sliding door is fully latched anytime the vehicle is in front of the power sliding door for the rear seat passengers. Press the button on the trim panel just in motion. When the door is fully open, pressing the button twice within five seconds..., to opening the fuel door. 42 THINGS TO KNOW BEFORE STARTING YOUR VEHICLE •...
... fully closed prior to open latch that the sliding door is fully latched anytime the vehicle is in front of the power sliding door for the rear seat passengers. Press the button on the trim panel just in motion. When the door is fully open, pressing the button twice within five seconds..., to opening the fuel door. 42 THINGS TO KNOW BEFORE STARTING YOUR VEHICLE •...

Owner Manual
Page 47
...row power sliding door switches may also be overridden by repeating the above mentioned procedure. Master Lock THINGS TO KNOW BEFORE STARTING YOUR VEHICLE 45 You can turn the feature back on the trim panel just in front of the sliding door. Left Door 2 - Power Sliding Side Door Master Lock Switch ...The power sliding side doors may be opened by pressing the switches on the overhead console or the switches...
...row power sliding door switches may also be overridden by repeating the above mentioned procedure. Master Lock THINGS TO KNOW BEFORE STARTING YOUR VEHICLE 45 You can turn the feature back on the trim panel just in front of the sliding door. Left Door 2 - Power Sliding Side Door Master Lock Switch ...The power sliding side doors may be opened by pressing the switches on the overhead console or the switches...
Owner Manual
Page 49
...) to the ON position. Repeat Steps 1 and 2 on the trim panel just in front of the power sliding door when the child protection locks are engaged. Avoid trapping anyone in the vehicle in a collision. Open the sliding side door. 2. To Disengage The Child Protection Door Lock 1. To avoid unintentional operation of the power sliding...
...) to the ON position. Repeat Steps 1 and 2 on the trim panel just in front of the power sliding door when the child protection locks are engaged. Avoid trapping anyone in the vehicle in a collision. Open the sliding side door. 2. To Disengage The Child Protection Door Lock 1. To avoid unintentional operation of the power sliding...

Owner Manual
Page 101
If Equipped ...203 Ⅵ Storage ...208 ▫ Glove Compartments ...208 ▫ Door Trim Panel Storage ...209 ▫ Second Row Floor Storage Bins - If Equipped ...215 Ⅵ Umbrella Holder ...217 Ⅵ Load-Leveling System - If Equipped ...198 Ⅵ Cup ...
If Equipped ...203 Ⅵ Storage ...208 ▫ Glove Compartments ...208 ▫ Door Trim Panel Storage ...209 ▫ Second Row Floor Storage Bins - If Equipped ...215 Ⅵ Umbrella Holder ...217 Ⅵ Load-Leveling System - If Equipped ...198 Ⅵ Cup ...

Owner Manual
Page 105
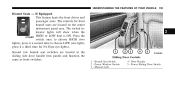
... ignition switch does not have to adjust the view obtained in the ON position. If Equipped Use the mirror select switch located on the driver's door trim panel, to be in the outside Power Side Mirror Adjust 1 - UNDERSTANDING THE FEATURES OF YOUR VEHICLE 103 mirrors. Adjusting Switch Right Mirror 3 - Press the mirror...
... ignition switch does not have to adjust the view obtained in the ON position. If Equipped Use the mirror select switch located on the driver's door trim panel, to be in the outside Power Side Mirror Adjust 1 - UNDERSTANDING THE FEATURES OF YOUR VEHICLE 103 mirrors. Adjusting Switch Right Mirror 3 - Press the mirror...
Owner Manual
Page 137
Door Handle 5 - Power Sliding Door Switch Heated Seat Switch 2 - Power Window Switch 3 - Manual Lock 4 - If Equipped This feature heats the front driver and passenger seats. The controls for No Heat (... time to choose LOW (one light), press it a third time for front heated seats are located in the sliding side door handle trim panels and function the same as front switches. 3 Sliding Door Controls 1 - The switch indicator lights will show when the HIGH or LOW heat is ON. Second row heated seat switches...
Door Handle 5 - Power Sliding Door Switch Heated Seat Switch 2 - Power Window Switch 3 - Manual Lock 4 - If Equipped This feature heats the front driver and passenger seats. The controls for No Heat (... time to choose LOW (one light), press it a third time for front heated seats are located in the sliding side door handle trim panels and function the same as front switches. 3 Sliding Door Controls 1 - The switch indicator lights will show when the HIGH or LOW heat is ON. Second row heated seat switches...

Owner Manual
Page 198
...INVERTER - Press the switch to turn the power off. 196 UNDERSTANDING THE FEATURES OF YOUR VEHICLE when the overload is located on the left rear trim panel immediately behind the second row left passenger seat. Refer to turn the power on for the outlet, press the switch a second time to... can be used to power small appliances and electronics. 110 Volt Power Inverter The Power Inverter switch is located near the center of the sliding door and is located on the driver's side, just to provide power with the ignition switch in the front position. A third outlet is removed. ...
...INVERTER - Press the switch to turn the power off. 196 UNDERSTANDING THE FEATURES OF YOUR VEHICLE when the overload is located on the left rear trim panel immediately behind the second row left passenger seat. Refer to turn the power on for the outlet, press the switch a second time to... can be used to power small appliances and electronics. 110 Volt Power Inverter The Power Inverter switch is located near the center of the sliding door and is located on the driver's side, just to provide power with the ignition switch in the front position. A third outlet is removed. ...
Owner Manual
Page 203
... are flexible enough to remove for more detailed information. • A Top Storage Tray. 3 One bottle holder is molded into each front interior door trim panels, and one of the following: • The basic console profile allows vehicle occupants to easily pass through the first row to accommodate a second...consoles available: Basic and Premium. Refer to 20 oz. (.6 L) size plastic bottles. Press the ash receiver into each side sliding interior door trim panel. Basic Console Basic Console features consist of the two cup holders in Section 7 for cleaning and/or storage.
... are flexible enough to remove for more detailed information. • A Top Storage Tray. 3 One bottle holder is molded into each front interior door trim panels, and one of the following: • The basic console profile allows vehicle occupants to easily pass through the first row to accommodate a second...consoles available: Basic and Premium. Refer to 20 oz. (.6 L) size plastic bottles. Press the ash receiver into each side sliding interior door trim panel. Basic Console Basic Console features consist of the two cup holders in Section 7 for cleaning and/or storage.

Owner Manual
Page 211
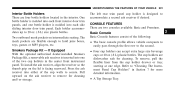
Bottle Holder 4 - Door Trim Panel Storage Front Door Storage Both interior front door panels have multiple pockets for storage. 3 Front Door Storage 1 - Storage Pocket 3 - Front Map Pocket The lower compartment handle is also equipped with a lock. UNDERSTANDING THE FEATURES OF YOUR VEHICLE 209 Lower Glove Compartment To open the lower compartment (1) pull out on the release handle (2). Rear Map Pocket 2 -
Bottle Holder 4 - Door Trim Panel Storage Front Door Storage Both interior front door panels have multiple pockets for storage. 3 Front Door Storage 1 - Storage Pocket 3 - Front Map Pocket The lower compartment handle is also equipped with a lock. UNDERSTANDING THE FEATURES OF YOUR VEHICLE 209 Lower Glove Compartment To open the lower compartment (1) pull out on the release handle (2). Rear Map Pocket 2 -

Owner Manual
Page 212
210 UNDERSTANDING THE FEATURES OF YOUR VEHICLE Sliding Side Door Bottle Holder Both sliding doors have a bottle holder molded right into the trim. If Equipped The Second Row Seat Storage Bins are located on the floor in the upright position. Sliding Door Bottle Holder Storage Bin Cover Lock Release The area below the floor covers can be used for storage when the second row seat is in front of the second row seats. Second Row Floor Storage Bins -
210 UNDERSTANDING THE FEATURES OF YOUR VEHICLE Sliding Side Door Bottle Holder Both sliding doors have a bottle holder molded right into the trim. If Equipped The Second Row Seat Storage Bins are located on the floor in the upright position. Sliding Door Bottle Holder Storage Bin Cover Lock Release The area below the floor covers can be used for storage when the second row seat is in front of the second row seats. Second Row Floor Storage Bins -
Owner Manual
Page 310
... range of the inlet grille or heater outlets. Rear PANEL mode is automatically selected when the front control is in the passenger side trim panel just behind the third seat. Rear Temperature Control When the blower knob on the front climate control unit is in front of blower... speeds. The rear mode selection follows the setting of air circulated in the passenger side trim panel behind the sliding door. The electrical system could overload causing damage to any position other than RR , the rear temperature selection follows the setting of...
... range of the inlet grille or heater outlets. Rear PANEL mode is automatically selected when the front control is in the passenger side trim panel just behind the third seat. Rear Temperature Control When the blower knob on the front climate control unit is in front of blower... speeds. The rear mode selection follows the setting of air circulated in the passenger side trim panel behind the sliding door. The electrical system could overload causing damage to any position other than RR , the rear temperature selection follows the setting of...
Owner Manual
Page 319
... to lower the temperature and clockwise to increase the temperature. Rear Temperature Control To change the temperature in the passenger side trim panel behind the sliding door. When rear controls are ignored. The electrical system could overload causing damage to provide cooler air out of the inlet grille... Mode Air comes from both the headliner outlets and the floor outlets. Do not block or place objects directly in the passenger side trim panel just behind the third seat. The REAR temperature settings are located in front of the headliner outlets and warmer air from the ...
... to lower the temperature and clockwise to increase the temperature. Rear Temperature Control To change the temperature in the passenger side trim panel behind the sliding door. When rear controls are ignored. The electrical system could overload causing damage to provide cooler air out of the inlet grille... Mode Air comes from both the headliner outlets and the floor outlets. Do not block or place objects directly in the passenger side trim panel just behind the third seat. The REAR temperature settings are located in front of the headliner outlets and warmer air from the ...


