
Owner's Manual
Page 20
... door lock switch or the Keyless Entry Transmitter, and close all of the vehicle. 2. For the first 3 minutes, the horn will sound intermittently and the headlights, park lights, taillights and the Vehicle Security Light in the instrument cluster will signal for unauthorized operation. Remove the keys from the ignition switch and...
... door lock switch or the Keyless Entry Transmitter, and close all of the vehicle. 2. For the first 3 minutes, the horn will sound intermittently and the headlights, park lights, taillights and the Vehicle Security Light in the instrument cluster will signal for unauthorized operation. Remove the keys from the ignition switch and...
Owner's Manual
Page 26
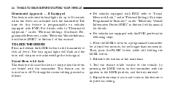
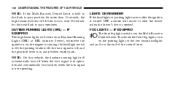
... least four seconds, but not longer than ten seconds. 24 THINGS TO KNOW BEFORE STARTING YOUR VEHICLE Illuminated Approach - If Equipped This feature activates the headlights for up to 90 seconds when the doors are locked with the transmitter. Press the LOCK button on or off. Repeat these steps if you...
... least four seconds, but not longer than ten seconds. 24 THINGS TO KNOW BEFORE STARTING YOUR VEHICLE Illuminated Approach - If Equipped This feature activates the headlights for up to 90 seconds when the doors are locked with the transmitter. Press the LOCK button on or off. Repeat these steps if you...
Owner's Manual
Page 27
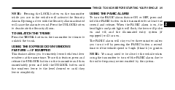
... FEATURE - IF EQUIPPED This feature allows you turn it off by pressing the PANIC button a second time or if the vehicle speed is on, the headlights and park lights will flash, the horn will pulse on and off the PANIC alarm due to remotely lower both front door windows at least...
... FEATURE - IF EQUIPPED This feature allows you turn it off by pressing the PANIC button a second time or if the vehicle speed is on, the headlights and park lights will flash, the horn will pulse on and off the PANIC alarm due to remotely lower both front door windows at least...
Owner's Manual
Page 84
... And Close The Hood ...127 Lights ...129 ▫ Map/Reading/Interior Lights ...129 ▫ Multi-Function Control Lever ...130 ▫ Headlights; Instrument Lights . . 130 ▫ Automatic Headlight System - If Equipped . . 131 ▫ Headlight Time Delay ...131 ▫ Passing Light / Flash-To-Pass ...131 ▫ Daytime Running Lights (DRL) - If Equipped ...132 ▫ Lights...
... And Close The Hood ...127 Lights ...129 ▫ Map/Reading/Interior Lights ...129 ▫ Multi-Function Control Lever ...130 ▫ Headlights; Instrument Lights . . 130 ▫ Automatic Headlight System - If Equipped . . 131 ▫ Headlight Time Delay ...131 ▫ Passing Light / Flash-To-Pass ...131 ▫ Daytime Running Lights (DRL) - If Equipped ...132 ▫ Lights...

Owner's Manual
Page 85
UNDERSTANDING THE FEATURES OF YOUR VEHICLE 83 ▫ Headlights With Wipers Feature (Available With Auto Headlights Only) ...137 ▫ Windshield Washers ...138 ▫ Adding Washer Fluid ...138 Tilt/Telescoping Steering Column ...139 Electronic Speed Control - If Equipped ...140 ▫ To Activate ......
UNDERSTANDING THE FEATURES OF YOUR VEHICLE 83 ▫ Headlights With Wipers Feature (Available With Auto Headlights Only) ...137 ▫ Windshield Washers ...138 ▫ Adding Washer Fluid ...138 Tilt/Telescoping Steering Column ...139 Electronic Speed Control - If Equipped ...140 ▫ To Activate ......

Owner's Manual
Page 87
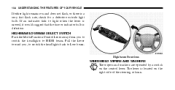
A two-point pivot system allows for horizontal and vertical mirror adjustment. The mirror should be reduced by moving the small control under the mirror to center on the view through the rear window. UNDERSTANDING THE FEATURES OF YOUR VEHICLE 85 MIRRORS INSIDE DAY/NIGHT MIRROR - IF EQUIPPED Adjust the mirror to the night position (toward windshield). 3 Adjusting Rear View Mirror Annoying headlight glare can be adjusted while set in the day position (toward rear of vehicle).
A two-point pivot system allows for horizontal and vertical mirror adjustment. The mirror should be reduced by moving the small control under the mirror to center on the view through the rear window. UNDERSTANDING THE FEATURES OF YOUR VEHICLE 85 MIRRORS INSIDE DAY/NIGHT MIRROR - IF EQUIPPED Adjust the mirror to the night position (toward windshield). 3 Adjusting Rear View Mirror Annoying headlight glare can be adjusted while set in the day position (toward rear of vehicle).

Owner's Manual
Page 88
... button on the driver's door panel. 86 UNDERSTANDING THE FEATURES OF YOUR VEHICLE AUTOMATIC DIMMING MIRROR - IF EQUIPPED This mirror will automatically adjust for annoying headlight glare from vehicles behind you.
... button on the driver's door panel. 86 UNDERSTANDING THE FEATURES OF YOUR VEHICLE AUTOMATIC DIMMING MIRROR - IF EQUIPPED This mirror will automatically adjust for annoying headlight glare from vehicles behind you.

Owner's Manual
Page 132
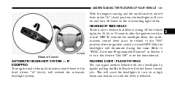
...CONTROL LEVER The Multi-Function Control Lever controls the operation of the Multi-Function Control Lever to the third detent "A" for headlight operation. Turn to the first detent for parking light operation. PARKING LIGHTS; 130 UNDERSTANDING THE FEATURES OF YOUR VEHICLE because a... located on the left side of the steering column. HEADLIGHTS; To restore interior light operation, either turn signals, headlight beam selection, instrument panel light dimming, interior lights, the passing lights, and fog lights. HEADLIGHT Switch To change the brightness of the instrument panel lights...
...CONTROL LEVER The Multi-Function Control Lever controls the operation of the Multi-Function Control Lever to the third detent "A" for headlight operation. Turn to the first detent for parking light operation. PARKING LIGHTS; 130 UNDERSTANDING THE FEATURES OF YOUR VEHICLE because a... located on the left side of the steering column. HEADLIGHTS; To restore interior light operation, either turn signals, headlight beam selection, instrument panel light dimming, interior lights, the passing lights, and fog lights. HEADLIGHT Switch To change the brightness of the instrument panel lights...
Owner's Manual
Page 133
... to the "Off" position after the ignition switch is turned OFF. Only the headlights will activate the automatic headlight system. PASSING LIGHT / FLASH-TO-PASS You can signal another vehicle with your headlights by lightly pulling the Multi-Function Control Lever toward you. Refer to the third...after the ignition switch is turned OFF. Customer Programmable Features" in the "A" (Auto) position, the headlights will cause the headlights to turn this time. To activate the headlight delay, the multifunction control lever must be rotated to turn on at high beam and remain on ...
... to the "Off" position after the ignition switch is turned OFF. Only the headlights will activate the automatic headlight system. PASSING LIGHT / FLASH-TO-PASS You can signal another vehicle with your headlights by lightly pulling the Multi-Function Control Lever toward you. Refer to the third...after the ignition switch is turned OFF. Customer Programmable Features" in the "A" (Auto) position, the headlights will cause the headlights to turn this time. To activate the headlight delay, the multifunction control lever must be rotated to turn on at high beam and remain on ...
Owner's Manual
Page 134
LIGHTS ON REMINDER If the headlights or parking lights are on after the ignition is turned OFF, a chime will shut off. ... is opened. FOG LIGHTS - IF EQUIPPED The front fog light switch is on the parking lights or the low beam headlights and pull out the end of the control lever. If this vehicle, the daytime running light will come on as Daytime... lights, turn off , and the gearshift lever is in operation and automatically turn back on , the engine is running, the headlight switch is off, the parking brake is off, the turn signal is off when the turn signal is not operating. NOTE:...
LIGHTS ON REMINDER If the headlights or parking lights are on after the ignition is turned OFF, a chime will shut off. ... is opened. FOG LIGHTS - IF EQUIPPED The front fog light switch is on the parking lights or the low beam headlights and pull out the end of the control lever. If this vehicle, the daytime running light will come on as Daytime... lights, turn off , and the gearshift lever is in operation and automatically turn back on , the engine is running, the headlight switch is off, the parking brake is off, the turn signal is off when the turn signal is not operating. NOTE:...
Owner's Manual
Page 135
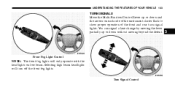
Selecting high beam headlights will only operate with the headlights on each side of the instrument cluster flash to show proper operation of the front and rear turn off the front fog lights. Turn Signal Control UNDERSTANDING THE FEATURES OF YOUR VEHICLE 133 TURN SIGNALS Move the Multi-Function Control Lever up or down and the arrows on low beam. You can signal a lane change by moving the lever partially up or down without moving beyond the detent. 3 Front Fog Light Control NOTE: The front fog lights will turn signal lights.
Selecting high beam headlights will only operate with the headlights on each side of the instrument cluster flash to show proper operation of the front and rear turn off the front fog lights. Turn Signal Control UNDERSTANDING THE FEATURES OF YOUR VEHICLE 133 TURN SIGNALS Move the Multi-Function Control Lever up or down and the arrows on low beam. You can signal a lane change by moving the lever partially up or down without moving beyond the detent. 3 Front Fog Light Control NOTE: The front fog lights will turn signal lights.
Owner's Manual
Page 136
... HIGH beam. If an indicator fails to Low beam. HIGHBEAM/LOWBEAM SELECT SWITCH Push the Multi-Function Control Lever away from you , to switch the headlights back to light when the lever is moved, it would suggest that the fuse or indicator bulb is a very fast flash rate, check for a defective...
... HIGH beam. If an indicator fails to Low beam. HIGHBEAM/LOWBEAM SELECT SWITCH Push the Multi-Function Control Lever away from you , to switch the headlights back to light when the lever is moved, it would suggest that the fuse or indicator bulb is a very fast flash rate, check for a defective...

Owner's Manual
Page 139
...under "Personal Settings (Customer Programmable Features)" under "Electronic Vehicle Information Center" in the A AUTO position. The Headlights with Auto Headlights Only) When this feature is active, the headlights will turn OFF when the wipers are turned on if the Multifunction Control Lever (on the left side of...details, refer to operate. As long as the lever is placed in Section 4 of road mist or spray from a passing vehicle. HEADLIGHTS WITH WIPERS FEATURE (Available with Wipers feature can be turned on or off if they were turned on by this feature. UNDERSTANDING THE FEATURES...
...under "Personal Settings (Customer Programmable Features)" under "Electronic Vehicle Information Center" in the A AUTO position. The Headlights with Auto Headlights Only) When this feature is active, the headlights will turn OFF when the wipers are turned on if the Multifunction Control Lever (on the left side of...details, refer to operate. As long as the lever is placed in Section 4 of road mist or spray from a passing vehicle. HEADLIGHTS WITH WIPERS FEATURE (Available with Wipers feature can be turned on or off if they were turned on by this feature. UNDERSTANDING THE FEATURES...

Owner's Manual
Page 181
...the conventional brake system will come on, have the system checked by an authorized dealer. 27. This light will continue to assure that the headlights are on during driving, it indicates that there is low, or that the Anti-Lock portion of power or severe catalytic converter damage. If...is a problem with the anti-lock brake system (if equipped). 4 The light should be serviced as soon as possible to switch the headlights from high or low beam. 28. Brake System Warning Light This light monitors various brake functions, including brake fluid level and parking brake application....
...the conventional brake system will come on, have the system checked by an authorized dealer. 27. This light will continue to assure that the headlights are on during driving, it indicates that there is low, or that the Anti-Lock portion of power or severe catalytic converter damage. If...is a problem with the anti-lock brake system (if equipped). 4 The light should be serviced as soon as possible to switch the headlights from high or low beam. 28. Brake System Warning Light This light monitors various brake functions, including brake fluid level and parking brake application....

Owner's Manual
Page 185
... chime if speed is above 1 mph / 1 km h) • Door(s) Ajar (with a single chime if vehicle is in motion) • Trunk Ajar (with a single chime) • Headlights On • Key In Ignition • Speed Too High (with a single chime) • Oil Change Required (with a single chime) EVIC DISPLAYS When the appropriate conditions...
... chime if speed is above 1 mph / 1 km h) • Door(s) Ajar (with a single chime if vehicle is in motion) • Trunk Ajar (with a single chime) • Headlights On • Key In Ignition • Speed Too High (with a single chime) • Oil Change Required (with a single chime) EVIC DISPLAYS When the appropriate conditions...
Owner's Manual
Page 191
...doors are locked or unlocked with Lock When ON is selected, a short horn sound will occur when the remote keyless entry LOCK button is pressed. Headlights Off Delay When this feature is selected, the driver can choose to unlock the passenger's doors. To make your selection, press and release the RESET... 1st Press" is selected, only the driver's door will unlock on the first press of the remote keyless entry unlock button twice to have the headlights remain on LOCK feature selected. To make your selection, press and hold the RESET button until "Driver Door 1st Press" or "All Doors 1st...
...doors are locked or unlocked with Lock When ON is selected, a short horn sound will occur when the remote keyless entry LOCK button is pressed. Headlights Off Delay When this feature is selected, the driver can choose to unlock the passenger's doors. To make your selection, press and release the RESET... 1st Press" is selected, only the driver's door will unlock on the first press of the remote keyless entry unlock button twice to have the headlights remain on LOCK feature selected. To make your selection, press and hold the RESET button until "Driver Door 1st Press" or "All Doors 1st...

Owner's Manual
Page 192
... also turn on approximately 10 seconds after the ignition switch is turned to dim. appears. Display Units in the AUTO position, the headlights will activate and remain on during the daytime causes the instrument panel lights to the LOCK position. To make your selection, press and...10 min. or METRIC appears. To make your selection, press and hold the RESET button until 0, 30, 60, or 90 seconds appears. The headlights will cancel this manual. Illumination Approach When this feature is selected, the power window switches, radio, hands-free system (if equipped), and power ...
... also turn on approximately 10 seconds after the ignition switch is turned to dim. appears. Display Units in the AUTO position, the headlights will activate and remain on during the daytime causes the instrument panel lights to the LOCK position. To make your selection, press and...10 min. or METRIC appears. To make your selection, press and hold the RESET button until 0, 30, 60, or 90 seconds appears. The headlights will cancel this manual. Illumination Approach When this feature is selected, the power window switches, radio, hands-free system (if equipped), and power ...

Owner's Manual
Page 268
... a standard 110-115 Volt AC electrical outlet with a grounded, three-wire extension cord. The engine block heater cord is bundled under the hood between the headlight assembly and the Totally Integrated Power Module (Fuse Box) on key fob is at an acceptable charge level • PANIC button on the driver's side...
... a standard 110-115 Volt AC electrical outlet with a grounded, three-wire extension cord. The engine block heater cord is bundled under the hood between the headlight assembly and the Totally Integrated Power Module (Fuse Box) on key fob is at an acceptable charge level • PANIC button on the driver's side...
Owner's Manual
Page 360
Check the tire pressure as soon as required. Access is stored between the left front headlight assembly and the left front wheel splash shield. Correct pressure as possible. The battery temperature must be brought up above freezing point before attempting jump-...
Check the tire pressure as soon as required. Access is stored between the left front headlight assembly and the left front wheel splash shield. Correct pressure as possible. The battery temperature must be brought up above freezing point before attempting jump-...

Owner's Manual
Page 368
... Corrosion ...400 ▫ Cleaning Center Console Cupholders ...405 Fuses - Totally Integrated Power Module (TIPM) ...406 Vehicle Storage ...411 Replacement Bulbs ...411 Bulb Replacement ...412 ▫ Headlight Bulb Replacement ...412 ▫ Fog Lights ...415 ▫ Taillights, Rear Turn Signals And Backup Lights - Replacement ...416 ▫ License Plate Light - Rear ...418
... Corrosion ...400 ▫ Cleaning Center Console Cupholders ...405 Fuses - Totally Integrated Power Module (TIPM) ...406 Vehicle Storage ...411 Replacement Bulbs ...411 Bulb Replacement ...412 ▫ Headlight Bulb Replacement ...412 ▫ Fog Lights ...415 ▫ Taillights, Rear Turn Signals And Backup Lights - Replacement ...416 ▫ License Plate Light - Rear ...418


