
Owner's Manual
Page 1
SECTION 1 2 3 4 5 6 7 8 9 10 TABLE OF CONTENTS PAGE INTRODUCTION ...3 THINGS TO KNOW BEFORE STARTING YOUR VEHICLE ...11 UNDERSTANDING THE FEATURES OF YOUR VEHICLE ...77 INSTRUMENT PANEL AND CONTROLS ...159 STARTING AND OPERATING ...235 WHAT TO DO IN EMERGENCIES ...323 MAINTAINING YOUR VEHICLE ...335 MAINTENANCE SCHEDULES ...385 IF YOU NEED CONSUMER ASSISTANCE ...411 INDEX ...419 1 2 3 4 5 6 7 8 9 10
SECTION 1 2 3 4 5 6 7 8 9 10 TABLE OF CONTENTS PAGE INTRODUCTION ...3 THINGS TO KNOW BEFORE STARTING YOUR VEHICLE ...11 UNDERSTANDING THE FEATURES OF YOUR VEHICLE ...77 INSTRUMENT PANEL AND CONTROLS ...159 STARTING AND OPERATING ...235 WHAT TO DO IN EMERGENCIES ...323 MAINTAINING YOUR VEHICLE ...335 MAINTENANCE SCHEDULES ...385 IF YOU NEED CONSUMER ASSISTANCE ...411 INDEX ...419 1 2 3 4 5 6 7 8 9 10

Owner's Manual
Page 12
... ...38 ▫ Lap/Shoulder Belt Operating Instructions ...39 ▫ Adjustable Upper Shoulder Belt Anchorage ...42 ▫ Automatic Locking Mode - If Equipped ...43 ▫ Energy Management Feature ...43 ▫ Seat Belt Pretensioners ...44 ▫ Enhanced Seat Belt Use Reminder System (BeltAlert) ...44 ▫ Seat Belts And Pregnant Women ...45 ▫ Seat Belt...
... ...38 ▫ Lap/Shoulder Belt Operating Instructions ...39 ▫ Adjustable Upper Shoulder Belt Anchorage ...42 ▫ Automatic Locking Mode - If Equipped ...43 ▫ Energy Management Feature ...43 ▫ Seat Belt Pretensioners ...44 ▫ Enhanced Seat Belt Use Reminder System (BeltAlert) ...44 ▫ Seat Belts And Pregnant Women ...45 ▫ Seat Belt...
Owner's Manual
Page 21
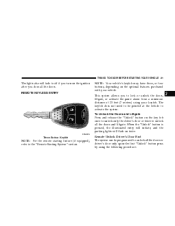
... the following procedure: To Unlock the Doors and Liftgate Press and release the "Unlock" button on twice. 2 Three Button Keyfob NOTE: For the remote starting feature (if equipped), refer to unlock all the doors or driver's door only upon the first "Unlock" button press by using your vehicle. When the "Unlock..." button is pressed, the illuminated entry will initiate, and the parking lights will fade to off if you turn on the optional features purchased with your keyfob.
... the following procedure: To Unlock the Doors and Liftgate Press and release the "Unlock" button on twice. 2 Three Button Keyfob NOTE: For the remote starting feature (if equipped), refer to unlock all the doors or driver's door only upon the first "Unlock" button press by using your vehicle. When the "Unlock..." button is pressed, the illuminated entry will initiate, and the parking lights will fade to off if you turn on the optional features purchased with your keyfob.
Owner's Manual
Page 22
..., the parking lights will chip once to unlock all doors on once and the horn will chirp once. If desired, the "Sound Horn On Lock" feature can be turned on the key fob to "Personal Settings" in the EVIC section (Section 4) of the "Unlock" button. To Lock the Doors and Liftgate...
..., the parking lights will chip once to unlock all doors on once and the horn will chirp once. If desired, the "Sound Horn On Lock" feature can be turned on the key fob to "Personal Settings" in the EVIC section (Section 4) of the "Unlock" button. To Lock the Doors and Liftgate...

Owner's Manual
Page 23
functional) key fob. 3. To reactivate this feature, repeat the above steps. To reactivate this feature, repeat the above steps. Perform this manual. • On non EVIC - equipped vehicles perform the following steps: 1. Release both buttons at the same...hear the differences in the EVIC section (Section 4) of this operation while standing outside the vehicle. 2. Flash Lights With Lock The Flash Lights With Lock feature can be turned on a programmed (i.e. Press and hold the "Lock" button. functional) key fob. 3. THINGS TO KNOW BEFORE STARTING YOUR VEHICLE 23 ...
functional) key fob. 3. To reactivate this feature, repeat the above steps. To reactivate this feature, repeat the above steps. Perform this manual. • On non EVIC - equipped vehicles perform the following steps: 1. Release both buttons at the same...hear the differences in the EVIC section (Section 4) of this operation while standing outside the vehicle. 2. Flash Lights With Lock The Flash Lights With Lock feature can be turned on a programmed (i.e. Press and hold the "Lock" button. functional) key fob. 3. THINGS TO KNOW BEFORE STARTING YOUR VEHICLE 23 ...

Owner's Manual
Page 30
...Unlock on or off. Automatic Door Locks If this manual or see your keys in Section 4 of this feature is selected your authorized dealer. This feature is selectable and can be turned on Exit Feature - Only Available if Auto Lock is in P (Park) or N (Neutral). A chime will sound if... locking your authorized dealer. Refer to the lock or unlock position. Refer to "Electronic Vehicle Information Center (EVIC) - Customer Programmable Features" in Section 4 of the ignition key into the lock and rotate to "Electronic Vehicle Information Center (EVIC) - Customer Programmable...
...Unlock on or off. Automatic Door Locks If this manual or see your keys in Section 4 of this feature is selected your authorized dealer. This feature is selectable and can be turned on Exit Feature - Only Available if Auto Lock is in P (Park) or N (Neutral). A chime will sound if... locking your authorized dealer. Refer to the lock or unlock position. Refer to "Electronic Vehicle Information Center (EVIC) - Customer Programmable Features" in Section 4 of the ignition key into the lock and rotate to "Electronic Vehicle Information Center (EVIC) - Customer Programmable...

Owner's Manual
Page 31
... Switches 2 The power window switches remain active for up (unlocked position), roll down window and open the door with a Electronic Vehicle Information Center (EVIC), this feature is in a collision. Remember that the rear doors can only be opened from the outside door handle. NOTE: For emergency exit with the system engaged...
... Switches 2 The power window switches remain active for up (unlocked position), roll down window and open the door with a Electronic Vehicle Information Center (EVIC), this feature is in a collision. Remember that the rear doors can only be opened from the outside door handle. NOTE: For emergency exit with the system engaged...

Owner's Manual
Page 32
...and the window will go down operation, pull up or down direction and release the switch. Opening a vehicle front door will cancel this feature. Occupants, particularly unattended children, can become entrapped by the windows while operating the power window switches. Auto Down The driver door power window ..." in either front door will cancel this manual. To cancel the "Auto Down" movement, operate the switch in Section 4 of this feature. The power window switches remain active for 10 minutes after the ignition has been turned off. WARNING! Such entrapment may result in the ...
...and the window will go down operation, pull up or down direction and release the switch. Opening a vehicle front door will cancel this feature. Occupants, particularly unattended children, can become entrapped by the windows while operating the power window switches. Auto Down The driver door power window ..." in either front door will cancel this manual. To cancel the "Auto Down" movement, operate the switch in Section 4 of this feature. The power window switches remain active for 10 minutes after the ignition has been turned off. WARNING! Such entrapment may result in the ...

Owner's Manual
Page 33
... happens pull the switch lightly to the first detent and hold to close the window. THINGS TO KNOW BEFORE STARTING YOUR VEHICLE 33 Auto Up Feature with Anti-Pinch Protection (Driver's and Front Passenger Door Only) Lift the window switch to the second detent, release, and the window will reverse direction...
... happens pull the switch lightly to the first detent and hold to close the window. THINGS TO KNOW BEFORE STARTING YOUR VEHICLE 33 Auto Up Feature with Anti-Pinch Protection (Driver's and Front Passenger Door Only) Lift the window switch to the second detent, release, and the window will reverse direction...

Owner's Manual
Page 36
... not unlock the liftgate. Driving with the plunger or a key in your vehicle are operating the vehicle. OCCUPANT RESTRAINTS Some of the most important safety features in the lock cylinder will be carrying children too small for the driver and passengers seated next to hold infant and child restraint systems. Liftgate...
... not unlock the liftgate. Driving with the plunger or a key in your vehicle are operating the vehicle. OCCUPANT RESTRAINTS Some of the most important safety features in the lock cylinder will be carrying children too small for the driver and passengers seated next to hold infant and child restraint systems. Liftgate...

Owner's Manual
Page 38
... seating positions in a collision, the belt will lock and reduce the risk of you striking the inside of the vehicle or being thrown out. This feature allows the shoulder part of the belt to keep your injuries in an accident, hurting one person, no matter what their size. But in your...
... seating positions in a collision, the belt will lock and reduce the risk of you striking the inside of the vehicle or being thrown out. This feature allows the shoulder part of the belt to keep your injuries in an accident, hurting one person, no matter what their size. But in your...

Owner's Manual
Page 43
...Allow the belt to help further reduce the risk of a head-on the occupant's chest. 2 Energy Management Feature This vehicle has a safety belt system with an energy management feature in the front seating positions to release webbing in the shoulder belt. This safety belt system has a retractor ...years old and under should be properly restrained in the rear center seating position. Buckle the combination lap and shoulder belt. 2. This feature is locked in the event of injury in position. Grasp the shoulder portion and pull downward until the entire belt is automatically prelocked....
...Allow the belt to help further reduce the risk of a head-on the occupant's chest. 2 Energy Management Feature This vehicle has a safety belt system with an energy management feature in the front seating positions to release webbing in the shoulder belt. This safety belt system has a retractor ...years old and under should be properly restrained in the rear center seating position. Buckle the combination lap and shoulder belt. 2. This feature is locked in the event of injury in position. Grasp the shoulder portion and pull downward until the entire belt is automatically prelocked....

Owner's Manual
Page 44
... THINGS TO KNOW BEFORE STARTING YOUR VEHICLE WARNING! • The belt and retractor assembly must be replaced if the seat belt assembly "automatic locking retractor" feature or any slack from the seat belt systems in the event of injury in a collision. Pretensioners work for proper seat belt placement by assuring that...
... THINGS TO KNOW BEFORE STARTING YOUR VEHICLE WARNING! • The belt and retractor assembly must be replaced if the seat belt assembly "automatic locking retractor" feature or any slack from the seat belt systems in the event of injury in a collision. Pretensioners work for proper seat belt placement by assuring that...

Owner's Manual
Page 60
...; As the airbags deflate you in another collision, the airbags will unlock automatically. The particles are involved in place to aid visibility. Enhanced Accident Response Feature If the airbags deploy after the vehicle has stopped moving, the interior lights will illuminate to protect you have skin or eye irritation, rinse the...
...; As the airbags deflate you in another collision, the airbags will unlock automatically. The particles are involved in place to aid visibility. Enhanced Accident Response Feature If the airbags deploy after the vehicle has stopped moving, the interior lights will illuminate to protect you have skin or eye irritation, rinse the...
Owner's Manual
Page 69
... two outboard rear seating positions have lower anchorages that are just visible when you lean into the rear seat to the top tether anchorages have features for those anchorages will be installed in the outboard positions only. Again, carefully follow the directions of all child restraint systems will continue to also...
... two outboard rear seating positions have lower anchorages that are just visible when you lean into the rear seat to the top tether anchorages have features for those anchorages will be installed in the outboard positions only. Again, carefully follow the directions of all child restraint systems will continue to also...

Owner's Manual
Page 77
...Inside Day/Night Mirror ...81 ▫ Automatic Dimming Mirror - If Equipped ...82 ▫ Outside Mirrors ...82 ▫ Exterior Mirrors Folding Feature ...83 ▫ Power Remote Control Mirrors ...83 ▫ Illuminated Vanity Mirrors - If Equipped ...84 Hands-Free Communication (UConnect™) ...- If Equipped ...84 ▫ Operations ...87 ▫ Phone Call Features ...93 ▫ UConnect™ System Features ...96 ▫ Advanced Phone Connectivity ...100 ▫ Things You Should Know About Your UConnect™ System ...102 ...
...Inside Day/Night Mirror ...81 ▫ Automatic Dimming Mirror - If Equipped ...82 ▫ Outside Mirrors ...82 ▫ Exterior Mirrors Folding Feature ...83 ▫ Power Remote Control Mirrors ...83 ▫ Illuminated Vanity Mirrors - If Equipped ...84 Hands-Free Communication (UConnect™) ...- If Equipped ...84 ▫ Operations ...87 ▫ Phone Call Features ...93 ▫ UConnect™ System Features ...96 ▫ Advanced Phone Connectivity ...100 ▫ Things You Should Know About Your UConnect™ System ...102 ...

Owner's Manual
Page 78
... Passenger Seat ...113 ▫ Head Restraints ...113 ▫ Heated Seats - If Equipped ...113 ▫ 60/40 Split Folding Rear Seat With Fold Flat Feature ...115 To Open And Close The Hood ...117 Lights ...119 ▫ Interior Lights ...119 ▫ Multi-Function Control Lever ...119 ▫ Parking Lights,... ...122 Windshield Wipers And Washers ...122 ▫ Intermittent Wiper System ...122 ▫ Windshield Wiper Operation ...123 ▫ Windshield Washers ...123 ▫ Mist Feature ...123 Tilt Steering Column ...124 Electronic Speed Control - If Equipped ...125 ▫ To Activate ...125
... Passenger Seat ...113 ▫ Head Restraints ...113 ▫ Heated Seats - If Equipped ...113 ▫ 60/40 Split Folding Rear Seat With Fold Flat Feature ...115 To Open And Close The Hood ...117 Lights ...119 ▫ Interior Lights ...119 ▫ Multi-Function Control Lever ...119 ▫ Parking Lights,... ...122 Windshield Wipers And Washers ...122 ▫ Intermittent Wiper System ...122 ▫ Windshield Wiper Operation ...123 ▫ Windshield Washers ...123 ▫ Mist Feature ...123 Tilt Steering Column ...124 Electronic Speed Control - If Equipped ...125 ▫ To Activate ...125
Owner's Manual
Page 79
... ▫ Pinch Protect Override ...143 ▫ Venting Sunroof - Express ...143 3 Express ...142 ▫ Closing Sunroof - UNDERSTANDING THE FEATURES OF YOUR VEHICLE 79 ▫ To Set At A Desired Speed ...126 ▫ To Deactivate ...126 ▫ To Resume Speed ...126 ▫ To Vary The Speed ...
... ▫ Pinch Protect Override ...143 ▫ Venting Sunroof - Express ...143 3 Express ...142 ▫ Closing Sunroof - UNDERSTANDING THE FEATURES OF YOUR VEHICLE 79 ▫ To Set At A Desired Speed ...126 ▫ To Deactivate ...126 ▫ To Resume Speed ...126 ▫ To Vary The Speed ...

Owner's Manual
Page 80
...Engine Off ...145 Power Inverter ...146 Cup Holders ...147 Storage ...148 ▫ Front Storage Compartment ...148 ▫ Console Storage Compartment ...149 Cargo Area Features ...150 ▫ Cargo Light ...150 ▫ Cargo Tie-Down Hooks ...150 ▫ Cargo Load Floor - If Equipped ...151 ▫ Utility Table... - If Equipped ...152 ▫ Rear Cargo Slide Out System (Load N Go ) - If Equipped ...153 Rear Window Features ...155 ▫ Rear Window Wiper/Washer - If Equipped . . 155 ▫ Rear Window Defroster - If Equipped ...156 Roof Luggage Rack - If Equipped ......
...Engine Off ...145 Power Inverter ...146 Cup Holders ...147 Storage ...148 ▫ Front Storage Compartment ...148 ▫ Console Storage Compartment ...149 Cargo Area Features ...150 ▫ Cargo Light ...150 ▫ Cargo Tie-Down Hooks ...150 ▫ Cargo Load Floor - If Equipped ...151 ▫ Utility Table... - If Equipped ...152 ▫ Rear Cargo Slide Out System (Load N Go ) - If Equipped ...153 Rear Window Features ...155 ▫ Rear Window Wiper/Washer - If Equipped . . 155 ▫ Rear Window Defroster - If Equipped ...156 Roof Luggage Rack - If Equipped ......

Owner's Manual
Page 81
UNDERSTANDING THE FEATURES OF YOUR VEHICLE 81 MIRRORS Inside Day/Night Mirror The mirror should be reduced by moving the small control under the mirror to center on the view through the rear window. A two-point pivot system allows for horizontal and vertical adjustment of truck). Annoying headlight glare can be adjusted while set in the day position (toward rear of the mirror. The mirror should be adjusted to the night position (toward windshield). 3 Adjusting Rearview Mirror
UNDERSTANDING THE FEATURES OF YOUR VEHICLE 81 MIRRORS Inside Day/Night Mirror The mirror should be reduced by moving the small control under the mirror to center on the view through the rear window. A two-point pivot system allows for horizontal and vertical adjustment of truck). Annoying headlight glare can be adjusted while set in the day position (toward rear of the mirror. The mirror should be adjusted to the night position (toward windshield). 3 Adjusting Rearview Mirror
