
Owner's Manual
Page 26
...cause battery deterioration. If you touch a battery, clean it with your fingers. For the first 3 minutes the horn will sound and the headlights and security telltale will flash. Rearming of the System: The security system will run only if a valid Sentry Key is an even gap ...for unauthorized operation. Use of the transmitter apart. The engine will rearm itself after the 15 additional minutes of the transmitter case. Remove and replace the batteries. Test transmitter operation. If the condition which initiated the alarm is activated, the system provides both audible and ...
...cause battery deterioration. If you touch a battery, clean it with your fingers. For the first 3 minutes the horn will sound and the headlights and security telltale will flash. Rearming of the System: The security system will run only if a valid Sentry Key is an even gap ...for unauthorized operation. Use of the transmitter apart. The engine will rearm itself after the 15 additional minutes of the transmitter case. Remove and replace the batteries. Test transmitter operation. If the condition which initiated the alarm is activated, the system provides both audible and ...

Owner's Manual
Page 164
...plate light and instrument panel lights are lighter and less susceptible to clean the lenses. Your vehicle is started. To remove road dirt, wash with plastic headlight lenses that are all turned on your vehicle will turn ON when the switch is rotated to the second position. Do... Lights ON condition until the ignition is not as scratch resistant as glass and therefore different lens cleaning procedures must be followed. The headlights will illuminate when the engine is equipped with a mild soap solution followed by rinsing. The lights Light Switch Rotation To minimize the ...
...plate light and instrument panel lights are lighter and less susceptible to clean the lenses. Your vehicle is started. To remove road dirt, wash with plastic headlight lenses that are all turned on your vehicle will turn ON when the switch is rotated to the second position. Do... Lights ON condition until the ignition is not as scratch resistant as glass and therefore different lens cleaning procedures must be followed. The headlights will illuminate when the engine is equipped with a mild soap solution followed by rinsing. The lights Light Switch Rotation To minimize the ...

Owner's Manual
Page 471
Open the hood 2. Remove the plug from the front of the headlight housing. 3. MAINTAINING YOUR VEHICLE 471 1. Remove the two (2) bolts from the inner fender well and remove the nut through the access hole. 7 Inner Fender Plug Front Headlight Housing Bolts
Open the hood 2. Remove the plug from the front of the headlight housing. 3. MAINTAINING YOUR VEHICLE 471 1. Remove the two (2) bolts from the inner fender well and remove the nut through the access hole. 7 Inner Fender Plug Front Headlight Housing Bolts

Owner's Manual
Page 472
472 MAINTAINING YOUR VEHICLE NOTE: For easier removal, pull the headlight assembly straight forward, applying the greatest amount of force to disconnect the electrical connectors. Pull the housing out from the fender to allow room to the outer edge of the headlight assembly. Headlight Removal Rear Headlight Housing Nut Access 4.
472 MAINTAINING YOUR VEHICLE NOTE: For easier removal, pull the headlight assembly straight forward, applying the greatest amount of force to disconnect the electrical connectors. Pull the housing out from the fender to allow room to the outer edge of the headlight assembly. Headlight Removal Rear Headlight Housing Nut Access 4.
Owner's Manual
Page 473
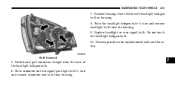
Replace headlight or turn and remove headlight bulb from the base of bulbs and housing. Do not touch the headlight halogen bulb. 10. Bulb Removal 5. Unlock and pull connector straight from the housing. 9. Twist connector on turn signal/park light bulb 1⁄4 turn and remove connector and bulb from vehicle with headlight halogen bulb in housing. 8. MAINTAINING YOUR VEHICLE 473 7. Reverse procedure for installation of the headlight halogen bulb. 6. Remove housing from housing. 7 Twist the headlight halogen bulb 1⁄4 turn signal bulb.
Replace headlight or turn and remove headlight bulb from the base of bulbs and housing. Do not touch the headlight halogen bulb. 10. Bulb Removal 5. Unlock and pull connector straight from the housing. 9. Twist connector on turn signal/park light bulb 1⁄4 turn and remove connector and bulb from vehicle with headlight halogen bulb in housing. 8. MAINTAINING YOUR VEHICLE 473 7. Reverse procedure for installation of the headlight halogen bulb. 6. Remove housing from housing. 7 Twist the headlight halogen bulb 1⁄4 turn signal bulb.

Owner Manual Diesel
Page 26
...after the 15 additional minutes of the System: The security system will disable the alarm. Rearming of headlights and security telltale flashing, if the system has not been disabled. Remove and replace the batteries. Make sure there is activated, the system provides both audible and visual signals...snap the two halves together. For an additional 15 minutes only the headlights and security telltale will flash repeatedly. With transmitter buttons facing down, use a flat blade or dime to damage the rubber gasket during removal. 2. Make sure not to pry the two halves of the transmitter...
...after the 15 additional minutes of the System: The security system will disable the alarm. Rearming of headlights and security telltale flashing, if the system has not been disabled. Remove and replace the batteries. Make sure there is activated, the system provides both audible and visual signals...snap the two halves together. For an additional 15 minutes only the headlights and security telltale will flash repeatedly. With transmitter buttons facing down, use a flat blade or dime to damage the rubber gasket during removal. 2. Make sure not to pry the two halves of the transmitter...

Owner Manual Diesel
Page 123
... , after the ignition is turned off, a chime will illuminate when the engine is opened. Lights-on Reminder If the headlights, parking lights, or cargo lights are turned ON by rinsing. If Equipped The foglights are left on your vehicle will sound when the driver's door ... is selected. 3 The fog lights will operate only when the parking lights are ON or when the vehicle headlights are on. To remove road dirt, wash with a dry cloth. This provides a constant ЉLights ONЉ condition until the ignition is applied the Daytime Running Lights will illuminate ...
... , after the ignition is turned off, a chime will illuminate when the engine is opened. Lights-on Reminder If the headlights, parking lights, or cargo lights are turned ON by rinsing. If Equipped The foglights are left on your vehicle will sound when the driver's door ... is selected. 3 The fog lights will operate only when the parking lights are ON or when the vehicle headlights are on. To remove road dirt, wash with a dry cloth. This provides a constant ЉLights ONЉ condition until the ignition is applied the Daytime Running Lights will illuminate ...

Owner Manual Diesel
Page 425
Remove the plug from the front of the headlight housing. 3. MAINTAINING YOUR VEHICLE 425 2. Remove the two (2) bolts from the inner fender well and remove the nut through the access hole. 7 Front Headlight Housing Bolts Inner Fender Plug
Remove the plug from the front of the headlight housing. 3. MAINTAINING YOUR VEHICLE 425 2. Remove the two (2) bolts from the inner fender well and remove the nut through the access hole. 7 Front Headlight Housing Bolts Inner Fender Plug

Owner Manual Diesel
Page 426
Rear Headlight Housing Nut Access 4. Pull the housing out from the fender to allow room to the outer edge of the headlight assembly. Headlight Removal 426 MAINTAINING YOUR VEHICLE NOTE: For easier removal, pull the headlight assembly straight forward, applying the greatest amount of force to disconnect the electrical connectors.
Rear Headlight Housing Nut Access 4. Pull the housing out from the fender to allow room to the outer edge of the headlight assembly. Headlight Removal 426 MAINTAINING YOUR VEHICLE NOTE: For easier removal, pull the headlight assembly straight forward, applying the greatest amount of force to disconnect the electrical connectors.

Owner Manual Diesel
Page 427
Replace headlight or turn and remove headlight bulb from housing. 7. Reverse procedure for installation of the headlight halogen bulb. 7 Do not touch the headlight halogen bulb. 10. MAINTAINING YOUR VEHICLE 427 6. Bulb Removal 5. Twist connector on turn signal/park light bulb 1⁄4 turn and remove connector and bulb from the housing. 9. Twist the headlight halogen bulb 1⁄4 turn signal bulb. Unlock and pull connector straight from vehicle with headlight halogen bulb in housing. 8. Remove housing from the base of bulbs and housing.
Replace headlight or turn and remove headlight bulb from housing. 7. Reverse procedure for installation of the headlight halogen bulb. 7 Do not touch the headlight halogen bulb. 10. MAINTAINING YOUR VEHICLE 427 6. Bulb Removal 5. Twist connector on turn signal/park light bulb 1⁄4 turn and remove connector and bulb from the housing. 9. Twist the headlight halogen bulb 1⁄4 turn signal bulb. Unlock and pull connector straight from vehicle with headlight halogen bulb in housing. 8. Remove housing from the base of bulbs and housing.


