
Owner's Manual
Page 17
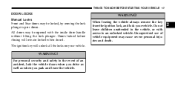
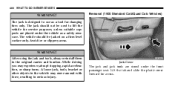
For personal security and safety in the vehicle, or with the inside door handle without lifting the lock plunger. THINGS TO KNOW BEFORE STARTING YOUR VEHICLE 17 DOOR LOCKS Manual Locks Front and Rear doors may be opened with access to ...
For personal security and safety in the vehicle, or with the inside door handle without lifting the lock plunger. THINGS TO KNOW BEFORE STARTING YOUR VEHICLE 17 DOOR LOCKS Manual Locks Front and Rear doors may be opened with access to ...

Owner's Manual
Page 64
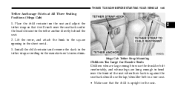
... reach over the seat back under the head restraint to the square opening in the tether strap according to secure a child restraint top tether strap. Lift the cover (if so equipped), and attach the hook to the tether anchor directly behind the child seat to the manufacturer's instructions. Use only the...
... reach over the seat back under the head restraint to the square opening in the tether strap according to secure a child restraint top tether strap. Lift the cover (if so equipped), and attach the hook to the tether anchor directly behind the child seat to the manufacturer's instructions. Use only the...

Owner's Manual
Page 102
... the seat back under the head restraint to crash into the inside of the vehicle or other passengers, or even be thrown from the vehicle. Lift the cover (if so equipped), and attach the hook to the manufacturer's instructions. Install the child restraint and remove the slack in the tether strap...
... the seat back under the head restraint to crash into the inside of the vehicle or other passengers, or even be thrown from the vehicle. Lift the cover (if so equipped), and attach the hook to the manufacturer's instructions. Install the child restraint and remove the slack in the tether strap...
Owner's Manual
Page 105
Lift the cover, and attach the hook to the manufacturer's instructions. Install the child restraint and remove the slack in the tether strap according to the ...
Lift the cover, and attach the hook to the manufacturer's instructions. Install the child restraint and remove the slack in the tether strap according to the ...

Owner's Manual
Page 154
Simply lift the seat back to return the seat to the upright position. Table Mode Table Mode Handle Verify that it is locked in place. 154 UNDERSTANDING THE FEATURES OF YOUR VEHICLE To fold either rear seat back down (Table Mode), lift the handle and fold the seat back forward.
Simply lift the seat back to return the seat to the upright position. Table Mode Table Mode Handle Verify that it is locked in place. 154 UNDERSTANDING THE FEATURES OF YOUR VEHICLE To fold either rear seat back down (Table Mode), lift the handle and fold the seat back forward.

Owner's Manual
Page 157
Verify that it is locked in place. 3 Kneel Mode Kneel Mode Handle UNDERSTANDING THE FEATURES OF YOUR VEHICLE 157 To fold either rear seat flat (Kneel Mode), lift the handle and fold the seat forward. Simply lift the seat back to return the seat to the upright position.
Verify that it is locked in place. 3 Kneel Mode Kneel Mode Handle UNDERSTANDING THE FEATURES OF YOUR VEHICLE 157 To fold either rear seat flat (Kneel Mode), lift the handle and fold the seat forward. Simply lift the seat back to return the seat to the upright position.
Owner's Manual
Page 201
... draw power from the vehicle's battery, even when not in long enough, the vehicle's battery will degrade the battery even more quickly. cellular phones, etc.). Lift the lower handle on the armrest could be driven a sufficient length of time to allow the generator to recharge the vehicle's battery. 3 WARNING! • This...
... draw power from the vehicle's battery, even when not in long enough, the vehicle's battery will degrade the battery even more quickly. cellular phones, etc.). Lift the lower handle on the armrest could be driven a sufficient length of time to allow the generator to recharge the vehicle's battery. 3 WARNING! • This...

Owner's Manual
Page 202
202 UNDERSTANDING THE FEATURES OF YOUR VEHICLE Storage and Seats (Quad Cab Models) Located in the center of the front 40/20/40 seat cushion there is a storage compartment. Quad Cab Storage Storage and Seats (Mega Cab Models) The Mega Cab models provide additional storage behind the seat. Lift the seat to access the storage compartment. Standard cab models also have storage behind the rear seat. The Quad Cab models provide additional storage under the rear seat.
202 UNDERSTANDING THE FEATURES OF YOUR VEHICLE Storage and Seats (Quad Cab Models) Located in the center of the front 40/20/40 seat cushion there is a storage compartment. Quad Cab Storage Storage and Seats (Mega Cab Models) The Mega Cab models provide additional storage behind the seat. Lift the seat to access the storage compartment. Standard cab models also have storage behind the rear seat. The Quad Cab models provide additional storage under the rear seat.

Owner's Manual
Page 203
UNDERSTANDING THE FEATURES OF YOUR VEHICLE 203 To gain access to the Mega Cab rear storage, fold the rear seats to the "kneel position". (See page 155 for more information.) Push down on the front of the storage compartment handle and lift the storage compartment cover. The rear storage compartment can be divided into three separate compartments by using the divider doors inside the storage compartment. 3 Mega Cab Rear Storage Dividers Mega Cab Rear Storage Compartment Handle
UNDERSTANDING THE FEATURES OF YOUR VEHICLE 203 To gain access to the Mega Cab rear storage, fold the rear seats to the "kneel position". (See page 155 for more information.) Push down on the front of the storage compartment handle and lift the storage compartment cover. The rear storage compartment can be divided into three separate compartments by using the divider doors inside the storage compartment. 3 Mega Cab Rear Storage Dividers Mega Cab Rear Storage Compartment Handle

Owner's Manual
Page 205
While driving or in an accident you may move around with loose items stored on the load floor may experience, abrupt stopping, rapid acceleration, or sharp turns. Unfolding The Load Floor 3 Unfolding the Load Floor 1. Lift the 60/40 seat cushion(s) to the upward position. Do not operate the vehicle with force and strike occupants, resulting in serious or fatal injury. Loose objects stored on the load floor. UNDERSTANDING THE FEATURES OF YOUR VEHICLE 205 WARNING!
While driving or in an accident you may move around with loose items stored on the load floor may experience, abrupt stopping, rapid acceleration, or sharp turns. Unfolding The Load Floor 3 Unfolding the Load Floor 1. Lift the 60/40 seat cushion(s) to the upward position. Do not operate the vehicle with force and strike occupants, resulting in serious or fatal injury. Loose objects stored on the load floor. UNDERSTANDING THE FEATURES OF YOUR VEHICLE 205 WARNING!

Owner's Manual
Page 206
... down position causing serious injury. 206 UNDERSTANDING THE FEATURES OF YOUR VEHICLE 2. Grasp the knob on the load floor and lift the knob until the load floor unfolds into position. Lift the 60/40 seat cushion(s) to store the load floor. Unsnap the securing snap located at either side of the load...
... down position causing serious injury. 206 UNDERSTANDING THE FEATURES OF YOUR VEHICLE 2. Grasp the knob on the load floor and lift the knob until the load floor unfolds into position. Lift the 60/40 seat cushion(s) to store the load floor. Unsnap the securing snap located at either side of the load...
Owner's Manual
Page 386
... from the vehicle, coat the exposed angling cylinder rods with an overhead console module, the outside ambient temperature. The lift cylinder should be extended upward and chassis lubricant applied to the lift rod. Whenever the plow is due to blocked or reduced airflow to idle and wheels have stopped. Keep all snowplow...
... from the vehicle, coat the exposed angling cylinder rods with an overhead console module, the outside ambient temperature. The lift cylinder should be extended upward and chassis lubricant applied to the lift rod. Whenever the plow is due to blocked or reduced airflow to idle and wheels have stopped. Keep all snowplow...

Owner's Manual
Page 387
Towing with the rear wheels on the ground can cause severe damage to the transfer case will occur if a front or rear wheel lift is not allowed. Failure to follow these requirements can result in neutral) for recreational towing. NOTE: Both the Manual Shift and Electronic Shift transfer cases ...
Towing with the rear wheels on the ground can cause severe damage to the transfer case will occur if a front or rear wheel lift is not allowed. Failure to follow these requirements can result in neutral) for recreational towing. NOTE: Both the Manual Shift and Electronic Shift transfer cases ...

Owner's Manual
Page 399
WHAT TO DO IN EMERGENCIES 399 JACK LOCATION Removal (2500/3500/Mega Cab) The jack and jack tools are stored under the seat. 6 Jack Location Lift the flap on the side of the seat for access. Remove the jack and tools by removing the wing bolt and sliding the assembly from under the front passenger seat.
WHAT TO DO IN EMERGENCIES 399 JACK LOCATION Removal (2500/3500/Mega Cab) The jack and jack tools are stored under the seat. 6 Jack Location Lift the flap on the side of the seat for access. Remove the jack and tools by removing the wing bolt and sliding the assembly from under the front passenger seat.
Owner's Manual
Page 400
... firm level surface only. Avoid ice or slippery areas. The jack should be used to use as a safety measure. The jack is designed to lift the vehicle for service purposes, unless suitable supports are stored under the vehicle as a tool for access. Removal (1500 Standard Cab/Quad Cab Vehicles)...with force, resulting in the original carrier and location. Jack Cover The jack and jack tools are placed under the front passenger seat. Lift the tab and slide the plactic cover forward for changing tires only. After using the jack and tools, always reinstall them in serious injury....
... firm level surface only. Avoid ice or slippery areas. The jack should be used to use as a safety measure. The jack is designed to lift the vehicle for service purposes, unless suitable supports are stored under the vehicle as a tool for access. Removal (1500 Standard Cab/Quad Cab Vehicles)...with force, resulting in the original carrier and location. Jack Cover The jack and jack tools are placed under the front passenger seat. Lift the tab and slide the plactic cover forward for changing tires only. After using the jack and tools, always reinstall them in serious injury....

Owner's Manual
Page 405
... Flasher. 6 The jack is designed as a tool for service purposes or to get any part of your body under a jacked-up vehicle is on a lift. WHAT TO DO IN EMERGENCIES 405 Tire Changing Procedure WARNING! Set the parking brake and place the gear selector in PARK (automatic transmission) or REVERSE... wheel. • Turn on a jack. Getting under a vehicle that is not recommended that the jack be used for changing tires on you need to lift more than one wheel at a time. Do not raise this vehicle only. Never start or run the engine while the vehicle is dangerous. You could...
... Flasher. 6 The jack is designed as a tool for service purposes or to get any part of your body under a jacked-up vehicle is on a lift. WHAT TO DO IN EMERGENCIES 405 Tire Changing Procedure WARNING! Set the parking brake and place the gear selector in PARK (automatic transmission) or REVERSE... wheel. • Turn on a jack. Getting under a vehicle that is not recommended that the jack be used for changing tires on you need to lift more than one wheel at a time. Do not raise this vehicle only. Never start or run the engine while the vehicle is dangerous. You could...

Owner's Manual
Page 413
... it is a significant difference, the larger tire should be completely off the ground when tightening to remove and install dual rear wheels, use a proper vehicle lifting device. Slots in the wheels will assist in a front location. The tires of both dual wheels must be installed in properly orienting the inner and...
... it is a significant difference, the larger tire should be completely off the ground when tightening to remove and install dual rear wheels, use a proper vehicle lifting device. Slots in the wheels will assist in a front location. The tires of both dual wheels must be installed in properly orienting the inner and...

Owner's Manual
Page 420
... hooks for freeing a stuck vehicle. Do not use only, to vehicles under tow must be equipped with tow hooks. TOWING A DISABLED VEHICLE Proper towing or lifting equipment is mandatory. Use of vehicles when pulling with emergency tow hooks. 420 WHAT TO DO IN EMERGENCIES EMERGENCY TOW HOOKS - IF EQUIPPED Your vehicle...
... hooks for freeing a stuck vehicle. Do not use only, to vehicles under tow must be equipped with tow hooks. TOWING A DISABLED VEHICLE Proper towing or lifting equipment is mandatory. Use of vehicles when pulling with emergency tow hooks. 420 WHAT TO DO IN EMERGENCIES EMERGENCY TOW HOOKS - IF EQUIPPED Your vehicle...

Owner Manual Diesel
Page 17
... start the vehicle is also used to an unlocked vehicle. For personal security and safety in the vehicle, or with the inside door handle without lifting the lock plunger. When leaving the vehicle always remove the key from the ignition lock, and lock your vehicle. Do not leave children unattended in...
... start the vehicle is also used to an unlocked vehicle. For personal security and safety in the vehicle, or with the inside door handle without lifting the lock plunger. When leaving the vehicle always remove the key from the ignition lock, and lock your vehicle. Do not leave children unattended in...

Owner Manual Diesel
Page 65
... each tether strap to the anchor behind the child seat. 2 Regular Cab Tether Strap Mounting 4. The tether strap may be retained with an elastic band. Lift the cover (if so equipped), and attach the hook to the "up" position. THINGS TO KNOW BEFORE STARTING YOUR VEHICLE 65 2.
... each tether strap to the anchor behind the child seat. 2 Regular Cab Tether Strap Mounting 4. The tether strap may be retained with an elastic band. Lift the cover (if so equipped), and attach the hook to the "up" position. THINGS TO KNOW BEFORE STARTING YOUR VEHICLE 65 2.

