Owner's Manual
Page 372
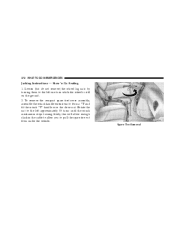
Loosen (but do not remove) the wheel lug nuts by turning them to the left approximately 33 turns until the winch mechanism stops turning freely, this will allow enough slack in the cable to allow you to pull the spare tire out from under the vehicle. To remove the compact spare tire/cover assembly, assemble the winch handle extensions to the left one turn while the wheel is still on the ground. 2. Spare Tire Removal Rotate the nut to form a "T' and fit the winch "T" handle over the drive nut. 372 WHAT TO DO IN EMERGENCIES Jacking Instructions - Stow 'n Go Seating 1.
Loosen (but do not remove) the wheel lug nuts by turning them to the left approximately 33 turns until the winch mechanism stops turning freely, this will allow enough slack in the cable to allow you to pull the spare tire out from under the vehicle. To remove the compact spare tire/cover assembly, assemble the winch handle extensions to the left one turn while the wheel is still on the ground. 2. Spare Tire Removal Rotate the nut to form a "T' and fit the winch "T" handle over the drive nut. 372 WHAT TO DO IN EMERGENCIES Jacking Instructions - Stow 'n Go Seating 1.
Owner's Manual
Page 376
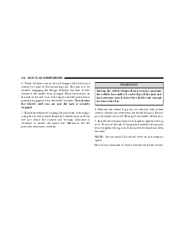
...sure the jack is properly engaged in the described location. WARNING! Do not pry the wheel cover off the jack, do not tighten the lug nuts fully until the tire just clears the surface and enough clearance is to be located, engaging the flange, between the pair of forcing the vehicle... off . Raising the vehicle higher than necessary can make the vehicle less stable. Lightly tighten the lug nuts. Raise the vehicle only until the vehicle has been lowered. The jack is obtained to be changed. Do not use a hammer or force to ...
...sure the jack is properly engaged in the described location. WARNING! Do not pry the wheel cover off the jack, do not tighten the lug nuts fully until the tire just clears the surface and enough clearance is to be located, engaging the flange, between the pair of forcing the vehicle... off . Raising the vehicle higher than necessary can make the vehicle less stable. Lightly tighten the lug nuts. Raise the vehicle only until the vehicle has been lowered. The jack is obtained to be changed. Do not use a hammer or force to ...

Owner's Manual
Page 377
Lower the vehicle by your dealer or at a service station. 12. Alternate lug nuts until each nut has been tightened twice. Finish tightening the lug nuts. Correct wheel nut tightness is installed without the compact spare tire in doubt about the correct tightness, have the tire repaired or replaced as soon as follows: • ...
Lower the vehicle by your dealer or at a service station. 12. Alternate lug nuts until each nut has been tightened twice. Finish tightening the lug nuts. Correct wheel nut tightness is installed without the compact spare tire in doubt about the correct tightness, have the tire repaired or replaced as soon as follows: • ...
Owner's Manual
Page 383
Rotate the nut to the left one turn while the wheel is designed for use with enough slack cable to allow you to the following illustration. CAUTION! When ... TO DO IN EMERGENCIES 383 2. Lowering Spare Tire 6 Jacking Instructions - Non Stow 'n Go Seating 1. Fit the jack handle over the drive nut. Loosen (but do not remove) the wheel lug nuts by turning them to the left until the spare is on the ground. 3. There are two jack engagement locations on each side...
Rotate the nut to the left one turn while the wheel is designed for use with enough slack cable to allow you to the following illustration. CAUTION! When ... TO DO IN EMERGENCIES 383 2. Lowering Spare Tire 6 Jacking Instructions - Non Stow 'n Go Seating 1. Fit the jack handle over the drive nut. Loosen (but do not remove) the wheel lug nuts by turning them to the left until the spare is on the ground. 3. There are two jack engagement locations on each side...

Owner's Manual
Page 385
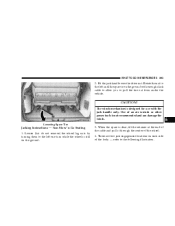
... clears the surface and enough clearance is securely engaged. 6. WARNING! Raising the vehicle higher than necessary can make the vehicle less stable. Remove the wheel lug nuts, for vehicles with wheel covers, align the notch in the described location. Do not pry the wheel cover off the hub. 8. Lightly tighten the... the wheel. Raise the vehicle only until you are on the wheel. It could slip off the jack, do not tighten the lug nuts fully until the jack head is to be located, engaging the flange, between the pair of downstanding tabs. The jack is properly engaged in the ...
... clears the surface and enough clearance is securely engaged. 6. WARNING! Raising the vehicle higher than necessary can make the vehicle less stable. Remove the wheel lug nuts, for vehicles with wheel covers, align the notch in the described location. Do not pry the wheel cover off the hub. 8. Lightly tighten the... the wheel. Raise the vehicle only until you are on the wheel. It could slip off the jack, do not tighten the lug nuts fully until the jack head is to be located, engaging the flange, between the pair of downstanding tabs. The jack is properly engaged in the ...
Owner's Manual
Page 386
... cover on the wrench while tightening for increased leverage. Push down . Alternate lug nuts until each nut has been tightened twice. WARNING! Secure the flat or spare tire as follows: • If your dealer or at a service station. 11. Correct wheel nut tightness is down on the compact spare. Lower the jack to install... the wheel must be removed prior to the left. 10. Do not use a hammer or force to its fully closed position. lbs). Finish tightening the lug nuts.
... cover on the wrench while tightening for increased leverage. Push down . Alternate lug nuts until each nut has been tightened twice. WARNING! Secure the flat or spare tire as follows: • If your dealer or at a service station. 11. Correct wheel nut tightness is down on the compact spare. Lower the jack to install... the wheel must be removed prior to the left. 10. Do not use a hammer or force to its fully closed position. lbs). Finish tightening the lug nuts.