Owner's Manual
Page 17
... position). Therefore, make sure the keys are not inside the vehicle before closing the door. Door Lock Plunger 2 If the lock plunger is in the interior lights ON position (extreme top position). • The illuminated entry system will lock. THINGS TO KNOW BEFORE STARTING YOUR VEHICLE 17 NOTE: • The front...
... position). Therefore, make sure the keys are not inside the vehicle before closing the door. Door Lock Plunger 2 If the lock plunger is in the interior lights ON position (extreme top position). • The illuminated entry system will lock. THINGS TO KNOW BEFORE STARTING YOUR VEHICLE 17 NOTE: • The front...
Owner's Manual
Page 19
... closing the door will lock. Cycle the ignition switch ON/OFF four times ending in gear, 2. Within 10 seconds of the final cycle, press the interior driver's door lock switch to signify that you from accidentally locking your keys in the ignition switch. 2.
... closing the door will lock. Cycle the ignition switch ON/OFF four times ending in gear, 2. Within 10 seconds of the final cycle, press the interior driver's door lock switch to signify that you from accidentally locking your keys in the ignition switch. 2.

Owner's Manual
Page 23
... manually access the liftgate area. 2 NOTE: When you turn on for at least one second and release. The panic alarm will turn off and the interior lights will stay on . The liftgate will reverse to the ON position. If the button is pushed while the liftgate is not equipped with a powered...
... manually access the liftgate area. 2 NOTE: When you turn on for at least one second and release. The panic alarm will turn off and the interior lights will stay on . The liftgate will reverse to the ON position. If the button is pushed while the liftgate is not equipped with a powered...
Owner's Manual
Page 28
... SIDE DOOR The sliding door may be unlocked from the inside , press the button on the outside . If you can not be opened from the interior power door lock switches. 28 THINGS TO KNOW BEFORE STARTING YOUR VEHICLE • The system remains armed during liftgate entry, pressing the liftgate button will...
... SIDE DOOR The sliding door may be unlocked from the inside , press the button on the outside . If you can not be opened from the interior power door lock switches. 28 THINGS TO KNOW BEFORE STARTING YOUR VEHICLE • The system remains armed during liftgate entry, pressing the liftgate button will...

Owner's Manual
Page 43
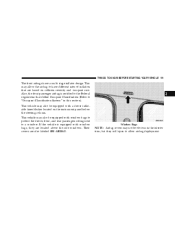
You can strike the interior of the belt to lock during very sudden stops or collisions. Someone on your vehicle or other passengers, or you can happen far away from ...
You can strike the interior of the belt to lock during very sudden stops or collisions. Someone on your vehicle or other passengers, or you can happen far away from ...
Owner's Manual
Page 55
... KNOW BEFORE STARTING YOUR VEHICLE 55 The front airbags have different rates of inflation that define Occupant Classification (Refer to "Occupant Classification System" in the interior trim; This may not be obvious in this section). Also, the front passenger airbag is equipped with window bags to protect the driver, front, and...
... KNOW BEFORE STARTING YOUR VEHICLE 55 The front airbags have different rates of inflation that define Occupant Classification (Refer to "Occupant Classification System" in the interior trim; This may not be obvious in this section). Also, the front passenger airbag is equipped with window bags to protect the driver, front, and...
Owner's Manual
Page 67
... irritation, rinse the area with power door locks will unlock automatically. If the irritation continues, see your vehicle after the vehicle has stopped moving, the interior lights will not be in another collision. Also, have deployed. The particles are involved in another collision, the airbags will illuminate until the ignition switch...
... irritation, rinse the area with power door locks will unlock automatically. If the irritation continues, see your vehicle after the vehicle has stopped moving, the interior lights will not be in another collision. Also, have deployed. The particles are involved in another collision, the airbags will illuminate until the ignition switch...
Owner's Manual
Page 86
... ▫ Rear Bench Seating Flexibility ...138 ▫ Rear Quad And 50/50 Seating Flexibility ...139 To Open And Close The Hood ...141 Lights ...142 ▫ Interior Lights ...143 ▫ Park Lights ...143 ▫ Headlights ...143
... ▫ Rear Bench Seating Flexibility ...138 ▫ Rear Quad And 50/50 Seating Flexibility ...139 To Open And Close The Hood ...141 Lights ...142 ▫ Interior Lights ...143 ▫ Park Lights ...143 ▫ Headlights ...143
Owner's Manual
Page 143
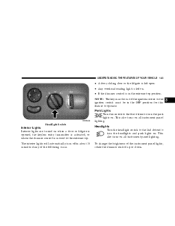
The interior lights will automatically turn the park lights on. Park Lights Turn this feature to the extreme top. This also turns on all instrument panel lighting. ... 2nd detent to turn off in about 15 minutes if any of the following occur. This also turns on all instrument panel lighting. Headlight Switch 3 Interior Lights Interior lights are turned on when a door or liftgate is opened, the keyless entry transmitter is activated, or when the dimmer control is in the...
The interior lights will automatically turn the park lights on. Park Lights Turn this feature to the extreme top. This also turns on all instrument panel lighting. ... 2nd detent to turn off in about 15 minutes if any of the following occur. This also turns on all instrument panel lighting. Headlight Switch 3 Interior Lights Interior lights are turned on when a door or liftgate is opened, the keyless entry transmitter is activated, or when the dimmer control is in the...

Owner's Manual
Page 144
...Light Position Rotate the dimmer control completely upward to the second detent (extreme top position) to turn on . The interior lights will increase the brightness of the instrument panel lights. Interior light Defeat (OFF) Rotate the dimmer control to the first detent. Parade Mode (Daytime Brightness Feature) Rotate the dimmer...bottom). 144 UNDERSTANDING THE FEATURES OF YOUR VEHICLE Dimmer Control With the park lights or headlights on, rotating the dimmer control for the interior lights on the instrument panel upward will remain on when the dimmer control is in this position. The...
...Light Position Rotate the dimmer control completely upward to the second detent (extreme top position) to turn on . The interior lights will increase the brightness of the instrument panel lights. Interior light Defeat (OFF) Rotate the dimmer control to the first detent. Parade Mode (Daytime Brightness Feature) Rotate the dimmer...bottom). 144 UNDERSTANDING THE FEATURES OF YOUR VEHICLE Dimmer Control With the park lights or headlights on, rotating the dimmer control for the interior lights on the instrument panel upward will remain on when the dimmer control is in this position. The...
Owner's Manual
Page 283
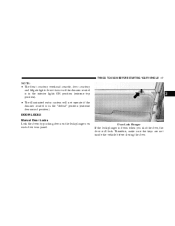
The rear blower control, located in front of the inlet grille or heater outlets. Interior air enters the Manual Rear Zone Climate Control system through an intake grille located in the passenger side trim panel just behind the third seat. ...
The rear blower control, located in front of the inlet grille or heater outlets. Interior air enters the Manual Rear Zone Climate Control system through an intake grille located in the passenger side trim panel just behind the third seat. ...

Owner's Manual
Page 284
... temperature knob is desired, set to the "REAR" position. Automatic Temperature Control - If Equipped The Infrared Three-Zone Automatic Temperature Control System automatically maintains the interior comfort level desired by the second seat occupants. Turn the A/C button OFF and select any position other than "REAR", the rear temperature selection follows the...
... temperature knob is desired, set to the "REAR" position. Automatic Temperature Control - If Equipped The Infrared Three-Zone Automatic Temperature Control System automatically maintains the interior comfort level desired by the second seat occupants. Turn the A/C button OFF and select any position other than "REAR", the rear temperature selection follows the...

Owner's Manual
Page 291
... the right side sliding door and overhead outlets at each outboard rear seating position. Recirculation will illuminate in the Mix and Defrost modes to recirculate interior air by pressing the recirculation button. Auxiliary Rear Automatic Temperature Control - If Equipped The Rear Automatic Temperature Control System has floor air outlets to the...
... the right side sliding door and overhead outlets at each outboard rear seating position. Recirculation will illuminate in the Mix and Defrost modes to recirculate interior air by pressing the recirculation button. Auxiliary Rear Automatic Temperature Control - If Equipped The Rear Automatic Temperature Control System has floor air outlets to the...

Owner's Manual
Page 293
... behind the sliding door. The electrical system could overload causing damage to the blower motor. or Metric by rotating the knob from low to high. Interior air enters the Rear Automatic Temperature Control System through an intake grille located in front of this manual.
... behind the sliding door. The electrical system could overload causing damage to the blower motor. or Metric by rotating the knob from low to high. Interior air enters the Rear Automatic Temperature Control System through an intake grille located in front of this manual.

Owner's Manual
Page 300
... with Infrared Three-Zone Automatic Temperature Control the rear defroster symbol will show in the display screen when the rear window defroster is on the interior surface of operation. The defroster automatically turns off after about 10 minutes of the window. To avoid damaging the electrical conductors of the rear window...
... with Infrared Three-Zone Automatic Temperature Control the rear defroster symbol will show in the display screen when the rear window defroster is on the interior surface of operation. The defroster automatically turns off after about 10 minutes of the window. To avoid damaging the electrical conductors of the rear window...
Owner's Manual
Page 304
... at high engine speeds, can cause excessive exhaust temperatures which can start within 3 seconds, slightly depress the accelerator pedal while continuing to start the engine. interior heat build up may cause serious injury or death.
... at high engine speeds, can cause excessive exhaust temperatures which can start within 3 seconds, slightly depress the accelerator pedal while continuing to start the engine. interior heat build up may cause serious injury or death.

Owner's Manual
Page 430
...with a mild soap and water to prevent corrosion. 430 MAINTAINING YOUR VEHICLE • If your vehicle is specifically recommended for leather upholstery. Interior Care Use Mopar Total Clean to match the color of such repairs is done on gravel roads, consider mud or stone shields behind each wheel.... • Use Mopar touch up paint to clean fabric upholstery and carpeting. Do not use oven cleaner. Interior Trim should be sure that may damage the wheels' protective finish. • If you carry special cargo such as possible. The cost of...
...with a mild soap and water to prevent corrosion. 430 MAINTAINING YOUR VEHICLE • If your vehicle is specifically recommended for leather upholstery. Interior Care Use Mopar Total Clean to match the color of such repairs is done on gravel roads, consider mud or stone shields behind each wheel.... • Use Mopar touch up paint to clean fabric upholstery and carpeting. Do not use oven cleaner. Interior Trim should be sure that may damage the wheels' protective finish. • If you carry special cargo such as possible. The cost of...

Owner's Manual
Page 437
Aluminum base bulbs are glass wedge base or glass cartridge types. REPLACEMENT LIGHT BULBS LIGHT BULBS - Interior Bulb Number Center & Rear Dome Light ...578 Center & Rear Reading Lights ...578 Front Door Courtesy Light ...578 Front Header Reading Lights - If Equipped ...578 Instrument ... idle for about five minutes in the fresh air and high blower setting. This will insure adequate system lubrication to minimize the possibility of the interior bulbs are not approved and should not be used for replacement instructions. All of compressor damage when the system is started again.
Aluminum base bulbs are glass wedge base or glass cartridge types. REPLACEMENT LIGHT BULBS LIGHT BULBS - Interior Bulb Number Center & Rear Dome Light ...578 Center & Rear Reading Lights ...578 Front Door Courtesy Light ...578 Front Header Reading Lights - If Equipped ...578 Instrument ... idle for about five minutes in the fresh air and high blower setting. This will insure adequate system lubrication to minimize the possibility of the interior bulbs are not approved and should not be used for replacement instructions. All of compressor damage when the system is started again.
Owner's Manual
Page 489
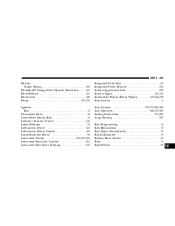
... ...90 Instrument Cluster ...202,203,204 Instrument Panel and Controls ...201 Instrument Panel Lens Cleaning ...432 Integrated Child Seat ...69 Integrated Power Module ...434 Interior Appearance Care ...430 Interior Lights ...143,144 Intermittent Wipers (Delay Wipers) ...149,296,298 Introduction ...4 Jack Location ...370,372,382,383 Jack Operation ...368,372,383 Jacking...
... ...90 Instrument Cluster ...202,203,204 Instrument Panel and Controls ...201 Instrument Panel Lens Cleaning ...432 Integrated Child Seat ...69 Integrated Power Module ...434 Interior Appearance Care ...430 Interior Lights ...143,144 Intermittent Wipers (Delay Wipers) ...149,296,298 Introduction ...4 Jack Location ...370,372,382,383 Jack Operation ...368,372,383 Jacking...
Owner's Manual
Page 490
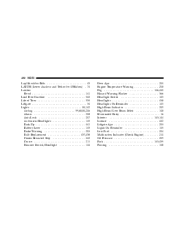
... Warning Flasher ...366 Headlight Switch ...143 Headlights ...438 Headlights On Reminder ...145 High Beam Indicator ...209 High Beam/Low Beam Select ...148 Illuminated Entry ...16 Interior ...143,144 License ...442 Liftgate Ajar ...205 Lights On Reminder ...145 Low Fuel ...204 Malfunction Indicator (Check Engine) ...210 Oil Pressure ...209 Park ...143,439...
... Warning Flasher ...366 Headlight Switch ...143 Headlights ...438 Headlights On Reminder ...145 High Beam Indicator ...209 High Beam/Low Beam Select ...148 Illuminated Entry ...16 Interior ...143,144 License ...442 Liftgate Ajar ...205 Lights On Reminder ...145 Low Fuel ...204 Malfunction Indicator (Check Engine) ...210 Oil Pressure ...209 Park ...143,439...

