Owner's Manual
Page 13
... the vehicle. Don't leave the keys in the ignition switch, a chime will sound to remove the key. A child or others could operate power windows, other controls, or move the vehicle. Always remove key from the ignition and lock all doors when leaving the vehicle unattended.
... the vehicle. Don't leave the keys in the ignition switch, a chime will sound to remove the key. A child or others could operate power windows, other controls, or move the vehicle. Always remove key from the ignition and lock all doors when leaving the vehicle unattended.
Owner's Manual
Page 17
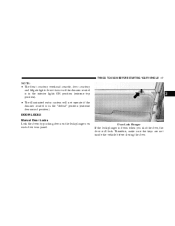
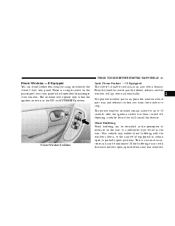
DOOR LOCKS Manual Door Locks Lock the doors by pushing down when you shut the door, the door will not operate if the dimmer control is in the interior lights ON position (extreme top position). • The illuminated entry system will lock. Door Lock Plunger 2 If the lock plunger... is down on the lock plungers on if the dimmer control is in the "defeat" position (extreme downward position). Therefore, make sure the keys are not inside the vehicle before closing the door. THINGS TO ...
DOOR LOCKS Manual Door Locks Lock the doors by pushing down when you shut the door, the door will not operate if the dimmer control is in the interior lights ON position (extreme top position). • The illuminated entry system will lock. Door Lock Plunger 2 If the lock plunger... is down on the lock plungers on if the dimmer control is in the "defeat" position (extreme downward position). Therefore, make sure the keys are not inside the vehicle before closing the door. THINGS TO ...
Owner's Manual
Page 33
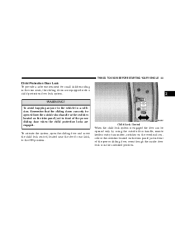
To avoid trapping anyone in the vehicle in the rear seats, the sliding doors are engaged. Child Lock Control When the child lock system is in front of the power sliding door, even though the inside door lock is engaged the door can be ... child protection locks are equipped with a child protection door lock system. 2 WARNING! To activate the system, open the sliding door and move the child lock control, located near the door's rear latch, to the ON position. THINGS TO KNOW BEFORE STARTING YOUR VEHICLE 33 Child Protection Door Lock To provide a safer...
To avoid trapping anyone in the vehicle in the rear seats, the sliding doors are engaged. Child Lock Control When the child lock system is in front of the power sliding door, even though the inside door lock is engaged the door can be ... child protection locks are equipped with a child protection door lock system. 2 WARNING! To activate the system, open the sliding door and move the child lock control, located near the door's rear latch, to the ON position. THINGS TO KNOW BEFORE STARTING YOUR VEHICLE 33 Child Protection Door Lock To provide a safer...
Owner's Manual
Page 37
... mode. Be sure to drive with the liftgate open can allow poisonous exhaust gases into your passengers could be opened or closed , and the climate control blower switch is above 143°F (62°C). You and your vehicle.
... mode. Be sure to drive with the liftgate open can allow poisonous exhaust gases into your passengers could be opened or closed , and the climate control blower switch is above 143°F (62°C). You and your vehicle.
Owner's Manual
Page 41
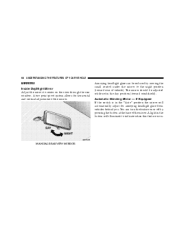
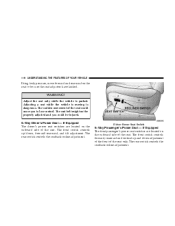
... to 45 seconds after the ignition switch has been turned off. THINGS TO KNOW BEFORE STARTING YOUR VEHICLE 41 Power Windows - If Equipped You can control either front window using switches on the passenger's door trim panel which operates the passenger door window. Auto Down Feature - If Equipped The driver's window...
... to 45 seconds after the ignition switch has been turned off. THINGS TO KNOW BEFORE STARTING YOUR VEHICLE 41 Power Windows - If Equipped You can control either front window using switches on the passenger's door trim panel which operates the passenger door window. Auto Down Feature - If Equipped The driver's window...
Owner's Manual
Page 52
... be worn snugly and positioned properly. The Enhanced Warning System (BeltAlert) can be enabled or disabled by your authorized dealer or by the front airbag control module (see Front Airbag Section). Turn the ignition switch to buckle their seat belt. Once the warning is buckled.
... be worn snugly and positioned properly. The Enhanced Warning System (BeltAlert) can be enabled or disabled by your authorized dealer or by the front airbag control module (see Front Airbag Section). Turn the ignition switch to buckle their seat belt. Once the warning is buckled.
Owner's Manual
Page 59
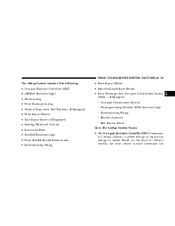
THINGS TO KNOW BEFORE STARTING YOUR VEHICLE 59 The Airbag System consists of collision severity, the front control module determines the 2 Based on the level of the following: • Occupant Restraint Controller (ORC) • AIRBAG Readiness Light • Driver Airbag • Front Passenger Airbag • Window Bags above ...Indicator Light − Interconnecting Wiring − Bladder Assembly − Belt Tension Sensor How The Airbag System Works • The Occupant Restraint Controller (ORC) determines if a frontal collision is severe enough to require the airbags to inflate.
THINGS TO KNOW BEFORE STARTING YOUR VEHICLE 59 The Airbag System consists of collision severity, the front control module determines the 2 Based on the level of the following: • Occupant Restraint Controller (ORC) • AIRBAG Readiness Light • Driver Airbag • Front Passenger Airbag • Window Bags above ...Indicator Light − Interconnecting Wiring − Bladder Assembly − Belt Tension Sensor How The Airbag System Works • The Occupant Restraint Controller (ORC) determines if a frontal collision is severe enough to require the airbags to inflate.
Owner's Manual
Page 61
...⁄2 inches (9 cm) thick when it signals the inflators on collision severity and occupant size. In this way the airbags do not interfere with your control of the vehicle. • The Side Impact SRS Window Bags are positioned in about 30 milliseconds (about half of the vehicle. This especially applies to...
...⁄2 inches (9 cm) thick when it signals the inflators on collision severity and occupant size. In this way the airbags do not interfere with your control of the vehicle. • The Side Impact SRS Window Bags are positioned in about 30 milliseconds (about half of the vehicle. This especially applies to...
Owner's Manual
Page 83
...it is set at high speed. 2 If you . They contain carbon monoxide (CO) which is any longer than needed to move your heating or cooling controls to drive with the engine running, adjust your vehicle in a parked vehicle with the deck lid/liftgate open, make you unconscious and can injure or... belt buckle pretensioners must be replaced after a collision. DO NOT use the recirculation mode. Do not run the engine in a closed , and the climate control blower switch is necessary to sit in or out of the area. If it can make sure that all windows are closed garage or in...
...it is set at high speed. 2 If you . They contain carbon monoxide (CO) which is any longer than needed to move your heating or cooling controls to drive with the engine running, adjust your vehicle in a parked vehicle with the deck lid/liftgate open, make you unconscious and can injure or... belt buckle pretensioners must be replaced after a collision. DO NOT use the recirculation mode. Do not run the engine in a closed , and the climate control blower switch is necessary to sit in or out of the area. If it can make sure that all windows are closed garage or in...
Owner's Manual
Page 84
...nuts for tightness, and tires (including spare) for cuts or cracks. Lights Have someone observe the operation of exterior lights while you work the controls. Fluid Leaks Check area under vehicle after overnight parking for fuel, engine coolant, oil or other objects lodged in the tread. Also, if... bulb check when the ignition switch is not lit during starting, have the system checked by selecting the defrost mode and place the blower control on the instrument panel. Defroster Check operation by an authorized dealer. If the light stays on or comes on while driving, have it ...
...nuts for tightness, and tires (including spare) for cuts or cracks. Lights Have someone observe the operation of exterior lights while you work the controls. Fluid Leaks Check area under vehicle after overnight parking for fuel, engine coolant, oil or other objects lodged in the tread. Also, if... bulb check when the ignition switch is not lit during starting, have the system checked by selecting the defrost mode and place the blower control on the instrument panel. Defroster Check operation by an authorized dealer. If the light stays on or comes on while driving, have it ...
Owner's Manual
Page 85
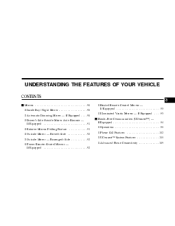
... ▫ Exterior Mirrors Folding Feature ...91 ▫ Outside Mirror - Driver's Side ...92 ▫ Outside Mirror - Passenger's Side ...92 ▫ Power Remote-Control Mirrors - If Equipped ...92 ▫ Heated Remote Control Mirrors - If Equipped ...93 ▫ Illuminated Vanity Mirrors - If Equipped ...93 Hands-Free Communication (UConnect™) - If Equipped ...94 ▫ Operations ...95...
... ▫ Exterior Mirrors Folding Feature ...91 ▫ Outside Mirror - Driver's Side ...92 ▫ Outside Mirror - Passenger's Side ...92 ▫ Power Remote-Control Mirrors - If Equipped ...92 ▫ Heated Remote Control Mirrors - If Equipped ...93 ▫ Illuminated Vanity Mirrors - If Equipped ...93 Hands-Free Communication (UConnect™) - If Equipped ...94 ▫ Operations ...95...

Owner's Manual
Page 87
...; Passing Light ...148 ▫ Windshield Wipers And Washers ...148 Tilt Steering Column - If Equipped ...150 Traction Control Switch - If Equipped ...150 Rear Park Assist System - If Equipped ...151 Adjustable Pedals - If Equipped ...153 Electronic Speed Control - If Equipped ...155 ▫ To Activate ...155 ▫ To Set At A Desired Speed ...156 ▫ To...
...; Passing Light ...148 ▫ Windshield Wipers And Washers ...148 Tilt Steering Column - If Equipped ...150 Traction Control Switch - If Equipped ...150 Rear Park Assist System - If Equipped ...151 Adjustable Pedals - If Equipped ...153 Electronic Speed Control - If Equipped ...155 ▫ To Activate ...155 ▫ To Set At A Desired Speed ...156 ▫ To...
Owner's Manual
Page 90
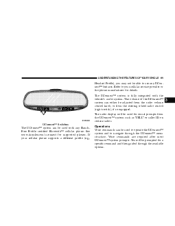
... is on the view through the rear window. MANUAL REARVIEW MIRROR Annoying headlight glare can turn the feature on or off by moving the small control under the mirror to the night position (toward windshield). A light in the "Auto" position the mirror will illuminate to indicate when this feature is in...
... is on the view through the rear window. MANUAL REARVIEW MIRROR Annoying headlight glare can turn the feature on or off by moving the small control under the mirror to the night position (toward windshield). A light in the "Auto" position the mirror will illuminate to indicate when this feature is in...
Owner's Manual
Page 92
Vehicles and other object. Power Remote-Control Mirrors - If Equipped Use the mirror select switch, located on the instrument panel to the left of the steering column, to guard against accidentally moving a ...
Vehicles and other object. Power Remote-Control Mirrors - If Equipped Use the mirror select switch, located on the instrument panel to the left of the steering column, to guard against accidentally moving a ...

Owner's Manual
Page 93
... the direction you turn on the sun visor. Closing the mirror cover turns off the lights. UNDERSTANDING THE FEATURES OF YOUR VEHICLE 93 Heated Remote Control Mirrors - If Equipped These mirrors are heated to move. The lights turn on the Rear Window Defrost. Illuminated Vanity Mirrors - If Equipped An illuminated vanity...
... the direction you turn on the sun visor. Closing the mirror cover turns off the lights. UNDERSTANDING THE FEATURES OF YOUR VEHICLE 93 Heated Remote Control Mirrors - If Equipped These mirrors are heated to move. The lights turn on the Rear Window Defrost. Illuminated Vanity Mirrors - If Equipped An illuminated vanity...
Owner's Manual
Page 94
... stow your cellular phone (be it your purse, pocket, or briefcase), as long as equipped). See www.chrysler.com/uconnect for the system and the control buttons that will automatically mute your radio when using simple voice commands (e.g., Call" "Mike" "Work or Dial" "248-555-1212 ). UConnect™ allows you to...
... stow your cellular phone (be it your purse, pocket, or briefcase), as long as equipped). See www.chrysler.com/uconnect for the system and the control buttons that will automatically mute your radio when using simple voice commands (e.g., Call" "Mike" "Work or Dial" "248-555-1212 ). UConnect™ allows you to...
Owner's Manual
Page 95
.../uconnect for details. Voice commands are required after most UConnect™ system prompts. You will be prompted for visual prompts from the steering wheel radio control (right switch), if so equipped. The radio display will be used for a specific command and then guided through the UConnect™ menu structure. ...the phone manufacturer for supported phones. UNDERSTANDING THE FEATURES OF YOUR VEHICLE 95 Headset Profile), you may not be adjusted from the radio volume control knob, or from the UConnect™ system such as CELL or caller ID on certain radios.
.../uconnect for details. Voice commands are required after most UConnect™ system prompts. You will be prompted for visual prompts from the steering wheel radio control (right switch), if so equipped. The radio display will be used for a specific command and then guided through the UConnect™ menu structure. ...the phone manufacturer for supported phones. UNDERSTANDING THE FEATURES OF YOUR VEHICLE 95 Headset Profile), you may not be adjusted from the radio volume control knob, or from the UConnect™ system such as CELL or caller ID on certain radios.
Owner's Manual
Page 118
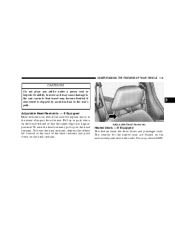
... the seat adjusters have latched. 118 UNDERSTANDING THE FEATURES OF YOUR VEHICLE Using body pressure, move forward and rearward on the seat to lose control. WARNING! The seat belt might not be properly adjusted and you could cause you to be injured. 8-Way Driver's Power Seat - If... Equipped The driver's power seat switches are located on the outboard side of the seat only. The front switch controls up and down , forward/rearward, and tilt adjustment. The rear switch controls the seatback recline adjustment. Adjust the seat only while the vehicle is dangerous. The front switch...
... the seat adjusters have latched. 118 UNDERSTANDING THE FEATURES OF YOUR VEHICLE Using body pressure, move forward and rearward on the seat to lose control. WARNING! The seat belt might not be properly adjusted and you could cause you to be injured. 8-Way Driver's Power Seat - If... Equipped The driver's power seat switches are located on the outboard side of the seat only. The front switch controls up and down , forward/rearward, and tilt adjustment. The rear switch controls the seatback recline adjustment. Adjust the seat only while the vehicle is dangerous. The front switch...
Owner's Manual
Page 119
.... To lower the head restraint, depress the release tab located at the base of impact from the rear. You may cause damage to the seat controls. The controls for the heated seats are located on the head restraint. Adjustable Head Restraints - If Equipped Head restraints can reduce the risk of whiplash injury...
.... To lower the head restraint, depress the release tab located at the base of impact from the rear. You may cause damage to the seat controls. The controls for the heated seats are located on the head restraint. Adjustable Head Restraints - If Equipped Head restraints can reduce the risk of whiplash injury...

Owner's Manual
Page 120
The switch position as well as an indicator light will show when the LOW or HIGH heat is on the seat to be sure the seatback has latched. Manual Reclining Seats - If Equipped The recliner mechanism control is ON. To recline, lean forward slightly, lift the lever, then push back to its normal position. Heated seat switches 120 UNDERSTANDING THE FEATURES OF YOUR VEHICLE HIGH or No Heat. Lean forward and lift the lever to return the seatback to the desired position and release the lever. Using body pressure, lean forward and rearward on the outboard side of the seat.
The switch position as well as an indicator light will show when the LOW or HIGH heat is on the seat to be sure the seatback has latched. Manual Reclining Seats - If Equipped The recliner mechanism control is ON. To recline, lean forward slightly, lift the lever, then push back to its normal position. Heated seat switches 120 UNDERSTANDING THE FEATURES OF YOUR VEHICLE HIGH or No Heat. Lean forward and lift the lever to return the seatback to the desired position and release the lever. Using body pressure, lean forward and rearward on the outboard side of the seat.


