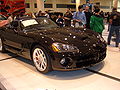
Owner's Manual
Page 1
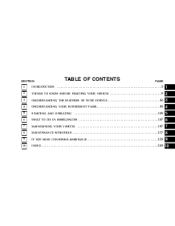
SECTION 1 2 3 4 5 6 7 8 9 10 TABLE OF CONTENTS PAGE INTRODUCTION ...3 THINGS TO KNOW BEFORE STARTING YOUR VEHICLE ...9 UNDERSTANDING THE FEATURES OF YOUR VEHICLE ...53 UNDERSTANDING YOUR INSTRUMENT PANEL ...83 STARTING AND OPERATING ...109 WHAT TO DO IN EMERGENCIES ...147 MAINTAINING YOUR VEHICLE ...157 MAINTENANCE SCHEDULES ...217 IF YOU NEED CONSUMER ASSISTANCE ...233 INDEX ...243 1 2 3 4 5 6 7 8 9 10
SECTION 1 2 3 4 5 6 7 8 9 10 TABLE OF CONTENTS PAGE INTRODUCTION ...3 THINGS TO KNOW BEFORE STARTING YOUR VEHICLE ...9 UNDERSTANDING THE FEATURES OF YOUR VEHICLE ...53 UNDERSTANDING YOUR INSTRUMENT PANEL ...83 STARTING AND OPERATING ...109 WHAT TO DO IN EMERGENCIES ...147 MAINTAINING YOUR VEHICLE ...157 MAINTENANCE SCHEDULES ...217 IF YOU NEED CONSUMER ASSISTANCE ...233 INDEX ...243 1 2 3 4 5 6 7 8 9 10
Owner's Manual
Page 10
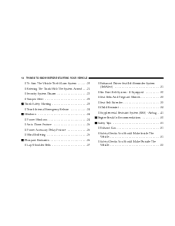
... ...51 ▫ Exhaust Gas ...51 ▫ Safety Checks You Should Make Inside The Vehicle ...51 ▫ Safety Checks You Should Make Outside The Vehicle ...52 10 THINGS TO KNOW BEFORE STARTING YOUR VEHICLE ▫ To Arm The Vehicle Theft Alarm System ...20 ▫ Entering The Trunk With The System Armed ...21...
... ...51 ▫ Exhaust Gas ...51 ▫ Safety Checks You Should Make Inside The Vehicle ...51 ▫ Safety Checks You Should Make Outside The Vehicle ...52 10 THINGS TO KNOW BEFORE STARTING YOUR VEHICLE ▫ To Arm The Vehicle Theft Alarm System ...20 ▫ Entering The Trunk With The System Armed ...21...

Owner's Manual
Page 16
... Unlock button. NOTE: The Lamp Flash can be displayed if both buttons. Press and hold the Lock button, wait at least 4 but no longer than 10 seconds, then press the Trunk button. 3. Press and hold the Unlock button, wait at least 4 but no longer than... 10 seconds, then press the Lock button. 3. 16 THINGS TO KNOW BEFORE STARTING YOUR VEHICLE To Unlock the Doors: Press and release the UNLOCK button on ...
... Unlock button. NOTE: The Lamp Flash can be displayed if both buttons. Press and hold the Lock button, wait at least 4 but no longer than 10 seconds, then press the Trunk button. 3. Press and hold the Unlock button, wait at least 4 but no longer than... 10 seconds, then press the Lock button. 3. 16 THINGS TO KNOW BEFORE STARTING YOUR VEHICLE To Unlock the Doors: Press and release the UNLOCK button on ...

Owner's Manual
Page 17
... hold the Panic button or turn signal lights will also shut itself off . The horn chirp can be disabled at least 4 but no longer than 10 seconds, then press the Unlock button. 3. Panic mode does not work when the vehicle is armed. Press and hold the Lock button on the transmitter...
... hold the Panic button or turn signal lights will also shut itself off . The horn chirp can be disabled at least 4 but no longer than 10 seconds, then press the Unlock button. 3. Panic mode does not work when the vehicle is armed. Press and hold the Lock button on the transmitter...
Owner's Manual
Page 18
... the following conditions: 1. While the UNLOCK button is over, or if you do not have a programmed transmitter, contact your vehicle. Turn the ignition switch to 10 seconds. To program another transmitter follow these steps: 1. You will hear a chime when the transmitter has been successfully programmed. You may occur. 3.
... the following conditions: 1. While the UNLOCK button is over, or if you do not have a programmed transmitter, contact your vehicle. Turn the ignition switch to 10 seconds. To program another transmitter follow these steps: 1. You will hear a chime when the transmitter has been successfully programmed. You may occur. 3.

Owner's Manual
Page 19
Press both buttons on the transmitter for about 10 seconds. Normal transmitter operation should resume. 2 Separating Transmitter Halves 2. NOTE: If the transmitter is operated more than 255 times out of range of synch". To ...
Press both buttons on the transmitter for about 10 seconds. Normal transmitter operation should resume. 2 Separating Transmitter Halves 2. NOTE: If the transmitter is operated more than 255 times out of range of synch". To ...
Owner's Manual
Page 31
... the warning is triggered, the Enhanced Warning System (BeltAlert) will alert the driver to chime and flash the Seat Belt Warning Light for more than 10 seconds and the vehicle speed is greater than 5 mph (8 km/h). Turn the ignition switch to the ON or START position. Be sure the belt is...
... the warning is triggered, the Enhanced Warning System (BeltAlert) will alert the driver to chime and flash the Seat Belt Warning Light for more than 10 seconds and the vehicle speed is greater than 5 mph (8 km/h). Turn the ignition switch to the ON or START position. Be sure the belt is...

Owner's Manual
Page 32
... successfully completed the programming. Within 60 seconds of starting the vehicle, unbuckle and then re-buckle the driver's seat belt at least three times within 10 seconds, ending with the seat belt buckled. Six Point Belt System - Adjust the belts by turning the belt latch mechanism 1⁄4 turn on the street...
... successfully completed the programming. Within 60 seconds of starting the vehicle, unbuckle and then re-buckle the driver's seat belt at least three times within 10 seconds, ending with the seat belt buckled. Six Point Belt System - Adjust the belts by turning the belt latch mechanism 1⁄4 turn on the street...

Owner's Manual
Page 63
Push down . 11. Push down on convertible top behind driver seat to lock down to engage inboard tab on the driver side. Close the trunk lid. 3 Stretching and Smoothing Cover Engaging Driver Side Tab UNDERSTANDING THE FEATURES OF YOUR VEHICLE 63 10. Stretch out and smooth cover from rear of vehicle.
Push down . 11. Push down on convertible top behind driver seat to lock down to engage inboard tab on the driver side. Close the trunk lid. 3 Stretching and Smoothing Cover Engaging Driver Side Tab UNDERSTANDING THE FEATURES OF YOUR VEHICLE 63 10. Stretch out and smooth cover from rear of vehicle.
Owner's Manual
Page 89
... light may come on. The vehicle must be serviced before any state emissions tests can be reactivated if the driver's seat belt is greater than 10 seconds and the vehicle speed is unfastened for deactivating the system. 4 If the light is required. Immediate service is flashing, severe catalytic converter damage and...
... light may come on. The vehicle must be serviced before any state emissions tests can be reactivated if the driver's seat belt is greater than 10 seconds and the vehicle speed is unfastened for deactivating the system. 4 If the light is required. Immediate service is flashing, severe catalytic converter damage and...
Owner's Manual
Page 112
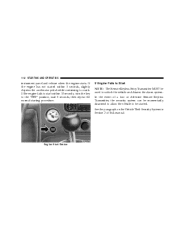
If the engine has not started within 10 seconds, turn the key to Start NOTE: The Remote Keyless Entry Transmitter MUST be started. If Engine Fails to the "OFF" position, wait 5 seconds, then ...
If the engine has not started within 10 seconds, turn the key to Start NOTE: The Remote Keyless Entry Transmitter MUST be started. If Engine Fails to the "OFF" position, wait 5 seconds, then ...
Owner's Manual
Page 113
... to continue running smoothly. If the engine has been flooded, it may be repeated. 5 If the engine shows no sign of this procedure carefully. Wait 10 to run, but not have followed the "NORMAL STARTING" procedure, it may be dangerous if done improperly, so follow this manual for more than 15...
... to continue running smoothly. If the engine has been flooded, it may be repeated. 5 If the engine shows no sign of this procedure carefully. Wait 10 to run, but not have followed the "NORMAL STARTING" procedure, it may be dangerous if done improperly, so follow this manual for more than 15...

Owner's Manual
Page 123
... = Overall Diameter in Inches (in) 215 = Section Width in Milimeters (mm) 65 = Aspect Ratio in Percent (%) -Ratio of section height to section width of tire. 10.5 = Section Width in Inches (in) R = Construction Code - R means Radial Construction. - D means Diagonal or Bias Construction. 15 = Rim Diameter in Inches (in...
... = Overall Diameter in Inches (in) 215 = Section Width in Milimeters (mm) 65 = Aspect Ratio in Percent (%) -Ratio of section height to section width of tire. 10.5 = Section Width in Inches (in) R = Construction Code - R means Radial Construction. - D means Diagonal or Bias Construction. 15 = Rim Diameter in Inches (in...

Owner's Manual
Page 143
DO NOT use gasolines containing METHANOL. Gasolines blended with materials called oxygenates such as 10% alcohol, MTBE, ETBE or TAME. Gasoline containing methanol may not be used in some areas of the same octane number without MMT. It is a manganese ...
DO NOT use gasolines containing METHANOL. Gasolines blended with materials called oxygenates such as 10% alcohol, MTBE, ETBE or TAME. Gasoline containing methanol may not be used in some areas of the same octane number without MMT. It is a manganese ...

Owner's Manual
Page 153
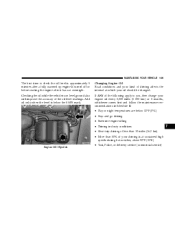
... electronics will prevent the engine from starting. 9. NOTE: If system is not turned off the Theft Security System. If engine does not start engine. 10. Make sure that you have a good contact on the engines. When removing the booster cables, reverse the above sequence exactly. 6 NOTE: When using..., stop cranking engine and allow starter to the engine of the other vehicle. Then start the Viper engine. WHAT TO DO IN EMERGENCIES 153 Thermostat Housing shown in illustration) of your Viper and the other end to cool down before cranking again. 11. Start the engine in the ...
... electronics will prevent the engine from starting. 9. NOTE: If system is not turned off the Theft Security System. If engine does not start engine. 10. Make sure that you have a good contact on the engines. When removing the booster cables, reverse the above sequence exactly. 6 NOTE: When using..., stop cranking engine and allow starter to the engine of the other vehicle. Then start the Viper engine. WHAT TO DO IN EMERGENCIES 153 Thermostat Housing shown in illustration) of your Viper and the other end to cool down before cranking again. 11. Start the engine in the ...

Owner's Manual
Page 162
... VEHICLE EMISSIONS INSPECTION AND MAINTENANCE PROGRAMS In some localities, it may be a legal requirement to pass an inspection of two things will flash for about 10 seconds and then return to being fully illuminated until you turn your key to the ON position, you will be ready. If the OBD system...
... VEHICLE EMISSIONS INSPECTION AND MAINTENANCE PROGRAMS In some localities, it may be a legal requirement to pass an inspection of two things will flash for about 10 seconds and then return to being fully illuminated until you turn your key to the ON position, you will be ready. If the OBD system...
Owner's Manual
Page 165
... below 32°F (0°C) • Stop and go driving • Extensive engine idling • Driving in dusty conditions • Short trip driving of less than 10 miles (16.2 km) • More than 50% of your driving is on level ground also will improve the accuracy of driving affects the interval at...
... below 32°F (0°C) • Stop and go driving • Extensive engine idling • Driving in dusty conditions • Short trip driving of less than 10 miles (16.2 km) • More than 50% of your driving is on level ground also will improve the accuracy of driving affects the interval at...
Owner's Manual
Page 166
... all types of oil pressure. Use Mopar or an equivalent oil meeting the specification MS-10725. This could damage your engine oil every 6,000 miles (10 000 km) or 6 months, whichever comes first and follow the maintenance recommendations in the engine oil viscosity chart. If you choose to you, then change...
... all types of oil pressure. Use Mopar or an equivalent oil meeting the specification MS-10725. This could damage your engine oil every 6,000 miles (10 000 km) or 6 months, whichever comes first and follow the maintenance recommendations in the engine oil viscosity chart. If you choose to you, then change...

Owner's Manual
Page 172
... the battery terminals and replace if parts are damaged or unusable. 8. Locate the battery compartment inside the trunk. 9. Install the battery cover and tighten down . 10. Lift out the battery. 6. Tighten the positive battery post and then tighten the negative battery post. 11. Clean out the battery tray area, freeing area...
... the battery terminals and replace if parts are damaged or unusable. 8. Locate the battery compartment inside the trunk. 9. Install the battery cover and tighten down . 10. Lift out the battery. 6. Tighten the positive battery post and then tighten the negative battery post. 11. Clean out the battery tray area, freeing area...
Owner's Manual
Page 193
... contaminated with the vehicle in the transmission should be checked for correct fluid type. Rear Axle Fluid Level Check Every 12 months or 6,000 miles (10 000 km) the exterior of the axle should be changed immediately. Fluid Level Check The fluid in a level position, supported by removing the fill plug...
... contaminated with the vehicle in the transmission should be checked for correct fluid type. Rear Axle Fluid Level Check Every 12 months or 6,000 miles (10 000 km) the exterior of the axle should be changed immediately. Fluid Level Check The fluid in a level position, supported by removing the fill plug...

