
Owner's Manual
Page 31
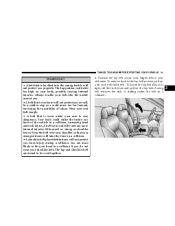
... under the belt in a collision. • A shoulder belt placed behind you will not protect you from injury during a collision. You are meant to hit your head in a collision if you could strike the inside surfaces of the vehicle in the lap belt portion, pull up a bit on the shoulder belt. The... risk of injury. In a sudden stop you do not wear your strongest bones will take the force in a collision. 2 To remove slack in a collision, increasing head and neck injury. Ribs aren't as strong as well. To loosen the lap belt if it is buckled into the buckle nearest you. • A belt...
... under the belt in a collision. • A shoulder belt placed behind you will not protect you from injury during a collision. You are meant to hit your head in a collision if you could strike the inside surfaces of the vehicle in the lap belt portion, pull up a bit on the shoulder belt. The... risk of injury. In a sudden stop you do not wear your strongest bones will take the force in a collision. 2 To remove slack in a collision, increasing head and neck injury. Ribs aren't as strong as well. To loosen the lap belt if it is buckled into the buckle nearest you. • A belt...
Owner's Manual
Page 53
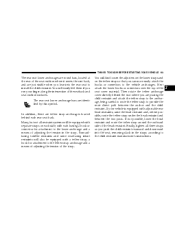
... most direct path between the two posts. If your finger along the intersection of the seat cover material. If not possible, lower the head restraint and route the tether strap around the outboard side of the seat cushion where it meets the seat back, and are just visible ... rear seat lower anchorage bars are identified by this symbol. You will be equipped with adjustable rear head restraints, raise the head restraint and, where possible, route the tether strap under the head restraint and between the anchor and the child restraint. Next attach the lower hooks or connectors over the...
... most direct path between the two posts. If your finger along the intersection of the seat cover material. If not possible, lower the head restraint and route the tether strap around the outboard side of the seat cushion where it meets the seat back, and are just visible ... rear seat lower anchorage bars are identified by this symbol. You will be equipped with adjustable rear head restraints, raise the head restraint and, where possible, route the tether strap under the head restraint and between the anchor and the child restraint. Next attach the lower hooks or connectors over the...
Owner's Manual
Page 55
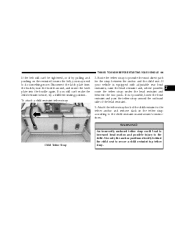
... plate into the buckle again. Attach the tether strap hook of the head restraint. 3. If your vehicle is equipped with adjustable rear head restraints, raise the head restraint and, where possible, route the tether strap under the head restraint and between the anchor and the child seat. To attach a ...child restraint tether strap: 2. An incorrectly anchored tether strap could lead to increased head motion and possible injury to secure a child restraint top tether strap. If you still can 't be tightened, or if by pulling and ...
... plate into the buckle again. Attach the tether strap hook of the head restraint. 3. If your vehicle is equipped with adjustable rear head restraints, raise the head restraint and, where possible, route the tether strap under the head restraint and between the anchor and the child seat. To attach a ...child restraint tether strap: 2. An incorrectly anchored tether strap could lead to increased head motion and possible injury to secure a child restraint top tether strap. If you still can 't be tightened, or if by pulling and ...
Owner's Manual
Page 60
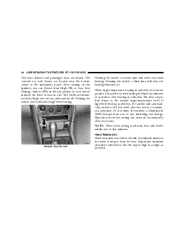
60 UNDERSTANDING THE FEATURES OF YOUR VEHICLE ▫ Lumbar Support ...85 ▫ Heated Seats-If Equipped ...85 ▫ Head Restraints ...86 ▫ Folding Rear Seat ...87 Adjustable Pedals - If Equipped ...88 To Open And Close The Hood ...89 Lights ...91 ▫ Overhead Console Map/...
60 UNDERSTANDING THE FEATURES OF YOUR VEHICLE ▫ Lumbar Support ...85 ▫ Heated Seats-If Equipped ...85 ▫ Head Restraints ...86 ▫ Folding Rear Seat ...87 Adjustable Pedals - If Equipped ...88 To Open And Close The Hood ...89 Lights ...91 ▫ Overhead Console Map/...
Owner's Manual
Page 86
... is selected, the heaters provide a boosted heat level during the first four minutes of continuous operation. The heat output then drops to five minutes. Head Restraints Head restraints can choose from the rear. When high-temperature heating is activated. If high-level heating is selected, the system will automatically switch to one...
... is selected, the heaters provide a boosted heat level during the first four minutes of continuous operation. The heat output then drops to five minutes. Head Restraints Head restraints can choose from the rear. When high-temperature heating is activated. If high-level heating is selected, the system will automatically switch to one...
Owner's Manual
Page 87
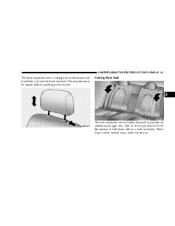
Pull on the loops shown in the illustration to lower the head restraint. UNDERSTANDING THE FEATURES OF YOUR VEHICLE 87 The head restraints have a locking button which must be pushed in to fold down either or both seatbacks. The restraints may be raised without pushing in use. These loops can be tucked away when not in the button. Folding Rear Seat 3 The rear seatbacks can be folded forward to provide an additional storage area.
Pull on the loops shown in the illustration to lower the head restraint. UNDERSTANDING THE FEATURES OF YOUR VEHICLE 87 The head restraints have a locking button which must be pushed in to fold down either or both seatbacks. The restraints may be raised without pushing in use. These loops can be tucked away when not in the button. Folding Rear Seat 3 The rear seatbacks can be folded forward to provide an additional storage area.
Owner's Manual
Page 110
... to prevent possible overheating. 3. Return to the vehicle and firmly press, hold for HomeLink to initiate step eight. 8. At the garage door opener receiver (motor-head unit) in the garage, locate the learn or smart button. (The name and color of the button may not be found where the hanging antenna.... HomeLink should now activate your hand-held transmitter until the frequency signal has successfully been accepted by manufacturer.) NOTE: There are designed to the motor-head unit. 7.
... to prevent possible overheating. 3. Return to the vehicle and firmly press, hold for HomeLink to initiate step eight. 8. At the garage door opener receiver (motor-head unit) in the garage, locate the learn or smart button. (The name and color of the button may not be found where the hanging antenna.... HomeLink should now activate your hand-held transmitter until the frequency signal has successfully been accepted by manufacturer.) NOTE: There are designed to the motor-head unit. 7.
Owner's Manual
Page 170
... poor playback may require a few minutes to warm up or down to return to the stations that it is reached. Clean and demagnetize the tape heads at least twice a year. At the end of the current selection. Seek Button Press the SEEK button up momentarily to advance the tape in will...
... poor playback may require a few minutes to warm up or down to return to the stations that it is reached. Clean and demagnetize the tape heads at least twice a year. At the end of the current selection. Seek Button Press the SEEK button up momentarily to advance the tape in will...
Owner's Manual
Page 184
...the treble tone control were turned all deposits with a simple WET cleaning cassette. Maintain your cassette tape player. As preventive maintenance, clean the head about every 30 hours of deposits on the capstan shaft may cause the tape to edge. 3. Store the disc in the required directions. ... cleaning cassette. Handle the disc by its case after playing. 6. Do not expose the disc to the disc; A loose tape should periodically clean the head with a soft cloth, wiping from one or both channels, as benzine, thinner, cleaners, or antistatic sprays. 5. Do not apply paper, paper CD ...
...the treble tone control were turned all deposits with a simple WET cleaning cassette. Maintain your cassette tape player. As preventive maintenance, clean the head about every 30 hours of deposits on the capstan shaft may cause the tape to edge. 3. Store the disc in the required directions. ... cleaning cassette. Handle the disc by its case after playing. 6. Do not expose the disc to the disc; A loose tape should periodically clean the head with a soft cloth, wiping from one or both channels, as benzine, thinner, cleaners, or antistatic sprays. 5. Do not apply paper, paper CD ...

Owner's Manual
Page 203
.... Do not coast in this range. If the transmission temperature gets too hot, the transmission may be started in cold outside temperatures, shifts into strong head winds, or while towing heavy trailers. Select the "3" range when frequent transmission shifting occurs when using the Overdrive range, such as when operating the vehicle...
.... Do not coast in this range. If the transmission temperature gets too hot, the transmission may be started in cold outside temperatures, shifts into strong head winds, or while towing heavy trailers. Select the "3" range when frequent transmission shifting occurs when using the Overdrive range, such as when operating the vehicle...

Owner's Manual
Page 208
... hilly terrain, traveling into another gear that is not covered by pressing the selector lever to slow the vehicle down is possible. Shifting into strong head winds, or while towing heavy trailers, use the AutoStick mode and select the "3" range. Press and hold the selector lever in the "D -" direction. Drive This...
... hilly terrain, traveling into another gear that is not covered by pressing the selector lever to slow the vehicle down is possible. Shifting into strong head winds, or while towing heavy trailers, use the AutoStick mode and select the "3" range. Press and hold the selector lever in the "D -" direction. Drive This...

Owner's Manual
Page 354
... Vehicle Weight Rating ... ...243 ...243 ...244 ...134 ...134 ...134 ...134 ...202 15,23,240 ...306 ...249 ...249 Hands-Free Phone ...65 Hazard Warning Flasher ...256 Head Restraints ...86 Headlights High Beam ...95 High Beam/Low Beam Select Switch ...95 Passing ...95 Switch ...93 Time Delay ...94
... Vehicle Weight Rating ... ...243 ...243 ...244 ...134 ...134 ...134 ...134 ...202 15,23,240 ...306 ...249 ...249 Hands-Free Phone ...65 Hazard Warning Flasher ...256 Head Restraints ...86 Headlights High Beam ...95 High Beam/Low Beam Select Switch ...95 Passing ...95 Switch ...93 Time Delay ...94
Owner's Manual
Page 358
... Data ...47 Refrigerant ...291 Reminder, Seat Belt ...34 Remote Keyless Entry ...20 Remote Sound System Controls ...181 Replacement Tires ...234 Reporting Safety Defects ...344 Restraint, Head ...86 Restraints, Occupant ...28 Rocking Vehicle When Stuck ...270 Roof Rack ...125 Rotation, Tires ...242 Safety Checks Inside Vehicle ...57
... Data ...47 Refrigerant ...291 Reminder, Seat Belt ...34 Remote Keyless Entry ...20 Remote Sound System Controls ...181 Replacement Tires ...234 Reporting Safety Defects ...344 Restraint, Head ...86 Restraints, Occupant ...28 Rocking Vehicle When Stuck ...270 Roof Rack ...125 Rotation, Tires ...242 Safety Checks Inside Vehicle ...57
