Owner's Manual
Page 1
SECTION 1 2 3 4 5 6 7 8 9 10 TABLE OF CONTENTS PAGE INTRODUCTION ...3 THINGS TO KNOW BEFORE STARTING YOUR VEHICLE ...9 UNDERSTANDING THE FEATURES OF YOUR VEHICLE ...59 UNDERSTANDING YOUR INSTRUMENT PANEL ...127 STARTING AND OPERATING ...197 WHAT TO DO IN EMERGENCIES ...255 MAINTAINING YOUR VEHICLE ...273 MAINTENANCE SCHEDULES ...323 IF YOU NEED CONSUMER ASSISTANCE ...339 INDEX ...349 1 2 3 4 5 6 7 8 9 10
SECTION 1 2 3 4 5 6 7 8 9 10 TABLE OF CONTENTS PAGE INTRODUCTION ...3 THINGS TO KNOW BEFORE STARTING YOUR VEHICLE ...9 UNDERSTANDING THE FEATURES OF YOUR VEHICLE ...59 UNDERSTANDING YOUR INSTRUMENT PANEL ...127 STARTING AND OPERATING ...197 WHAT TO DO IN EMERGENCIES ...255 MAINTAINING YOUR VEHICLE ...273 MAINTENANCE SCHEDULES ...323 IF YOU NEED CONSUMER ASSISTANCE ...339 INDEX ...349 1 2 3 4 5 6 7 8 9 10
Owner's Manual
Page 11
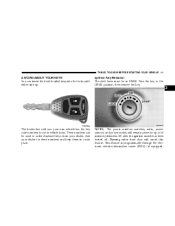
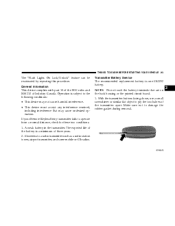
These numbers can insert the double sided keys into the locks with either front door will remain active for up . This feature is 10) after the ignition switch has been turned off. Opening either side up to 60 minutes (default is programmable through the electronic vehicle... (EVIC)-if equipped. Ask your dealer for your vehicle locks. NOTE: The power window switches, radio, power sunroof, and power outlets will cancel this feature. THINGS TO KNOW BEFORE STARTING YOUR VEHICLE 11 A WORD ABOUT YOUR KEYS You can be in a safe place. Ignition Key Removal The shift lever must...
These numbers can insert the double sided keys into the locks with either front door will remain active for up . This feature is 10) after the ignition switch has been turned off. Opening either side up to 60 minutes (default is programmable through the electronic vehicle... (EVIC)-if equipped. Ask your dealer for your vehicle locks. NOTE: The power window switches, radio, power sunroof, and power outlets will cancel this feature. THINGS TO KNOW BEFORE STARTING YOUR VEHICLE 11 A WORD ABOUT YOUR KEYS You can be in a safe place. Ignition Key Removal The shift lever must...
Owner's Manual
Page 17
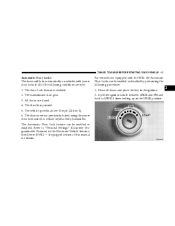
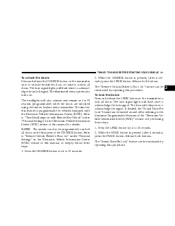
...: 1. All doors are met: 1. Cycle the ignition switch between LOCK and ON and back to "Personal Settings" (Customer Programmable Features) in the ignition. 2. The Auto Lock feature is above 15 mph (24 km/h). 6. The vehicle speed is enabled. 2. The throttle is in the LOCK position. 2 The... doors were not previously locked using the power door lock switch or remote keyless entry transmitter. The Automatic Door Lock feature can be enabled or disabled. Refer to LOCK 4 times ending up in gear. 3. THINGS TO KNOW BEFORE STARTING YOUR VEHICLE 17 ...
...: 1. All doors are met: 1. Cycle the ignition switch between LOCK and ON and back to "Personal Settings" (Customer Programmable Features) in the ignition. 2. The Auto Lock feature is above 15 mph (24 km/h). 6. The vehicle speed is enabled. 2. The throttle is in the LOCK position. 2 The... doors were not previously locked using the power door lock switch or remote keyless entry transmitter. The Automatic Door Lock feature can be enabled or disabled. Refer to LOCK 4 times ending up in gear. 3. THINGS TO KNOW BEFORE STARTING YOUR VEHICLE 17 ...
Owner's Manual
Page 18
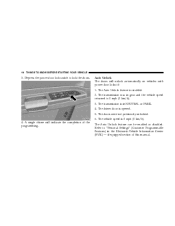
... or PARK. 4. The vehicle speed is enabled. 2. Depress the power door lock switch to "Personal Settings" (Customer Programmable Features) in the Electronic Vehicle Information Center (EVIC) - if equipped section of the programming. The transmission is opened. 5. The Auto Unlock... feature can be enabled or disabled. 18 THINGS TO KNOW BEFORE STARTING YOUR VEHICLE 3. The Auto Unlock feature is 0 mph (0 km/h). 4. The driver door is in gear and the vehicle speed returned to...
... or PARK. 4. The vehicle speed is enabled. 2. Depress the power door lock switch to "Personal Settings" (Customer Programmable Features) in the Electronic Vehicle Information Center (EVIC) - if equipped section of the programming. The transmission is opened. 5. The Auto Unlock... feature can be enabled or disabled. 18 THINGS TO KNOW BEFORE STARTING YOUR VEHICLE 3. The Auto Unlock feature is 0 mph (0 km/h). 4. The driver door is in gear and the vehicle speed returned to...
Owner's Manual
Page 19
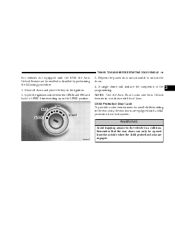
...! Remember that the rear doors can only be opened from the outside when the child protection locks are equipped with the EVIC the Auto Unlock Feature can be enabled or disabled by performing the following procedure: 1. Depress the power door unlock switch to LOCK 4 times ending up in the LOCK position... children riding in accordance with local laws. Close all doors and place the key in a collision. NOTE: Use the Auto Door Locks and Auto Unlock features in the rear seats, the rear doors are engaged.
...! Remember that the rear doors can only be opened from the outside when the child protection locks are equipped with the EVIC the Auto Unlock Feature can be enabled or disabled by performing the following procedure: 1. Depress the power door unlock switch to LOCK 4 times ending up in the LOCK position... children riding in accordance with local laws. Close all doors and place the key in a collision. NOTE: Use the Auto Door Locks and Auto Unlock features in the rear seats, the rear doors are engaged.
Owner's Manual
Page 21
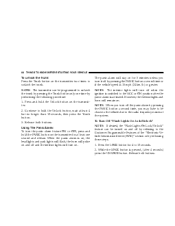
...press of this manual, or simply follow these steps. 1. The "Sound Horn On Lock" feature can be reactivated by repeating this procedure. The time for details. The "Remote Unlock Driver's Door 1st" feature can be reactivated by following these steps: 1. To lock the doors: Press and release the... LOCK button on . If desired, the "Sound Horn On Lock" feature can also be turned on and off by referring to the Customer Programmable Features of this manual for this feature is programmable on the transmitter once to unlock the driver's door, or twice to lock...
...press of this manual, or simply follow these steps. 1. The "Sound Horn On Lock" feature can be reactivated by repeating this procedure. The time for details. The "Remote Unlock Driver's Door 1st" feature can be reactivated by following these steps: 1. To lock the doors: Press and release the... LOCK button on . If desired, the "Sound Horn On Lock" feature can also be turned on and off by referring to the Customer Programmable Features of this manual for this feature is programmable on the transmitter once to unlock the driver's door, or twice to lock...
Owner's Manual
Page 22
... position after 4 seconds) press the UNLOCK button. To Turn Off "Flash Lights On Lock/Unlock" NOTE: If desired, the "Flash Lights On Lock/Unlock" feature can be turned on . While the LOCK button is on, the headlights and park lights will flash, the horn will pulse on and off by... 3. Press and hold the Unlock button on the transmitter two times to the Customer Programmable Features of the system. Release both buttons. Continue to 10 seconds. 2. The panic alarm will turn the panic alarm feature ON or OFF, press and hold the Unlock button, wait at least one time by following...
... position after 4 seconds) press the UNLOCK button. To Turn Off "Flash Lights On Lock/Unlock" NOTE: If desired, the "Flash Lights On Lock/Unlock" feature can be turned on . While the LOCK button is on, the headlights and park lights will flash, the horn will pulse on and off by... 3. Press and hold the Unlock button on the transmitter two times to the Customer Programmable Features of the system. Release both buttons. Continue to 10 seconds. 2. The panic alarm will turn the panic alarm feature ON or OFF, press and hold the Unlock button, wait at least one time by following...
Owner's Manual
Page 23
... that are on the back housing or the printed circuit board. 1. THINGS TO KNOW BEFORE STARTING YOUR VEHICLE 23 The "Flash Lights On Lock/Unlock" feature can be reactivated by repeating this procedure. The expected life of the transmitter apart. Closeness to operate from a normal distance, check for these two conditions...
... that are on the back housing or the printed circuit board. 1. THINGS TO KNOW BEFORE STARTING YOUR VEHICLE 23 The "Flash Lights On Lock/Unlock" feature can be reactivated by repeating this procedure. The expected life of the transmitter apart. Closeness to operate from a normal distance, check for these two conditions...
Owner's Manual
Page 28
...for the driver and passengers seated next to minimize the buffeting. Wind Buffeting Wind buffeting can be described as the perception of this feature. Your vehicle may exhibit wind buffeting with the windows down operation, pull up on the ears or a helicopter type sound in ...window switch, and some model passenger door power window switches have an auto down automatically. OCCUPANT RESTRAINTS Some of the most important safety features in your seat belts also can be used to Accessories Until Exit" under "Personal Settings" in the Electronic Vehicle Information Center section...
...for the driver and passengers seated next to minimize the buffeting. Wind Buffeting Wind buffeting can be described as the perception of this feature. Your vehicle may exhibit wind buffeting with the windows down operation, pull up on the ears or a helicopter type sound in ...window switch, and some model passenger door power window switches have an auto down automatically. OCCUPANT RESTRAINTS Some of the most important safety features in your seat belts also can be used to Accessories Until Exit" under "Personal Settings" in the Electronic Vehicle Information Center section...
Owner's Manual
Page 29
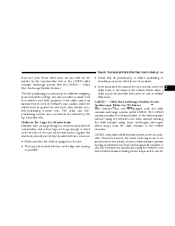
... the inside of the vehicle. But in a collision. Some of the belt to lock during very sudden stops or impacts. Everyone in this section. This feature allows the shoulder part of the worst injuries happen when people are not properly buckled up properly. It tells you how to use your passengers...
... the inside of the vehicle. But in a collision. Some of the belt to lock during very sudden stops or impacts. Everyone in this section. This feature allows the shoulder part of the worst injuries happen when people are not properly buckled up properly. It tells you how to use your passengers...
Owner's Manual
Page 32
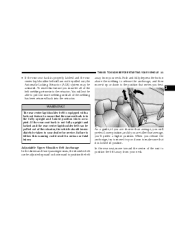
.../shoulder belt can 't straighten a belt in the belt. 6. Be sure the belt is not fully latched. Rear Center Lap/Shoulder Belt Retractor Lock-Out This feature is designed to your neck. Position the shoulder belt on your abdomen. Seat belt assemblies must be pulled out, check that it fixed. 5. WARNING! If...
.../shoulder belt can 't straighten a belt in the belt. 6. Be sure the belt is not fully latched. Rear Center Lap/Shoulder Belt Retractor Lock-Out This feature is designed to your neck. Position the shoulder belt on your abdomen. Seat belt assemblies must be pulled out, check that it fixed. 5. WARNING! If...
Owner's Manual
Page 33
... has been returned back into the retractor. away from your neck. When you release the anchorage, try to move it is equipped with a lock-out feature to follow this feature you must let all of the seat to position the belt away from your neck.
... has been returned back into the retractor. away from your neck. When you release the anchorage, try to move it is equipped with a lock-out feature to follow this feature you must let all of the seat to position the belt away from your neck.
Owner's Manual
Page 42
... the side curtain airbags. The inflating side curtain airbag pushes the outside edge of the headliner out of nontoxic gas is driven. Enhanced Accident Response Feature If the airbags deploy after an impact and the electrical system remains functional, vehicles equipped with enough force to injure you if you in another...
... the side curtain airbags. The inflating side curtain airbag pushes the outside edge of the headliner out of nontoxic gas is driven. Enhanced Accident Response Feature If the airbags deploy after an impact and the electrical system remains functional, vehicles equipped with enough force to injure you if you in another...
Owner's Manual
Page 51
... anchorages and upper tether straps from the child restraint to the vehicle structure. Child restraints having attachments for those anchorages will continue to also have features for the installation of the child restraint without using the vehicle's seat belts, instead securing the child restraint using the vehicle's seat belts. However, because...
... anchorages and upper tether straps from the child restraint to the vehicle structure. Child restraints having attachments for those anchorages will continue to also have features for the installation of the child restraint without using the vehicle's seat belts, instead securing the child restraint using the vehicle's seat belts. However, because...
Owner's Manual
Page 54
... the shoulder portion of a child restraint to the LATCH anchorages can lead to shorten it. The seat belt must be necessary once the automatic locking feature is too close to the Automatic Locking Mode section for details. A locking clip should not be in the automatic locking mode in . 54 THINGS TO...
... the shoulder portion of a child restraint to the LATCH anchorages can lead to shorten it. The seat belt must be necessary once the automatic locking feature is too close to the Automatic Locking Mode section for details. A locking clip should not be in the automatic locking mode in . 54 THINGS TO...

Owner's Manual
Page 59
... Automatic Dimming Inside Mirror - If Equipped ...62 ▫ Driver's Side Outside Mirror Auto Dimmer - If Equipped ...63 ▫ Exterior Mirrors Folding Feature - If Equipped ...63 ▫ Outside Mirror - Driver's Side ...63 ▫ Outside Mirror - Passenger's Side ...63 ▫ Power Remote...If Equipped ...64 Hands-Free Communication (UConnect™) - If Equipped ...65 ▫ Operation ...66 ▫ Phone Call Features ...72 ▫ UConnect™ System Features ...74 ▫ Advanced Phone Connectivity ...77 ▫ Things You Should Know About Your UConnect™ System ...78 Seats ...
... Automatic Dimming Inside Mirror - If Equipped ...62 ▫ Driver's Side Outside Mirror Auto Dimmer - If Equipped ...63 ▫ Exterior Mirrors Folding Feature - If Equipped ...63 ▫ Outside Mirror - Driver's Side ...63 ▫ Outside Mirror - Passenger's Side ...63 ▫ Power Remote...If Equipped ...64 Hands-Free Communication (UConnect™) - If Equipped ...65 ▫ Operation ...66 ▫ Phone Call Features ...72 ▫ UConnect™ System Features ...74 ▫ Advanced Phone Connectivity ...77 ▫ Things You Should Know About Your UConnect™ System ...78 Seats ...
Owner's Manual
Page 60
60 UNDERSTANDING THE FEATURES OF YOUR VEHICLE ▫ Lumbar Support ...85 ▫ Heated Seats-If Equipped ...85 ▫ Head Restraints ...86 ▫ Folding Rear Seat ...87 Adjustable Pedals - If ...
60 UNDERSTANDING THE FEATURES OF YOUR VEHICLE ▫ Lumbar Support ...85 ▫ Heated Seats-If Equipped ...85 ▫ Head Restraints ...86 ▫ Folding Rear Seat ...87 Adjustable Pedals - If ...

Owner's Manual
Page 61
...Homelink Buttons ...111 ▫ Reprogramming a Single Homelink Button ...111 ▫ Security ...111 Power Sunroof - If Equipped ...112 ▫ Express Open Feature ...113 ▫ Wind Buffeting ...114 ▫ Sunroof Maintenance ...114 Electrical Power Outlets ...115 ▫ Electrical Outlet Use With Engine Off ...117 ...Cupholders ...117 ▫ Front Seat Cupholders ...117 ▫ Rear Seat Cupholders ...118 Storage ...118 ▫ Console Features ...118 ▫ Cargo Management System - If Equipped ...119 Roof Luggage Rack - If Equipped ...125 Load Leveling System - If Equipped ...126...
...Homelink Buttons ...111 ▫ Reprogramming a Single Homelink Button ...111 ▫ Security ...111 Power Sunroof - If Equipped ...112 ▫ Express Open Feature ...113 ▫ Wind Buffeting ...114 ▫ Sunroof Maintenance ...114 Electrical Power Outlets ...115 ▫ Electrical Outlet Use With Engine Off ...117 ...Cupholders ...117 ▫ Front Seat Cupholders ...117 ▫ Rear Seat Cupholders ...118 Storage ...118 ▫ Console Features ...118 ▫ Cargo Management System - If Equipped ...119 Roof Luggage Rack - If Equipped ...125 Load Leveling System - If Equipped ...126...

Owner's Manual
Page 62
... on the view through the rear window. Annoying headlight glare can be reduced by moving the small control under the mirror to indicate when this feature is in the base of the mirror will automatically adjust for horizontal and vertical adjustment of vehicle). A two point pivot system allows for annoying headlight... glare from vehicles behind you. A green light in the "AUTO" position the mirror will illuminate to the night position (toward windshield). 62 UNDERSTANDING THE FEATURES OF YOUR VEHICLE MIRRORS Inside Day/Night Mirror Adjust the mirror to center on .
... on the view through the rear window. Annoying headlight glare can be reduced by moving the small control under the mirror to indicate when this feature is in the base of the mirror will automatically adjust for horizontal and vertical adjustment of vehicle). A two point pivot system allows for annoying headlight... glare from vehicles behind you. A green light in the "AUTO" position the mirror will illuminate to the night position (toward windshield). 62 UNDERSTANDING THE FEATURES OF YOUR VEHICLE MIRRORS Inside Day/Night Mirror Adjust the mirror to center on .

Owner's Manual
Page 63
...outside mirror automatically adjusts for annoying headlight glare from vehicles behind you to resist damage. full forward, full rearward, and normal. This feature can just see the side of the mirror closest to the mirror during cleaning, never spray any cleaning solution directly onto the mirror.... Exterior Mirrors Folding Feature - If Equipped Some models have three detent positions; This type of mirror will look smaller and farther away than they really are...
...outside mirror automatically adjusts for annoying headlight glare from vehicles behind you to resist damage. full forward, full rearward, and normal. This feature can just see the side of the mirror closest to the mirror during cleaning, never spray any cleaning solution directly onto the mirror.... Exterior Mirrors Folding Feature - If Equipped Some models have three detent positions; This type of mirror will look smaller and farther away than they really are...
