Owner's Manual
Page 24
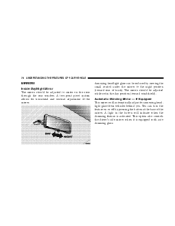
... the screw until the system is disarmed. If you touch a battery, clean it with your fingers. The horn will sound repeatedly for 3 minutes and the headlights and security light in the instrument cluster will not run until snug. The engine will flash for unauthorized operation. Avoid touching the new batteries with...
... the screw until the system is disarmed. If you touch a battery, clean it with your fingers. The horn will sound repeatedly for 3 minutes and the headlights and security light in the instrument cluster will not run until snug. The engine will flash for unauthorized operation. Avoid touching the new batteries with...
Owner's Manual
Page 66
... ...101 ▫ Tilt Mirrors In Reverse ...101 To Open And Close The Hood ...102 Lights ...103 ▫ Interior Lights ...104 ▫ Battery Saver ...105 ▫ Headlight Delay ...106 ▫ Automatic Headlights - If Equipped ...106 Way Driver's Power Seat - If Equipped ...89 ▫ 4 -
... ...101 ▫ Tilt Mirrors In Reverse ...101 To Open And Close The Hood ...102 Lights ...103 ▫ Interior Lights ...104 ▫ Battery Saver ...105 ▫ Headlight Delay ...106 ▫ Automatic Headlights - If Equipped ...106 Way Driver's Power Seat - If Equipped ...89 ▫ 4 -
Owner's Manual
Page 67
UNDERSTANDING THE FEATURES OF YOUR VEHICLE 67 ▫ Headlights, Parking Lights, Panel Lights ...106 ▫ Illuminated Entry ...107 ▫ Daytime Running Lights (Canada Only) ...107 ▫ Lights-On Reminder ...107 ▫ Fog Lights - If ...
UNDERSTANDING THE FEATURES OF YOUR VEHICLE 67 ▫ Headlights, Parking Lights, Panel Lights ...106 ▫ Illuminated Entry ...107 ▫ Daytime Running Lights (Canada Only) ...107 ▫ Lights-On Reminder ...107 ▫ Fog Lights - If ...
Owner's Manual
Page 70
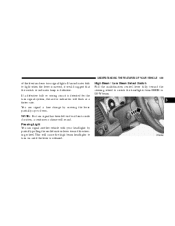
... mirror will indicate when the dimming feature is equipped with auto dimming glass. A light in the day position (toward rear of truck). Annoying headlight glare can turn the feature on or off by moving the small control under the mirror to center on the view through the rear window.... A two-point pivot system allows for annoying headlight glare from vehicles behind you. 70 UNDERSTANDING THE FEATURES OF YOUR VEHICLE MIRRORS Inside Day/Night Mirror The mirror should be adjusted while set ...
... mirror will indicate when the dimming feature is equipped with auto dimming glass. A light in the day position (toward rear of truck). Annoying headlight glare can turn the feature on or off by moving the small control under the mirror to center on the view through the rear window.... A two-point pivot system allows for annoying headlight glare from vehicles behind you. 70 UNDERSTANDING THE FEATURES OF YOUR VEHICLE MIRRORS Inside Day/Night Mirror The mirror should be adjusted while set ...

Owner's Manual
Page 105
...the interior and exterior lights. Battery Saver To protect the life of your vehicle's battery, Load Shedding is useful when headlights are required during the day. If the headlights are ON you can be regulated by rotating the control up (brighter) or down to the OFF detent will automatically ...turn off and any door is left on while the ignition is cycled off, the exterior lights will automatically turn off . If the headlights remain on for 8 minutes while the ignition is ON. NOTE: Battery Saver mode is cancelled if the ignition is off, the exterior lights...
...the interior and exterior lights. Battery Saver To protect the life of your vehicle's battery, Load Shedding is useful when headlights are required during the day. If the headlights are ON you can be regulated by rotating the control up (brighter) or down to the OFF detent will automatically ...turn off and any door is left on while the ignition is cycled off, the exterior lights will automatically turn off . If the headlights remain on for 8 minutes while the ignition is ON. NOTE: Battery Saver mode is cancelled if the ignition is off, the exterior lights...
Owner's Manual
Page 106
...is not as scratch resistant as glass and therefore different lens cleaning procedures must be followed. The headlights will remain on , and then the headlight switch is equipped with a headlight delay that will turn ON when the switch is in your exit, your authorized dealer. NOTE:... This feature can be disabled by rinsing. Headlights, Parking Lights, Panel Lights When the headlight switch is turned to clean the lenses. The headlights will leave the headlights on . This delay is initiated when the ignition is cycled off . Your ...
...is not as scratch resistant as glass and therefore different lens cleaning procedures must be followed. The headlights will remain on , and then the headlight switch is equipped with a headlight delay that will turn ON when the switch is in your exit, your authorized dealer. NOTE:... This feature can be disabled by rinsing. Headlights, Parking Lights, Panel Lights When the headlight switch is turned to clean the lenses. The headlights will leave the headlights on . This delay is initiated when the ignition is cycled off . Your ...

Owner's Manual
Page 107
... Equipped 3 The foglights are activated, the Daytime Running Lights feature will sound when the driver's door is opened. If the headlights are turned ON by your Durango will turn on Reminder If the headlights, parking lights, or courtesy lights are left On, after the ignition is turned Off, a chime will transition to the...
... Equipped 3 The foglights are activated, the Daytime Running Lights feature will sound when the driver's door is opened. If the headlights are turned ON by your Durango will turn on Reminder If the headlights, parking lights, or courtesy lights are left On, after the ignition is turned Off, a chime will transition to the...

Owner's Manual
Page 108
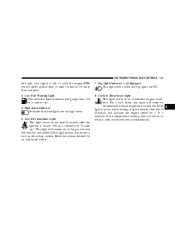
MULTIFUNCTION CONTROL LEVER The multifunction control lever is selected. The arrow on . An indicator light located in , when the headlight switch is rotated to the OFF position, or the high beam is located on the left -hand turn , and proper operation The fog lights will ...turn off when the switch is pressed in the instrument cluster will operate only when the parking lights are ON or when the vehicle headlights are on either side of the turn . 108 UNDERSTANDING THE FEATURES OF YOUR VEHICLE position and pressing the fog light button. The fog lights will...
MULTIFUNCTION CONTROL LEVER The multifunction control lever is selected. The arrow on . An indicator light located in , when the headlight switch is rotated to the OFF position, or the high beam is located on the left -hand turn , and proper operation The fog lights will ...turn off when the switch is pressed in the instrument cluster will operate only when the parking lights are ON or when the vehicle headlights are on either side of the turn . 108 UNDERSTANDING THE FEATURES OF YOUR VEHICLE position and pressing the fog light button. The fog lights will...
Owner's Manual
Page 109
... moving the lever partially up or down. NOTE: If a turn signal lights. If an indicator fails to switch the headlights from HIGH or LOW beam. 3 If a defective bulb or wiring circuit is detected for at least a mile duration, a continuous chime will flash at a faster rate. ...
... moving the lever partially up or down. NOTE: If a turn signal lights. If an indicator fails to switch the headlights from HIGH or LOW beam. 3 If a defective bulb or wiring circuit is detected for at least a mile duration, a continuous chime will flash at a faster rate. ...
Owner's Manual
Page 147
... "buckle up." This light will come on momentarily when the ignition is turned ON as the seat belt remains unbuckled. High Beam Indicator Indicates that headlights are ON. 8. Fog Light Indicator - If Equipped This light shows when the fog lights are on high beam. 6. If the temperature reading does not return...
... "buckle up." This light will come on momentarily when the ignition is turned ON as the seat belt remains unbuckled. High Beam Indicator Indicates that headlights are ON. 8. Fog Light Indicator - If Equipped This light shows when the fog lights are on high beam. 6. If the temperature reading does not return...
Owner's Manual
Page 284
... And Protection From Corrosion ...321 Power Distribution Center (Fuse/Relay) ...325 Fuse Block ...325 Vehicle Storage ...326 Replacement Light Bulbs ...327 Bulb Replacement ...327 ▫ Headlights/Parking/Turn Signal ...327 ▫ Rear Side Marker, Tail Lights, Turn Signals And Backup Lights - Replacement ...329 ▫ License Lights ...333 ▫ Center High-Mounted...
... And Protection From Corrosion ...321 Power Distribution Center (Fuse/Relay) ...325 Fuse Block ...325 Vehicle Storage ...326 Replacement Light Bulbs ...327 Bulb Replacement ...327 ▫ Headlights/Parking/Turn Signal ...327 ▫ Rear Side Marker, Tail Lights, Turn Signals And Backup Lights - Replacement ...329 ▫ License Lights ...333 ▫ Center High-Mounted...
Owner's Manual
Page 327
... Stoplight ...921 Fog Lamp ...9006LL Rear Sidemarker ...168 License Plate Light ...168 Rear Tail, Stop, Turn Signal...3057 BULB REPLACEMENT Headlights/Parking/Turn Signal 7 1. Remove the two bolts attaching the headlight to the inner fender panel. MAINTAINING YOUR VEHICLE 327 REPLACEMENT LIGHT BULBS Dome Light ...WL212-2 Liftgate Lamp ...567 Overhead Console Lights...
... Stoplight ...921 Fog Lamp ...9006LL Rear Sidemarker ...168 License Plate Light ...168 Rear Tail, Stop, Turn Signal...3057 BULB REPLACEMENT Headlights/Parking/Turn Signal 7 1. Remove the two bolts attaching the headlight to the inner fender panel. MAINTAINING YOUR VEHICLE 327 REPLACEMENT LIGHT BULBS Dome Light ...WL212-2 Liftgate Lamp ...567 Overhead Console Lights...

Owner's Manual
Page 328
... the bulb. While firmly holding the headlight in your hands disconnect all connectors. Loosen the connector by pressing down on the black and/or green release which is located below the 194 red tab. 6. Remove one nut that attaches the headlight to the nut is possible by following... the procedure described in the wheel liner. 3. Grasp the headlight and pull firmly to disengage the headlight from the headlight making sure to touch the bulb with your fingers could cause excessive...
... the bulb. While firmly holding the headlight in your hands disconnect all connectors. Loosen the connector by pressing down on the black and/or green release which is located below the 194 red tab. 6. Remove one nut that attaches the headlight to the nut is possible by following... the procedure described in the wheel liner. 3. Grasp the headlight and pull firmly to disengage the headlight from the headlight making sure to touch the bulb with your fingers could cause excessive...
Owner's Manual
Page 370
... Anti-Theft System ...24,149 Appearance Care ...321 Arming Theft System ...25 Auto Unlock ...16 Automatic Dimming Mirror ...70,74 Automatic Door Locks ...15 Automatic Headlights ...106 Automatic Temperature Control ...184 Automatic Transaxle ...203 Automatic Transmission ...200,203,315 Adding Fluid ...316,317 Fluid and Filter Changes ...318 Fluid Level Check...
... Anti-Theft System ...24,149 Appearance Care ...321 Arming Theft System ...25 Auto Unlock ...16 Automatic Dimming Mirror ...70,74 Automatic Door Locks ...15 Automatic Headlights ...106 Automatic Temperature Control ...184 Automatic Transaxle ...203 Automatic Transmission ...200,203,315 Adding Fluid ...316,317 Fluid and Filter Changes ...318 Fluid Level Check...
Owner's Manual
Page 373
... Daytime Running Lights ...107 Dealer Service ...291 Defroster, Rear Window ...195 Defroster, Windshield ...63,182,187 Delay Wipers ...110 Diagnostic System, Onboard ...289 Dimmer Switch, Headlight ...147 Dipsticks Automatic Transmission ...316 Oil (Engine) ...292 Power Steering ...303 Disarming, Theft System ...25 Disc Brakes ...313 Disposal Used Coolant ...308 Door Ajar Light...
... Daytime Running Lights ...107 Dealer Service ...291 Defroster, Rear Window ...195 Defroster, Windshield ...63,182,187 Delay Wipers ...110 Diagnostic System, Onboard ...289 Dimmer Switch, Headlight ...147 Dipsticks Automatic Transmission ...316 Oil (Engine) ...292 Power Steering ...303 Disarming, Theft System ...25 Disc Brakes ...313 Disposal Used Coolant ...308 Door Ajar Light...
Owner's Manual
Page 376
376 INDEX Headlights ...327 Delay ...106 High Beam ...109 High Beam/Low Beam Select Switch ...109 Lights On Reminder ...107 Passing ...109 Replacing ...327 Heated Mirrors ...73 Heated ...
376 INDEX Headlights ...327 Delay ...106 High Beam ...109 High Beam/Low Beam Select Switch ...109 Lights On Reminder ...107 Passing ...109 Replacing ...327 Heated Mirrors ...73 Heated ...
Owner's Manual
Page 377
...34 LATCH (Lower Anchors and Tether for CHildren) . 54 Liftgate ...26 Lights ...64,103 Airbag ...50,153 Anti-Lock Warning ...149 Automatic Headlights ...106 Back-Up ...329 Brake Warning ...151 Bulb Replacement ...327 Center Mounted Stop ...334 Courtesy/Reading ...120 Cruise ...153 Daytime Running ...107... Door Ajar ...151 Fog ...107,147,335 Hazard Warning Flasher ...270 Headlights ...106 High Beam ...109 High Beam/Low Beam Select ...109 Instrument Cluster ...106,146 Interior ...104,120 License ...333 Lights On Reminder...
...34 LATCH (Lower Anchors and Tether for CHildren) . 54 Liftgate ...26 Lights ...64,103 Airbag ...50,153 Anti-Lock Warning ...149 Automatic Headlights ...106 Back-Up ...329 Brake Warning ...151 Bulb Replacement ...327 Center Mounted Stop ...334 Courtesy/Reading ...120 Cruise ...153 Daytime Running ...107... Door Ajar ...151 Fog ...107,147,335 Hazard Warning Flasher ...270 Headlights ...106 High Beam ...109 High Beam/Low Beam Select ...109 Instrument Cluster ...106,146 Interior ...104,120 License ...333 Lights On Reminder...


