Owner's Manual
Page 284
...; Selection Of Lubricating Grease ...320 ▫ Appearance Care And Protection From Corrosion ...321 Power Distribution Center (Fuse/Relay) ...325 Fuse Block ...325 Vehicle Storage ...326 Replacement Light Bulbs ...327 Bulb Replacement ...327 ▫ Headlights/Parking/Turn Signal ...327 ▫ Rear Side Marker, Tail Lights, Turn Signals And Backup Lights...
...; Selection Of Lubricating Grease ...320 ▫ Appearance Care And Protection From Corrosion ...321 Power Distribution Center (Fuse/Relay) ...325 Fuse Block ...325 Vehicle Storage ...326 Replacement Light Bulbs ...327 Bulb Replacement ...327 ▫ Headlights/Parking/Turn Signal ...327 ▫ Rear Side Marker, Tail Lights, Turn Signals And Backup Lights...
Owner's Manual
Page 327
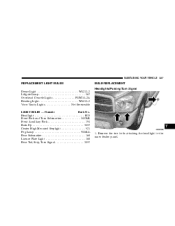
... ...3057 Center High Mounted Stoplight ...921 Fog Lamp ...9006LL Rear Sidemarker ...168 License Plate Light ...168 Rear Tail, Stop, Turn Signal...3057 BULB REPLACEMENT Headlights/Parking/Turn Signal 7 1. MAINTAINING YOUR VEHICLE 327 REPLACEMENT LIGHT BULBS Dome Light ...WL212-2 Liftgate Lamp ...567 Overhead Console Lights ...PLW214-2A Reading Light ...WL212-2 Visor Vanity Lights ...Not Serviceable LIGHT...
... ...3057 Center High Mounted Stoplight ...921 Fog Lamp ...9006LL Rear Sidemarker ...168 License Plate Light ...168 Rear Tail, Stop, Turn Signal...3057 BULB REPLACEMENT Headlights/Parking/Turn Signal 7 1. MAINTAINING YOUR VEHICLE 327 REPLACEMENT LIGHT BULBS Dome Light ...WL212-2 Liftgate Lamp ...567 Overhead Console Lights ...PLW214-2A Reading Light ...WL212-2 Visor Vanity Lights ...Not Serviceable LIGHT...

Owner's Manual
Page 328
...the red tab. Access to pull and release the red tab on the black and/or green release which reduces bulb life. Remove and replace the bulb. While firmly holding the headlight in your hands disconnect all connectors. Loosen the connector by pressing down on all connectors by removing the fender ... is located below . 5. Body oils from your fingers. Take care not to the inner fender panel. Remove one nut that attaches the headlight to touch the bulb with your fingers could cause excessive heat build-up which is located in step number 5 below the 194 red tab. 6.
...the red tab. Access to pull and release the red tab on the black and/or green release which reduces bulb life. Remove and replace the bulb. While firmly holding the headlight in your hands disconnect all connectors. Loosen the connector by pressing down on all connectors by removing the fender ... is located below . 5. Body oils from your fingers. Take care not to the inner fender panel. Remove one nut that attaches the headlight to touch the bulb with your fingers could cause excessive heat build-up which is located in step number 5 below the 194 red tab. 6.
Owner's Manual
Page 377
...Tether for CHildren) . 54 Liftgate ...26 Lights ...64,103 Airbag ...50,153 Anti-Lock Warning ...149 Automatic Headlights ...106 Back-Up ...329 Brake Warning ...151 Bulb Replacement ...327 Center Mounted Stop ...334 Courtesy/Reading ...120 Cruise ...153 Daytime Running ...107 Door Ajar ...151 Fog ......107,147,335 Hazard Warning Flasher ...270 Headlights ...106 High Beam ...109 High Beam/Low Beam Select ...109 Instrument ...
...Tether for CHildren) . 54 Liftgate ...26 Lights ...64,103 Airbag ...50,153 Anti-Lock Warning ...149 Automatic Headlights ...106 Back-Up ...329 Brake Warning ...151 Bulb Replacement ...327 Center Mounted Stop ...334 Courtesy/Reading ...120 Cruise ...153 Daytime Running ...107 Door Ajar ...151 Fog ......107,147,335 Hazard Warning Flasher ...270 Headlights ...106 High Beam ...109 High Beam/Low Beam Select ...109 Instrument ...


