

Owner Manual
Page 41
.... The driver's front airbag gas is about 50-70 milliseconds. In this way the airbags do not interfere with your eyes. The steering wheel hub trim cover and the upper right side of the instrument panel separate and fold out of the time it signals the inflator units. These protective covers...
.... The driver's front airbag gas is about 50-70 milliseconds. In this way the airbags do not interfere with your eyes. The steering wheel hub trim cover and the upper right side of the instrument panel separate and fold out of the time it signals the inflator units. These protective covers...

Owner Manual
Page 46
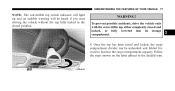
... remain OFF. (The PAD indicator light is a fault present in the system, the AIRBAG warning light will light indicating that you should try to your trim cover and cushion needs to be serviced in any way, take the vehicle to objects hanging on the seat, other passengers pushing on the seat...
... remain OFF. (The PAD indicator light is a fault present in the system, the AIRBAG warning light will light indicating that you should try to your trim cover and cushion needs to be serviced in any way, take the vehicle to objects hanging on the seat, other passengers pushing on the seat...
Owner Manual
Page 73
... operate. If the divider is clear of debris or other items. Do not use the tonneau cover area for the top to the cargo compartment trim on the vertical panel using the center cutout shown, and hook the pins at a complete stop before attempting to either the top or the rear...
... operate. If the divider is clear of debris or other items. Do not use the tonneau cover area for the top to the cargo compartment trim on the vertical panel using the center cutout shown, and hook the pins at a complete stop before attempting to either the top or the rear...
Owner Manual
Page 79
... YOUR VEHICLE 77 NOTE: The convertible top switch indicator will light up and an audible warning will be unhooked and folded forward to the decklid trim. 3
... YOUR VEHICLE 77 NOTE: The convertible top switch indicator will light up and an audible warning will be unhooked and folded forward to the decklid trim. 3

Owner Manual
Page 292
... common causes are highly corrosive to the metal in your vehicle to aid in snow and ice, and those that are sprayed on paint, metal trim, and underbody protection. Special Additives Do not add any fluid additives to geographic locations and usage. Appearance Care and Protection from Corrosion Protection of Body...
... common causes are highly corrosive to the metal in your vehicle to aid in snow and ice, and those that are sprayed on paint, metal trim, and underbody protection. Special Additives Do not add any fluid additives to geographic locations and usage. Appearance Care and Protection from Corrosion Protection of Body...
Owner Manual
Page 294
...If you detect any stone chips or scratches in the selection of the "DO NOT USE" items listed below can damage wheels and wheel trim. Avoid automatic car washes that use scouring pads or metal polishes. To remove heavy soil, select a non-abrasive, non-acidic cleaner. Wheel And... Wheel Trim Care All wheels and wheel trim, especially Aluminum, should be cleaned regularly, using mild soap and water to maintain their luster and to prevent corrosion. Rinse the ...
...If you detect any stone chips or scratches in the selection of the "DO NOT USE" items listed below can damage wheels and wheel trim. Avoid automatic car washes that use scouring pads or metal polishes. To remove heavy soil, select a non-abrasive, non-acidic cleaner. Wheel And... Wheel Trim Care All wheels and wheel trim, especially Aluminum, should be cleaned regularly, using mild soap and water to maintain their luster and to prevent corrosion. Rinse the ...
Owner Manual
Page 295
... with any liquid. Use Mopar Vinyl Cleaner to clean fabric upholstery and carpeting. Leather Seat Care and Cleaning Leather is specifically recommended for vinyl trim. Mopar Vinyl Cleaner is best preserved by regular cleaning with a soft cloth and Mopar Total Clean. Care should be removed easily with a damp...
... with any liquid. Use Mopar Vinyl Cleaner to clean fabric upholstery and carpeting. Leather Seat Care and Cleaning Leather is specifically recommended for vinyl trim. Mopar Vinyl Cleaner is best preserved by regular cleaning with a soft cloth and Mopar Total Clean. Care should be removed easily with a damp...
Owner Manual
Page 296
... components, solvents, steel wool or other sharp instruments which minimizes reflections in closed areas they may scratch the elements. To minimize the possibility of interior trim parts. Instrument Panel Cover The instrument panel cover has a low glare surface which may cause respiratory harm. Cleaning Headlights Your vehicle has plastic headlights that...
... components, solvents, steel wool or other sharp instruments which minimizes reflections in closed areas they may scratch the elements. To minimize the possibility of interior trim parts. Instrument Panel Cover The instrument panel cover has a low glare surface which may cause respiratory harm. Cleaning Headlights Your vehicle has plastic headlights that...
Owner Manual
Page 306
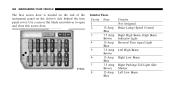
Interior Fuses Cavity Fuse 1 2 15 Amp Blue 3 7.5 Amp Brown 4 15 Amp Blue 5 7.5 Amp Brown 6 15 Amp Blue 7 7.5 Amp Brown 8 15 Amp Blue Circuits Not Assigned Brake Lamp/Speed Control Right High Beam, High Beam Indicator Light Reverse/Turn signal Light Left High Beam Right Low Beam Right Parking/Tail Light Side Marker Left Low Beam 304 MAINTAINING YOUR VEHICLE The fuse access door is located on the end of the instrument panel on the driver's side behind the trim panel cover. Use a coin or flat blade screwdriver to open and close this access door.
Interior Fuses Cavity Fuse 1 2 15 Amp Blue 3 7.5 Amp Brown 4 15 Amp Blue 5 7.5 Amp Brown 6 15 Amp Blue 7 7.5 Amp Brown 8 15 Amp Blue Circuits Not Assigned Brake Lamp/Speed Control Right High Beam, High Beam Indicator Light Reverse/Turn signal Light Left High Beam Right Low Beam Right Parking/Tail Light Side Marker Left Low Beam 304 MAINTAINING YOUR VEHICLE The fuse access door is located on the end of the instrument panel on the driver's side behind the trim panel cover. Use a coin or flat blade screwdriver to open and close this access door.
Owner Manual
Page 310
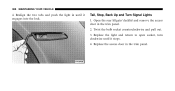
Tail, Stop, Back Up and Turn Signal Lights 1. Replace the light and return to open socket, turn clockwise until it stops. 4. Realign the two tabs and push the light in until it engages into the lock. Twist the bulb socket counterclockwise and pull out. 3. Replace the access door in the trim panel. 2. 308 MAINTAINING YOUR VEHICLE 4. Open the rear liftgate/decklid and remove the access door in the trim panel.
Tail, Stop, Back Up and Turn Signal Lights 1. Replace the light and return to open socket, turn clockwise until it stops. 4. Realign the two tabs and push the light in until it engages into the lock. Twist the bulb socket counterclockwise and pull out. 3. Replace the access door in the trim panel. 2. 308 MAINTAINING YOUR VEHICLE 4. Open the rear liftgate/decklid and remove the access door in the trim panel.

Owner Manual
Page 354
352 INDEX Vehicle Storage ...311 Vehicle Theft Alarm (Security Alarm) ...21 Warnings and Cautions ...6 Warranty Information ...336 Washer, Adding Fluid ...278 Washing Vehicle ...291 Water Driving Through ...183 Wheel Alignment and Balance ...214 Wheel and Wheel Trim Care ...292 Windows Power ...24 Windshield Defroster ...62 Windshield Washers ...101 Windshield Wiper Blades ...276 Windshield Wipers ...101 Wiper Blade Replacement ...277 Wiring, Ignition (Spark Plug Wires) ...271
352 INDEX Vehicle Storage ...311 Vehicle Theft Alarm (Security Alarm) ...21 Warnings and Cautions ...6 Warranty Information ...336 Washer, Adding Fluid ...278 Washing Vehicle ...291 Water Driving Through ...183 Wheel Alignment and Balance ...214 Wheel and Wheel Trim Care ...292 Windows Power ...24 Windshield Defroster ...62 Windshield Washers ...101 Windshield Wiper Blades ...276 Windshield Wipers ...101 Wiper Blade Replacement ...277 Wiring, Ignition (Spark Plug Wires) ...271
