

Owner's Manual
Page 28
If one time access into the liftgate area. If this occurs, disarm the system. The exterior lights will flash, the horn will sound, and the ignition will sound. If you remain in the vehicle and open a door, the alarm will not start ..., on a non-power liftgate vehicle, you have a 30 second one of whether you are in your vehicle, however, you can not be activated when the battery is not opened within 30 seconds the liftgate will remain locked. • The system remains armed during liftgate entry, pressing the liftgate button will not...
If one time access into the liftgate area. If this occurs, disarm the system. The exterior lights will flash, the horn will sound, and the ignition will sound. If you remain in the vehicle and open a door, the alarm will not start ..., on a non-power liftgate vehicle, you have a 30 second one of whether you are in your vehicle, however, you can not be activated when the battery is not opened within 30 seconds the liftgate will remain locked. • The system remains armed during liftgate entry, pressing the liftgate button will not...

Owner's Manual
Page 89
... ▫ Headlights ...149 ▫ Automatic Headlights - If Equipped ...151 ▫ Daytime Running Lights (Canada/Fleet Vehicles Only) ...151 ▫ Lights-On Reminder ...151 ▫ Battery Protection ...151 ▫ Headlamp Delay - If Equipped ...152 ▫ Front Fog Lights - If Equipped ...152 Multifunction Lever ...153 ▫ Turn Signals ...153 ▫ Headlight Low/High Beam Selector Switch...
... ▫ Headlights ...149 ▫ Automatic Headlights - If Equipped ...151 ▫ Daytime Running Lights (Canada/Fleet Vehicles Only) ...151 ▫ Lights-On Reminder ...151 ▫ Battery Protection ...151 ▫ Headlamp Delay - If Equipped ...152 ▫ Front Fog Lights - If Equipped ...152 Multifunction Lever ...153 ▫ Turn Signals ...153 ▫ Headlight Low/High Beam Selector Switch...

Owner's Manual
Page 151
... in the LOCK position and the headlight switch in the extreme top position after you turn the headlight switch to the OFF position. Battery Protection This feature provides battery protection to 90 seconds after the ignition switch is turned off, a chime will sound when the driver's door is also ON.... YOUR VEHICLE 151 Automatic Headlights - If Equipped This system automatically turns your headlights will stay ON for up to avoid wearing down the battery if the headlights, park lights, or front fog lights are off . Daytime Running Lights (Canada/Fleet Vehicles Only) The Daytime Running...
... in the LOCK position and the headlight switch in the extreme top position after you turn the headlight switch to the OFF position. Battery Protection This feature provides battery protection to 90 seconds after the ignition switch is turned off, a chime will sound when the driver's door is also ON.... YOUR VEHICLE 151 Automatic Headlights - If Equipped This system automatically turns your headlights will stay ON for up to avoid wearing down the battery if the headlights, park lights, or front fog lights are off . Daytime Running Lights (Canada/Fleet Vehicles Only) The Daytime Running...
Owner's Manual
Page 152
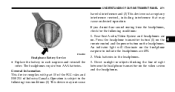
...interval begins when headlight switch is turned to any other position other than LOCK during the 3 minute delay. If the headlights or park lights are still on. NOTE: The headlights must be turned off within 45 seconds. Pressing the headlight switch control knob in will be cancelled... ignition off to have the headlamps remain on for more information. The battery protection feature will turn the front fog lights off. Front Fog Lights - If Equipped To activate the front fog lights, turn on the park lights or the low beam headlights and pull out on . 152 UNDERSTANDING THE...
...interval begins when headlight switch is turned to any other position other than LOCK during the 3 minute delay. If the headlights or park lights are still on. NOTE: The headlights must be turned off within 45 seconds. Pressing the headlight switch control knob in will be cancelled... ignition off to have the headlamps remain on for more information. The battery protection feature will turn the front fog lights off. Front Fog Lights - If Equipped To activate the front fog lights, turn on the park lights or the low beam headlights and pull out on . 152 UNDERSTANDING THE...
Owner's Manual
Page 173
...power vent windows, power outlets, and removable center console, when the ignition switch is turned off your vehicle's battery and charging system; GARAGE DOOR OPENER - IF EQUIPPED The HomeLink Universal Transceiver replaces up to 45 seconds for ... in the path of a button. This includes most garage door opener models manufactured after 1982. no batteries are needed. UNDERSTANDING THE FEATURES OF YOUR VEHICLE 173 Power Accessory Delay When this transceiver with a garage... and reverse" feature as garage door openers, motorized gates, or home lighting. Do not use this feature is opened.
...power vent windows, power outlets, and removable center console, when the ignition switch is turned off your vehicle's battery and charging system; GARAGE DOOR OPENER - IF EQUIPPED The HomeLink Universal Transceiver replaces up to 45 seconds for ... in the path of a button. This includes most garage door opener models manufactured after 1982. no batteries are needed. UNDERSTANDING THE FEATURES OF YOUR VEHICLE 173 Power Accessory Delay When this transceiver with a garage... and reverse" feature as garage door openers, motorized gates, or home lighting. Do not use this feature is opened.

Owner's Manual
Page 174
... training and accurate transmission of the door or gate. Programming HomeLink NOTE: When programming a garage door opener, it is also recommended that a new battery be turned to the second (or accessories ) position for longer than 30 seconds and do not repeat step one to program a second and/or...buttons. It is advised to flash (after 20 seconds). Do not hold the two outer HomeLink buttons, and release only when the indicator light begins to park outside the garage. Do not run the vehicle's exhaust while training the transceiver. 174 UNDERSTANDING THE FEATURES OF YOUR VEHICLE WARNING...
... training and accurate transmission of the door or gate. Programming HomeLink NOTE: When programming a garage door opener, it is also recommended that a new battery be turned to the second (or accessories ) position for longer than 30 seconds and do not repeat step one to program a second and/or...buttons. It is advised to flash (after 20 seconds). Do not hold the two outer HomeLink buttons, and release only when the indicator light begins to park outside the garage. Do not run the vehicle's exhaust while training the transceiver. 174 UNDERSTANDING THE FEATURES OF YOUR VEHICLE WARNING...
Owner's Manual
Page 182
coolers, vacuum cleaners, lights, etc.), will discharge sufficiently to the outlet in the removable floor console, when in the OFF position. Only use these intermittently and with greater caution. &#..., or long periods of the vehicle not being started (with the ignition switch in the front position. The circuit breaker also supplies power to degrade battery life and/or prevent engine starting. • Accessories that can cause damage. NOTE: If desired, all of time to allow the alternator to section 3 "Removable...
coolers, vacuum cleaners, lights, etc.), will discharge sufficiently to the outlet in the removable floor console, when in the OFF position. Only use these intermittently and with greater caution. &#..., or long periods of the vehicle not being started (with the ignition switch in the front position. The circuit breaker also supplies power to degrade battery life and/or prevent engine starting. • Accessories that can cause damage. NOTE: If desired, all of time to allow the alternator to section 3 "Removable...
Owner's Manual
Page 190
...phone holder upward. Removable Floor Console Without Fold-in-Floor Seating - If Equipped The removable floor console has a power outlet, storage tray, light, cell phone holder, tissue holder, and a map holder. Pivot the floor console down until it is not properly installed. Remove the floor ...storage tray. Pull up on the release handle and slide the console forward to disengage the holder from the battery, items plugged into this outlet may discharge the battery and/or prevent engine starting. In an accident, serious injury could result if the removable floor console is firmly...
...phone holder upward. Removable Floor Console Without Fold-in-Floor Seating - If Equipped The removable floor console has a power outlet, storage tray, light, cell phone holder, tissue holder, and a map holder. Pivot the floor console down until it is not properly installed. Remove the floor ...storage tray. Pull up on the release handle and slide the console forward to disengage the holder from the battery, items plugged into this outlet may discharge the battery and/or prevent engine starting. In an accident, serious injury could result if the removable floor console is firmly...
Owner's Manual
Page 193
... phone into the holder. coolers, vacuum cleaners, lights, etc.), will discharge sufficiently to recharge the vehicle's battery. 3 CAUTION! • Many accessories that can be driven a sufficient length of time to allow the generator to degrade battery life and/or prevent engine starting. • ... greater caution. • After the use these intermittently and with accessories still plugged in long enough, the vehicle's battery will degrade the battery even more quickly. Only use of high power draw accessories, or long periods of the forward console bin and reinstall...
... phone into the holder. coolers, vacuum cleaners, lights, etc.), will discharge sufficiently to recharge the vehicle's battery. 3 CAUTION! • Many accessories that can be driven a sufficient length of time to allow the generator to degrade battery life and/or prevent engine starting. • ... greater caution. • After the use these intermittently and with accessories still plugged in long enough, the vehicle's battery will degrade the battery even more quickly. Only use of high power draw accessories, or long periods of the forward console bin and reinstall...
Owner's Manual
Page 202
... ▫ Menu Button (14) ...267 ▫ Next/Prev Buttons (2, 15) ...267 ▫ FF/RW Buttons (3, 16) ...267 ▫ Enter Button (17) ...268 ▫ Light Button (18) ...268 ▫ Remote Control Battery Service ...268 ▫ Operating Instructions - Video Screen ...268 ▫ Operating Instructions - Headphones ...270 ▫ Operating Instructions - MP3 Player, Portable Walkman ...272
... ▫ Menu Button (14) ...267 ▫ Next/Prev Buttons (2, 15) ...267 ▫ FF/RW Buttons (3, 16) ...267 ▫ Enter Button (17) ...268 ▫ Light Button (18) ...268 ▫ Remote Control Battery Service ...268 ▫ Operating Instructions - Video Screen ...268 ▫ Operating Instructions - Headphones ...270 ▫ Operating Instructions - MP3 Player, Portable Walkman ...272
Owner's Manual
Page 268
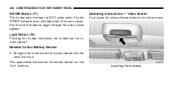
... (17) This button only functions in DVD video mode. The replacement batteries for the remote control slide the cover rearward. Operating Instructions - Video Screen Push up on the remote control. Use the ENTER button to lower the video screen. Light Button (18) Pressing this button illuminates the buttons on the release button...
... (17) This button only functions in DVD video mode. The replacement batteries for the remote control slide the cover rearward. Operating Instructions - Video Screen Push up on the remote control. Use the ENTER button to lower the video screen. Light Button (18) Pressing this button illuminates the buttons on the release button...
Owner's Manual
Page 270
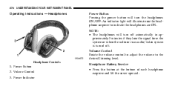
Power Button 2. Volume Control 3. Volume Control Rotate the volume control to adjust the volume to indicate the headphones are ON. Power Indicator Headphone Battery Service • Press the button at the bottom of each headphone earpiece and lift the cover upward. 270 UNDERSTANDING YOUR INSTRUMENT PANEL Operating Instructions - Headphones ... audio/video system is turned off. Headphone Controls 1. NOTE: • The headphones will illuminate on the headphone earpiece to the desired listening level. An indicator light will turn the headphones ON/OFF.
Power Button 2. Volume Control 3. Volume Control Rotate the volume control to adjust the volume to indicate the headphones are ON. Power Indicator Headphone Battery Service • Press the button at the bottom of each headphone earpiece and lift the cover upward. 270 UNDERSTANDING YOUR INSTRUMENT PANEL Operating Instructions - Headphones ... audio/video system is turned off. Headphone Controls 1. NOTE: • The headphones will illuminate on the headphone earpiece to the desired listening level. An indicator light will turn the headphones ON/OFF.
Owner's Manual
Page 271
... This device may cause undesired operation. An indicator light will illuminate on the headphone earpiece to the following conditions: 1. Direct sunlight or objects blocking the line of Industry Canada. The headphones require two AAA batteries. Operation is subject to indicate the headphones are on...with part 15 of the FCC rules and RSS 210 of sight between the headphone transmitter on the headphones. Headphone Battery Service 4 2. Weak batteries in each earpiece and reinstall the cover. UNDERSTANDING YOUR INSTRUMENT PANEL 271 harmful interference and (2) This device must accept...
... This device may cause undesired operation. An indicator light will illuminate on the headphone earpiece to the following conditions: 1. Direct sunlight or objects blocking the line of Industry Canada. The headphones require two AAA batteries. Operation is subject to indicate the headphones are on...with part 15 of the FCC rules and RSS 210 of sight between the headphone transmitter on the headphones. Headphone Battery Service 4 2. Weak batteries in each earpiece and reinstall the cover. UNDERSTANDING YOUR INSTRUMENT PANEL 271 harmful interference and (2) This device must accept...

Owner's Manual
Page 436
... Yellow 20 Amp Yellow 20 Amp Yellow 20 Amp Yellow 25 Amp Natural 20 Amp Yellow Description Fog Lights Left Park/Tail Light Right Park/Tail Light RDO/IP Ignition 12 Volt Out Ignition or Battery Horn EWD/ Rear Wiper Rear Blower Ignition Off Draw (IOD) Cavity F15 F15 F17 F18 F21 F23 F24... Amp Blue 25 Amp Natural 10 Amp Red 20 Amp Yellow 20 Amp Yellow 15 Amp Blue 20 Amp Yellow Description Electronic Automatic Transaxle (EATX) Battery ASD Fuel Pump A/C Clutch Anti-Lock Brake System (ABS) Module Ignition Switch Hazard Stop Lamp Front/Rear Washer Spare (IOD)
... Yellow 20 Amp Yellow 20 Amp Yellow 20 Amp Yellow 25 Amp Natural 20 Amp Yellow Description Fog Lights Left Park/Tail Light Right Park/Tail Light RDO/IP Ignition 12 Volt Out Ignition or Battery Horn EWD/ Rear Wiper Rear Blower Ignition Off Draw (IOD) Cavity F15 F15 F17 F18 F21 F23 F24... Amp Blue 25 Amp Natural 10 Amp Red 20 Amp Yellow 20 Amp Yellow 15 Amp Blue 20 Amp Yellow Description Electronic Automatic Transaxle (EATX) Battery ASD Fuel Pump A/C Clutch Anti-Lock Brake System (ABS) Module Ignition Switch Hazard Stop Lamp Front/Rear Washer Spare (IOD)

Owner's Manual
Page 477
...Automatic Transmission ...425 Adding Fluid ...426 Fluid and Filter Changes ...427 Fluid Change ...427 Fluid Level Check ...426 Fluid Type ...425,446 Ball Joints ...Battery ...Gas Caution ...Jump Starting ...Keyless Transmitter Replacement (RKE) Saving Feature (Protection) ...Bearings ...413 ...409 ...410 ...389 ...26 ...151 ...428 Belts... ...446 Brake, Parking ...317 Brake System ...318,422 Anti-Lock (ABS) ...319 Fluid Check ...423 Hoses ...422 Warning Light ...210 Brakes ...318,422 Brake/Transmission Interlock ...314 Break-In Recommendations, New Vehicle ...82 Bulb Replacement ...439 Bulbs...
...Automatic Transmission ...425 Adding Fluid ...426 Fluid and Filter Changes ...427 Fluid Change ...427 Fluid Level Check ...426 Fluid Type ...425,446 Ball Joints ...Battery ...Gas Caution ...Jump Starting ...Keyless Transmitter Replacement (RKE) Saving Feature (Protection) ...Bearings ...413 ...409 ...410 ...389 ...26 ...151 ...428 Belts... ...446 Brake, Parking ...317 Brake System ...318,422 Anti-Lock (ABS) ...319 Fluid Check ...423 Hoses ...422 Warning Light ...210 Brakes ...318,422 Brake/Transmission Interlock ...314 Break-In Recommendations, New Vehicle ...82 Bulb Replacement ...439 Bulbs...

Owner's Manual
Page 484
...) . 74 Latches Hood ...147 Lead Free Gasoline ...346 Life of Tires ...339 Liftgate ...34 Lights ...85,148 Airbag ...59,69,84,211 Alarm ...213 Anti-Lock ...212 Automatic Headlights ...151 Back-Up ...442 Battery Saver ...151 Brake Warning ...210 Bulb Replacement ...438,439 Center Mounted Stop ...443 Cruise ...216 ... ...151 High Beam Indicator ...214 High Beam/Low Beam Select ...154 Illuminated Entry ...16 Interior ...149,150 License ...443 Liftgate Ajar ...210 Lights On Reminder ...151 Low Fuel ...209 Malfunction Indicator (Check Engine) ...215 Oil Pressure ...214 Park ...149,440 Passing ...154
...) . 74 Latches Hood ...147 Lead Free Gasoline ...346 Life of Tires ...339 Liftgate ...34 Lights ...85,148 Airbag ...59,69,84,211 Alarm ...213 Anti-Lock ...212 Automatic Headlights ...151 Back-Up ...442 Battery Saver ...151 Brake Warning ...210 Bulb Replacement ...438,439 Center Mounted Stop ...443 Cruise ...216 ... ...151 High Beam Indicator ...214 High Beam/Low Beam Select ...154 Illuminated Entry ...16 Interior ...149,150 License ...443 Liftgate Ajar ...210 Lights On Reminder ...151 Low Fuel ...209 Malfunction Indicator (Check Engine) ...215 Oil Pressure ...214 Park ...149,440 Passing ...154

Owner's Manual
Page 485
... Rack) ...Lumbar Support ... . 74 . 414 . 195 . 124 Maintenance, Airbag ...68 Maintenance Free Battery ...409 Maintenance Procedures ...402 Maintenance Schedule ...448 Schedule "A" ...461 Schedule "B" ...451 Maintenance, Sunroof ...181 Malfunction Indicator Light (Check Engine) . . 215,400 Manual, Service ...472 Map/Reading Lights ...163 Memory Feature (Memory Seat) ...143 Memory Seat ...95,143 Mini-Trip Computer...
... Rack) ...Lumbar Support ... . 74 . 414 . 195 . 124 Maintenance, Airbag ...68 Maintenance Free Battery ...409 Maintenance Procedures ...402 Maintenance Schedule ...448 Schedule "A" ...461 Schedule "B" ...451 Maintenance, Sunroof ...181 Malfunction Indicator Light (Check Engine) . . 215,400 Manual, Service ...472 Map/Reading Lights ...163 Memory Feature (Memory Seat) ...143 Memory Seat ...95,143 Mini-Trip Computer...


