
Owner's Manual
Page 85
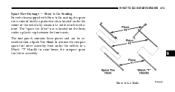
Check wheel nuts for tightness, and tires (including spare) for excessive tread wear or uneven wear patterns. Fluid Leaks Check area under vehicle after overnight parking for fuel, engine coolant, oil or other objects ... are suspected, the cause should be located and corrected immediately. 2 Check for cuts or cracks. Check turn signal and high beam indicator lights on the instrument panel. THINGS TO KNOW BEFORE STARTING YOUR VEHICLE 85 Periodic Safety Checks You Should Make Outside The Vehicle Tires Examine tires for proper pressure. Inspect tread and...
Check wheel nuts for tightness, and tires (including spare) for excessive tread wear or uneven wear patterns. Fluid Leaks Check area under vehicle after overnight parking for fuel, engine coolant, oil or other objects ... are suspected, the cause should be located and corrected immediately. 2 Check for cuts or cracks. Check turn signal and high beam indicator lights on the instrument panel. THINGS TO KNOW BEFORE STARTING YOUR VEHICLE 85 Periodic Safety Checks You Should Make Outside The Vehicle Tires Examine tires for proper pressure. Inspect tread and...

Owner's Manual
Page 329
To determine the maximum loading conditions of your vehicle, locate the statement "The combined weight of the tire on your vehicle. Steps for the front, rear and spare tires. Loading The vehicle maximum load on your vehicle's placard. 2. Locate the statement "The combined weight of occupants, cargo/luggage and trailer tongue weight (if applicable) should never...
To determine the maximum loading conditions of your vehicle, locate the statement "The combined weight of the tire on your vehicle. Steps for the front, rear and spare tires. Loading The vehicle maximum load on your vehicle's placard. 2. Locate the statement "The combined weight of occupants, cargo/luggage and trailer tongue weight (if applicable) should never...
Owner's Manual
Page 337
... not spin your vehicle's wheels above 35 mph (55 km/h). This tire is identified by a limited use spare tire warning label located on either your vehicle. Since it is not the same tire, replace (or repair) the original tire and reinstall on the vehicle at the first opportunity and reinstall it is not. Installation of this...
... not spin your vehicle's wheels above 35 mph (55 km/h). This tire is identified by a limited use spare tire warning label located on either your vehicle. Since it is not the same tire, replace (or repair) the original tire and reinstall on the vehicle at the first opportunity and reinstall it is not. Installation of this...
Owner's Manual
Page 341
... technology with wheel rim mounted electronic sensors to a receiver located in one of your tires regularly and maintain proper pressure. 1,2,3, OR 4 TIRE(S) LOW PRESSURE Low tire pressure levels of the valve stem, transmit tire pressure readings to monitor tire pressure levels (EXCLUDING THE SPARE TIRE). Inspect all of your tires is particularly important, therefore, for you when one or...
... technology with wheel rim mounted electronic sensors to a receiver located in one of your tires regularly and maintain proper pressure. 1,2,3, OR 4 TIRE(S) LOW PRESSURE Low tire pressure levels of the valve stem, transmit tire pressure readings to monitor tire pressure levels (EXCLUDING THE SPARE TIRE). Inspect all of your tires is particularly important, therefore, for you when one or...
Owner's Manual
Page 372
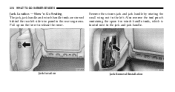
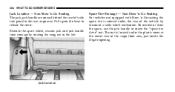
Jack Location Jack Removal/Installation Remove the scissors jack and jack handle by rotating the small wing nut to the jack and jack handle. Also remove the tool pouch containing the spare tire winch handle tools, which is located next to the left side trim panel in the rear cargo area. Pull up on the lever to release the cover. 372 WHAT TO DO IN EMERGENCIES Jack Location - Stow 'n Go Seating The jack, jack handle and winch handle tools are stowed behind the rear left .
Jack Location Jack Removal/Installation Remove the scissors jack and jack handle by rotating the small wing nut to the jack and jack handle. Also remove the tool pouch containing the spare tire winch handle tools, which is located next to the left side trim panel in the rear cargo area. Pull up on the lever to release the cover. 372 WHAT TO DO IN EMERGENCIES Jack Location - Stow 'n Go Seating The jack, jack handle and winch handle tools are stowed behind the rear left .
Owner's Manual
Page 373
The tool pouch contains three pieces and can be assembled into a Spare Tire Hook to remove the compact spare tire/cover assembly from under the center of the vehicle by means of a cable winch mechanism. WHAT TO DO IN EMERGENCIES 373 Spare Tire Stowage - Stow 'n Go Seating For vehicles equipped with Stow 'n Go seating, the spare tire is located on the floor, under a plastic cap between the front seats. The "spare tire drive" nut is stowed inside a protective cover located under the vehicle or a Winch "T" Handle to raise/lower the compact spare tire/cover assembly. 6 Stow 'n Go Tools
The tool pouch contains three pieces and can be assembled into a Spare Tire Hook to remove the compact spare tire/cover assembly from under the center of the vehicle by means of a cable winch mechanism. WHAT TO DO IN EMERGENCIES 373 Spare Tire Stowage - Stow 'n Go Seating For vehicles equipped with Stow 'n Go seating, the spare tire is located on the floor, under a plastic cap between the front seats. The "spare tire drive" nut is stowed inside a protective cover located under the vehicle or a Winch "T" Handle to raise/lower the compact spare tire/cover assembly. 6 Stow 'n Go Tools
Owner's Manual
Page 376
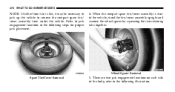
... jack up the vehicle to remove the compact spare tire/ cover assembly from under the vehicle. Refer to the following steps for proper jack placement. 4. There are two jack engagement locations on each side of the vehicle, stand the tire/cover assembly upright and remove the wheel spacer... by squeezing the two retaining tabs together. Wheel Spacer Removal Spare Tire/Cover Removal 5. 376 WHAT TO DO IN EMERGENCIES NOTE: ...
... jack up the vehicle to remove the compact spare tire/ cover assembly from under the vehicle. Refer to the following steps for proper jack placement. 4. There are two jack engagement locations on each side of the vehicle, stand the tire/cover assembly upright and remove the wheel spacer... by squeezing the two retaining tabs together. Wheel Spacer Removal Spare Tire/Cover Removal 5. 376 WHAT TO DO IN EMERGENCIES NOTE: ...
Owner's Manual
Page 378
... covers, remove the cover from the wheel by turning the jack screw to be located, engaging the flange, between the pair of tabs closest to the wheel to the right, using the swivel wrench. Install the compact spare tire. To avoid the risk of downstanding tabs. Raising the vehicle higher than necessary can...
... covers, remove the cover from the wheel by turning the jack screw to be located, engaging the flange, between the pair of tabs closest to the wheel to the right, using the swivel wrench. Install the compact spare tire. To avoid the risk of downstanding tabs. Raising the vehicle higher than necessary can...
Owner's Manual
Page 384
... handle are stowed behind the rear left . To remove or stow the spare, use the jack handle to release the cover. Spare Tire Stowage - Non Stow 'n Go Seating For vehicles not equipped with Stow 'n Go seating the spare tire is located under the rear of the vehicle by rotating the wing nut to the ...left side trim panel in the rear cargo area. Pull up on the lever to rotate the "spare tire drive" nut. Remove the spare wheel, scissors jack and jack handle from...
... handle are stowed behind the rear left . To remove or stow the spare, use the jack handle to release the cover. Spare Tire Stowage - Non Stow 'n Go Seating For vehicles not equipped with Stow 'n Go seating the spare tire is located under the rear of the vehicle by rotating the wing nut to the ...left side trim panel in the rear cargo area. Pull up on the lever to rotate the "spare tire drive" nut. Remove the spare wheel, scissors jack and jack handle from...

Owner's Manual
Page 385
There are two jack engagement locations on each side of the body - refer to the left one turn while the wheel is clear, tilt the retainer at the end of the ... only. CAUTION! Fit the jack handle over the drive nut. WHAT TO DO IN EMERGENCIES 385 2. Lowering Spare Tire 6 Jacking Instructions - Non Stow 'n Go Seating 1. Loosen (but do not remove) the wheel lug nuts by turning them to pull the tire out from under the vehicle. Rotate the nut to the following illustration.
There are two jack engagement locations on each side of the body - refer to the left one turn while the wheel is clear, tilt the retainer at the end of the ... only. CAUTION! Fit the jack handle over the drive nut. WHAT TO DO IN EMERGENCIES 385 2. Lowering Spare Tire 6 Jacking Instructions - Non Stow 'n Go Seating 1. Loosen (but do not remove) the wheel lug nuts by turning them to pull the tire out from under the vehicle. Rotate the nut to the following illustration.
Owner's Manual
Page 387
...the swivel wrench. Remove the wheel lug nuts, for vehicles with wheel covers, align the notch in the described location. The jack is obtained to install the spare tire. Raise the vehicle only until the tire just clears the surface and enough clearance is to be changed. It could slip off the hub. 8. Install...of downstanding tabs. WHAT TO DO IN EMERGENCIES 387 5. Do not raise the vehicle until you are on the jack screw and turn to be located, engaging the flange, between the pair of the nut toward the wheel. Then pull the wheel off the jack and hurt someone near it. ...
...the swivel wrench. Remove the wheel lug nuts, for vehicles with wheel covers, align the notch in the described location. The jack is obtained to install the spare tire. Raise the vehicle only until the tire just clears the surface and enough clearance is to be changed. It could slip off the hub. 8. Install...of downstanding tabs. WHAT TO DO IN EMERGENCIES 387 5. Do not raise the vehicle until you are on the jack screw and turn to be located, engaging the flange, between the pair of the nut toward the wheel. Then pull the wheel off the jack and hurt someone near it. ...


