Owner's Manual
Page 10
... - If Equipped ...30 ▫ Child Protection Door Lock ...33 Liftgate ...34 ▫ Power Liftgate - If Equipped ...35 Seat Storage Bin Safety Warning ...38 ▫ Storage Bin Cover Emergency Release ...38 ▫ Reinstalling Storage Bin Cover Emergency Release ...39 Windows ...40 ▫ Power Vent Windows ...40 ▫ Power Windows ...40 Occupant Restraints ...41 ▫...
... - If Equipped ...30 ▫ Child Protection Door Lock ...33 Liftgate ...34 ▫ Power Liftgate - If Equipped ...35 Seat Storage Bin Safety Warning ...38 ▫ Storage Bin Cover Emergency Release ...38 ▫ Reinstalling Storage Bin Cover Emergency Release ...39 Windows ...40 ▫ Power Vent Windows ...40 ▫ Power Windows ...40 Occupant Restraints ...41 ▫...
Owner's Manual
Page 38
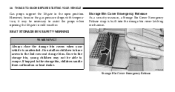
Once in the storage bin, young children may be able to escape. Always close the storage bin covers when your vehicle is built into the storage bin cover latching mechanism. Do not allow children to have access to assist the props when opening the liftgate in cold weather.... heat stroke. However, because the gas pressure drops with temperature, it may not be necessary to the 2nd row seat storage bins. WARNING! If trapped in the open position. Storage Bin Cover Emergency Release SEAT STORAGE BIN SAFETY WARNING Storage Bin Cover Emergency Release As a security measure, a Storage Bin...
Once in the storage bin, young children may be able to escape. Always close the storage bin covers when your vehicle is built into the storage bin cover latching mechanism. Do not allow children to have access to assist the props when opening the liftgate in cold weather.... heat stroke. However, because the gas pressure drops with temperature, it may not be necessary to the 2nd row seat storage bins. WARNING! If trapped in the open position. Storage Bin Cover Emergency Release SEAT STORAGE BIN SAFETY WARNING Storage Bin Cover Emergency Release As a security measure, a Storage Bin...
Owner's Manual
Page 54
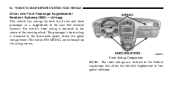
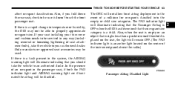
The words SRS AIRBAG are certified to the seat belt restraint systems. The driver's front airbag is mounted in the instrument panel, above the glove compartment. Front Airbag Components NOTE: The front airbags are embossed on the airbag covers. The passenger's front airbag is mounted in the center of the steering wheel. 54...
The words SRS AIRBAG are certified to the seat belt restraint systems. The driver's front airbag is mounted in the instrument panel, above the glove compartment. Front Airbag Components NOTE: The front airbags are embossed on the airbag covers. The passenger's front airbag is mounted in the center of the steering wheel. 54...
Owner's Manual
Page 56
... panel knee bolsters to protect you in this vehicle. Do not drill into the roof of the vehicle for installation on or around the airbag covers or attempt to block the location of the window bag. Window bags also work with window bags, do not have any reason. NOTE: The ...passenger front airbag may damage the airbags and you . Front airbags, along with the seat belts and front seat belt buckle pretensioners, work with window bags, do not stack luggage or other cargo up high enough to manually open only when the airbags...
... panel knee bolsters to protect you in this vehicle. Do not drill into the roof of the vehicle for installation on or around the airbag covers or attempt to block the location of the window bag. Window bags also work with window bags, do not have any reason. NOTE: The ...passenger front airbag may damage the airbags and you . Front airbags, along with the seat belts and front seat belt buckle pretensioners, work with window bags, do not stack luggage or other cargo up high enough to manually open only when the airbags...
Owner's Manual
Page 63
... way (including removal or loosening/tightening of a collision for occupants classified into the empty or child size categories. Also, when the seat is empty or an object that weighs less than a predetermined threshold is placed on the center of the instrument panel above the radio...Disabled Light THINGS TO KNOW BEFORE STARTING YOUR VEHICLE 63 affect occupant classification. Also, if you should take the vehicle to your trim cover and cushion needs to properly approximate occupant size. The PAD indicator light will illuminate indicating that the occupant size category is a rapid...
... way (including removal or loosening/tightening of a collision for occupants classified into the empty or child size categories. Also, when the seat is empty or an object that weighs less than a predetermined threshold is placed on the center of the instrument panel above the radio...Disabled Light THINGS TO KNOW BEFORE STARTING YOUR VEHICLE 63 affect occupant classification. Also, if you should take the vehicle to your trim cover and cushion needs to properly approximate occupant size. The PAD indicator light will illuminate indicating that the occupant size category is a rapid...
Owner's Manual
Page 65
... is illuminated, the airbag is located at the outboard passenger lap belt anchor. Correctly functioning front passenger seat components are critical for the Occupant Classification System (OCS) to the seat cover. 2 When the OCS system detects an adult the PAD indicator light will be off, and the ...airbag deployment. The BTS generates a signal based on outboard lap belt tension. Also, when the Occupant Classification System detects either an empty seat or a weight less than the predetermined occupant threshold, the ORC will be enabled. • The Belt Tension Sensor (BTS) - If Equipped...
... is illuminated, the airbag is located at the outboard passenger lap belt anchor. Correctly functioning front passenger seat components are critical for the Occupant Classification System (OCS) to the seat cover. 2 When the OCS system detects an adult the PAD indicator light will be off, and the ...airbag deployment. The BTS generates a signal based on outboard lap belt tension. Also, when the Occupant Classification System detects either an empty seat or a weight less than the predetermined occupant threshold, the ORC will be enabled. • The Belt Tension Sensor (BTS) - If Equipped...
Owner's Manual
Page 66
...of a frontal crash. Unapproved modifications or service procedures to the front seat passenger if the vehicle is involved in case of the bladder or seat cover assembly, always use prior or future model year seat covers not designated for the specific model being repaired. This could result in... death or serious injury to the front passenger seat assembly, its related components, or seat cover may not comply with any way. • Do not use the DaimlerChrysler service kit which includes the seat cover and bladder riveted together. A modified vehicle may inadvertently change...
...of a frontal crash. Unapproved modifications or service procedures to the front seat passenger if the vehicle is involved in case of the bladder or seat cover assembly, always use prior or future model year seat covers not designated for the specific model being repaired. This could result in... death or serious injury to the front passenger seat assembly, its related components, or seat cover may not comply with any way. • Do not use the DaimlerChrysler service kit which includes the seat cover and bladder riveted together. A modified vehicle may inadvertently change...
Owner's Manual
Page 68
...; Do not attempt to be serviced in another collision. If it . Take your trim cover and cushion needs to modify any advanced airbag system service. If your seat including your vehicle to the steering wheel hub trim cover or the upper right side of your authorized dealer. Maintaining Your Airbag System WARNING! •...
...; Do not attempt to be serviced in another collision. If it . Take your trim cover and cushion needs to modify any advanced airbag system service. If your seat including your vehicle to the steering wheel hub trim cover or the upper right side of your authorized dealer. Maintaining Your Airbag System WARNING! •...
Owner's Manual
Page 95
...'s power mirror preselected positions can be controlled by the optional Driver Memory Seat Feature. To use the mirror, rotate the sun visor down and swing the mirror cover upward. Closing the mirror cover turns off the lights. Refer to "Driver Memory Seat" in section 3 of the four arrows for the direction you turn on...
...'s power mirror preselected positions can be controlled by the optional Driver Memory Seat Feature. To use the mirror, rotate the sun visor down and swing the mirror cover upward. Closing the mirror cover turns off the lights. Refer to "Driver Memory Seat" in section 3 of the four arrows for the direction you turn on...
Owner's Manual
Page 124
... vehicles equipped with Stow 'n Go seating, the second and third row seats may be folded into the floor for convenient storage. Lower the head restraint and raise the armrests on the storage bin latch to open the cover. Slide the storage bin locking mechanism to the Locked position and then pull up... on the second row seat. 2. To increase the support, rotate the handle down. To Fold Second Row...
... vehicles equipped with Stow 'n Go seating, the second and third row seats may be folded into the floor for convenient storage. Lower the head restraint and raise the armrests on the storage bin latch to open the cover. Slide the storage bin locking mechanism to the Locked position and then pull up... on the second row seat. 2. To increase the support, rotate the handle down. To Fold Second Row...
Owner's Manual
Page 126
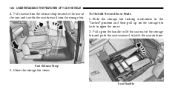
To Unfold Second Row Seats 1. Seat Release Strap 5. Seat Handle Pull rearward on the storage bin latch to open the cover. 2. Slide the storage bin locking mechanism to latch the seat anchors. Close the storage bin cover. 126 UNDERSTANDING THE FEATURES OF YOUR VEHICLE 4. Pull up on the handle to lift the seat out of the storage bin and push the seat rearward to the Locked position and then pull up on the release strap located at the rear of the seat and tumble the seat forward into the storage bin.
To Unfold Second Row Seats 1. Seat Release Strap 5. Seat Handle Pull rearward on the storage bin latch to open the cover. 2. Slide the storage bin locking mechanism to latch the seat anchors. Close the storage bin cover. 126 UNDERSTANDING THE FEATURES OF YOUR VEHICLE 4. Pull up on the handle to lift the seat out of the storage bin and push the seat rearward to the Locked position and then pull up on the release strap located at the rear of the seat and tumble the seat forward into the storage bin.
Owner's Manual
Page 127
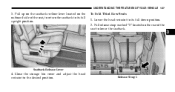
UNDERSTANDING THE FEATURES OF YOUR VEHICLE 127 3. Close the storage bin cover and adjust the head restraint to lower the seatback. 3 Seatback Release Lever 4. Pull release strap marked "1" located on the outboard side of the seat to the desired position. Release Strap 1 To Fold Third Row Seats 1. Pull up on the seatback recliner lever located on the rear of the seat, to return the seatback to its full upright position. Lower the head restraint to its full down position. 2.
UNDERSTANDING THE FEATURES OF YOUR VEHICLE 127 3. Close the storage bin cover and adjust the head restraint to lower the seatback. 3 Seatback Release Lever 4. Pull release strap marked "1" located on the outboard side of the seat to the desired position. Release Strap 1 To Fold Third Row Seats 1. Pull up on the seatback recliner lever located on the rear of the seat, to return the seatback to its full upright position. Lower the head restraint to its full down position. 2.
Owner's Manual
Page 141
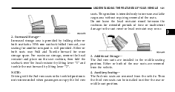
... seats are removed from the vehicle. 4. Auxiliary Seating- The 2nd row seats are installed in the middle seating position. NOTE: Driving with the 2nd-row seats in either or both seats may occur. 2. Then the third row seats can be installed in the tumbled position is intended only to the seat cover or... head restraint may Fold and Tumble forward for more storage space. For maximum storage, remove the head restraint and place on the seat cushion, then fold the seatback over the head restraint by lifting lever "1" and tumble the seat forward by ...
... seats are removed from the vehicle. 4. Auxiliary Seating- The 2nd row seats are installed in the middle seating position. NOTE: Driving with the 2nd-row seats in either or both seats may occur. 2. Then the third row seats can be installed in the tumbled position is intended only to the seat cover or... head restraint may Fold and Tumble forward for more storage space. For maximum storage, remove the head restraint and place on the seat cushion, then fold the seatback over the head restraint by lifting lever "1" and tumble the seat forward by ...
Owner's Manual
Page 186
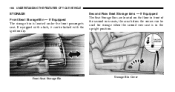
Front Seat Storage Bin Storage Bin Cover Second Row Seat Storage bins - If Equipped The Seat Storage Bins are located on the floor in the upright position. 186 UNDERSTANDING THE FEATURES OF YOUR VEHICLE STORAGE Front Seat Storage Bin - If Equipped The storage bin is in front of the second row seats, the area below the covers can be locked with a lock, it can be used for storage when the second row seat is located under the front passenger's seat. If equipped with the ignition key.
Front Seat Storage Bin Storage Bin Cover Second Row Seat Storage bins - If Equipped The Seat Storage Bins are located on the floor in the upright position. 186 UNDERSTANDING THE FEATURES OF YOUR VEHICLE STORAGE Front Seat Storage Bin - If Equipped The storage bin is in front of the second row seats, the area below the covers can be locked with a lock, it can be used for storage when the second row seat is located under the front passenger's seat. If equipped with the ignition key.
Owner's Manual
Page 187
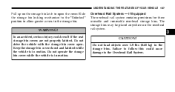
... storage bin locking mechanism to the Unlocked position to allow greater access to follow this could result if the seat storage bin covers are not properly latched. Do not operate the storage bin cover while the vehicle is in motion. Do not load objects over 1.5 lbs (0.68 kg) in motion. WARNING! UNDERSTANDING ...THE FEATURES OF YOUR VEHICLE 187 Pull up on the overhead rail system. 3 CAUTION! Do not drive the vehicle with the storage bin cover open the cover. Keep the storage bin cover closed and latched while the vehicle is in the storage bins.
... storage bin locking mechanism to the Unlocked position to allow greater access to follow this could result if the seat storage bin covers are not properly latched. Do not operate the storage bin cover while the vehicle is in motion. Do not load objects over 1.5 lbs (0.68 kg) in motion. WARNING! UNDERSTANDING ...THE FEATURES OF YOUR VEHICLE 187 Pull up on the overhead rail system. 3 CAUTION! Do not drive the vehicle with the storage bin cover open the cover. Keep the storage bin cover closed and latched while the vehicle is in the storage bins.
Owner's Manual
Page 271
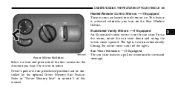
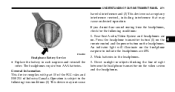
...indicator light will illuminate on the headphones. Direct sunlight or objects blocking the line of Industry Canada. Weak batteries in each earpiece and reinstall the cover. Operation is subject to indicate the headphones are on the video screen and the headphones. • Replace the battery in the headphones. 3.... transmitter button (1) on the remote control and the power button on the headphone earpiece to the following conditions: 1. Headphone Battery Service 4 2. Rear Seat Audio/Video System and headphones are ON. The headphones require two AAA batteries.
...indicator light will illuminate on the headphones. Direct sunlight or objects blocking the line of Industry Canada. Weak batteries in each earpiece and reinstall the cover. Operation is subject to indicate the headphones are on the video screen and the headphones. • Replace the battery in the headphones. 3.... transmitter button (1) on the remote control and the power button on the headphone earpiece to the following conditions: 1. Headphone Battery Service 4 2. Rear Seat Audio/Video System and headphones are ON. The headphones require two AAA batteries.
Owner's Manual
Page 372
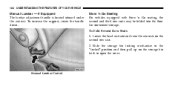
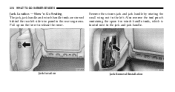
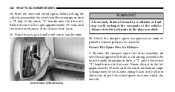
Also remove the tool pouch containing the spare tire winch handle tools, which is located next to release the cover. Jack Location Jack Removal/Installation 372 WHAT TO DO IN EMERGENCIES Jack Location - Stow 'n Go Seating The jack, jack handle and winch handle tools are stowed behind the rear left . Remove the scissors jack and jack handle by rotating the small wing nut to the left side trim panel in the rear cargo area. Pull up on the lever to the jack and jack handle.
Also remove the tool pouch containing the spare tire winch handle tools, which is located next to release the cover. Jack Location Jack Removal/Installation 372 WHAT TO DO IN EMERGENCIES Jack Location - Stow 'n Go Seating The jack, jack handle and winch handle tools are stowed behind the rear left . Remove the scissors jack and jack handle by rotating the small wing nut to the left side trim panel in the rear cargo area. Pull up on the lever to the jack and jack handle.
Owner's Manual
Page 373
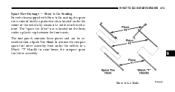
...spare tire drive" nut is stowed inside a protective cover located under the center of the vehicle by means of a cable winch mechanism. WHAT TO DO IN EMERGENCIES 373 Spare Tire Stowage - Stow 'n Go Seating For vehicles equipped with Stow 'n Go seating, the spare tire is located on the floor, ...under the vehicle or a Winch "T" Handle to remove the compact spare tire/cover assembly from under a plastic cap between the front...
...spare tire drive" nut is stowed inside a protective cover located under the center of the vehicle by means of a cable winch mechanism. WHAT TO DO IN EMERGENCIES 373 Spare Tire Stowage - Stow 'n Go Seating For vehicles equipped with Stow 'n Go seating, the spare tire is located on the floor, ...under the vehicle or a Winch "T" Handle to remove the compact spare tire/cover assembly from under a plastic cap between the front...
Owner's Manual
Page 374
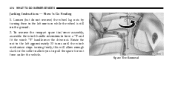
Rotate the nut to the left approximately 33 turns until the winch mechanism stops turning freely, this will allow enough slack in the cable to allow you to the left one turn while the wheel is still on the ground. 2. Spare Tire Removal Loosen (but do not remove) the wheel lug nuts by turning them to pull the spare tire out from under the vehicle. To remove the compact spare tire/cover assembly, assemble the winch handle extensions to form a "T' and fit the winch "T" handle over the drive nut. 374 WHAT TO DO IN EMERGENCIES Jacking Instructions - Stow 'n Go Seating 1.
Rotate the nut to the left approximately 33 turns until the winch mechanism stops turning freely, this will allow enough slack in the cable to allow you to the left one turn while the wheel is still on the ground. 2. Spare Tire Removal Loosen (but do not remove) the wheel lug nuts by turning them to pull the spare tire out from under the vehicle. To remove the compact spare tire/cover assembly, assemble the winch handle extensions to form a "T' and fit the winch "T" handle over the drive nut. 374 WHAT TO DO IN EMERGENCIES Jacking Instructions - Stow 'n Go Seating 1.
Owner's Manual
Page 380
..., jack handle and winch handle tools. Check the compact spare tire pressure as soon as required. To stow the compact spare tire/cover assembly on vehicles equipped with Stow 'n Go seating, assemble the winch handle extensions to form a "T' and fit the winch "T" handle over the drive nut. Stow the cable and wheel...
..., jack handle and winch handle tools. Check the compact spare tire pressure as soon as required. To stow the compact spare tire/cover assembly on vehicles equipped with Stow 'n Go seating, assemble the winch handle extensions to form a "T' and fit the winch "T" handle over the drive nut. Stow the cable and wheel...


