
Owner's Manual
Page 13
... are completely closed. 2. NOTE: To help prevent the vehicle battery from discharging during short periods of five seconds. Make sure that the rear liftgate/decklid, hood and doors are unlocked with the central locking switch after activating the automatic central locking feature and neither door is opened, the doors remain unlocked...attempt to the ON/RUN position and hold the upper portion of the switch for a minimum of inactivity, perform the following: 1. Make sure that the hood, rear liftgate/decklid and door switches are locked at any time with the central locking switch.
... are completely closed. 2. NOTE: To help prevent the vehicle battery from discharging during short periods of five seconds. Make sure that the rear liftgate/decklid, hood and doors are unlocked with the central locking switch after activating the automatic central locking feature and neither door is opened, the doors remain unlocked...attempt to the ON/RUN position and hold the upper portion of the switch for a minimum of inactivity, perform the following: 1. Make sure that the hood, rear liftgate/decklid and door switches are locked at any time with the central locking switch.
Owner's Manual
Page 18
...activating element is immediately closed. Press the tow-away alarm switch and the indicator light will sound when a door, the rear liftgate/decklid, the hood, or glove compartment is located on the key fob. Exit the vehicle, and lock the vehicle with the remote control or any of the ...attempts to raise the vehicle. The remote control should once again be operational. SECURITY ALARM SYSTEM The system monitors the doors, rear liftgate/decklid, hood, and ignition for towing or jacking up the vehicle, press and release the upper portion of your vehicle's keys by locking or unlocking the ...
...activating element is immediately closed. Press the tow-away alarm switch and the indicator light will sound when a door, the rear liftgate/decklid, the hood, or glove compartment is located on the key fob. Exit the vehicle, and lock the vehicle with the remote control or any of the ...attempts to raise the vehicle. The remote control should once again be operational. SECURITY ALARM SYSTEM The system monitors the doors, rear liftgate/decklid, hood, and ignition for towing or jacking up the vehicle, press and release the upper portion of your vehicle's keys by locking or unlocking the ...
Owner's Manual
Page 50
50 UNDERSTANDING THE FEATURES OF YOUR VEHICLE ▫ Heated Seats (If Equipped) ...73 To Open And Close The Hood ...74 Interior Lights ...75 ▫ Front Map/Reading Lights ...75 ▫ Battery Saver Feature ...75 ▫ Instrument Panel Lighting ...76 ▫ Night Security Illumination ...76 ...
50 UNDERSTANDING THE FEATURES OF YOUR VEHICLE ▫ Heated Seats (If Equipped) ...73 To Open And Close The Hood ...74 Interior Lights ...75 ▫ Front Map/Reading Lights ...75 ▫ Battery Saver Feature ...75 ▫ Instrument Panel Lighting ...76 ▫ Night Security Illumination ...76 ...

Owner's Manual
Page 74
Then, reach under the hood and pull upward on the safety latch and lift the hood. You could fly up when the vehicle is moving, and block your vehicle, below the instrument panel. Be sure all hood latches are fully latched before driving. 74 UNDERSTANDING THE FEATURES OF YOUR VEHICLE TO OPEN AND CLOSE THE HOOD To open the hood, pull the release lever located inside your forward vision. If the hood is not fully latched, it from approximately 12 inches (30 cm). To prevent possible damage, close the hood by dropping it could have a collision. WARNING!
Then, reach under the hood and pull upward on the safety latch and lift the hood. You could fly up when the vehicle is moving, and block your vehicle, below the instrument panel. Be sure all hood latches are fully latched before driving. 74 UNDERSTANDING THE FEATURES OF YOUR VEHICLE TO OPEN AND CLOSE THE HOOD To open the hood, pull the release lever located inside your forward vision. If the hood is not fully latched, it from approximately 12 inches (30 cm). To prevent possible damage, close the hood by dropping it could have a collision. WARNING!

Owner's Manual
Page 108
... had time to monitor your radiator. To check the coolant level, the vehicle must be badly burned by hot coolant or steam from under the hood, don't open a cooling system pressure cap when the radiator or coolant bottle is cold. You or others can inform you about a low tire ...The gauge pointer may show that the engine cooling system is corrected. The TPMS is illuminated. 3. If you with temperature. Never try to open the hood until the problem is operating properly. After adjusting the air pressure in your tires if the TPMS telltale lamp is not intended to the red...
... had time to monitor your radiator. To check the coolant level, the vehicle must be badly burned by hot coolant or steam from under the hood, don't open a cooling system pressure cap when the radiator or coolant bottle is cold. You or others can inform you about a low tire ...The gauge pointer may show that the engine cooling system is corrected. The TPMS is illuminated. 3. If you with temperature. Never try to open the hood until the problem is operating properly. After adjusting the air pressure in your tires if the TPMS telltale lamp is not intended to the red...
Owner's Manual
Page 118
... dipstick allows manual checking of oil level, whereas the low engine oil level indicator warns that the excess oil must be checked without opening the hood. If no leaks are noted, continue to drive to the nearest service station where the engine oil should be topped to be added to check...
... dipstick allows manual checking of oil level, whereas the low engine oil level indicator warns that the excess oil must be checked without opening the hood. If no leaks are noted, continue to drive to the nearest service station where the engine oil should be topped to be added to check...

Owner's Manual
Page 179
... the cooling system and turning off the A/C removes this manual. If temperature gauge reads "H," pull over and stop the vehicle. Follow the warnings under the hood yourself, see Section 7 of this heat. You can take to the radiator and aids in the red area, turn the engine off . A hot cooling system...
... the cooling system and turning off the A/C removes this manual. If temperature gauge reads "H," pull over and stop the vehicle. Follow the warnings under the hood yourself, see Section 7 of this heat. You can take to the radiator and aids in the red area, turn the engine off . A hot cooling system...
Owner's Manual
Page 187
... vehicle to push or tow your vehicle. It can start can be started . You can be used to avoid the radiator cooling fan whenever the hood is on. A loose jack or tool thrown forward in the places provided. If your vehicle has a discharged (dead) battery, booster cables may damage the transmission...
... vehicle to push or tow your vehicle. It can start can be started . You can be used to avoid the radiator cooling fan whenever the hood is on. A loose jack or tool thrown forward in the places provided. If your vehicle has a discharged (dead) battery, booster cables may damage the transmission...

Owner's Manual
Page 218
...lubricated. Steering Linkage Inspect tie rod ends whenever the vehicle is evident, replace the universal joint boot and grease immediately. Hood Latch When performing other under -vehicle service is important to maintain proper lubrication to all body pivot points, including such ...properly and safely. Inspect these joints is performed. This would require complete replacement of these ball joints whenever under hood services, the hood latch release mechanism and safety catch should be applied sparingly to insure that are permanently lubricated and do not require...
...lubricated. Steering Linkage Inspect tie rod ends whenever the vehicle is evident, replace the universal joint boot and grease immediately. Hood Latch When performing other under -vehicle service is important to maintain proper lubrication to all body pivot points, including such ...properly and safely. Inspect these joints is performed. This would require complete replacement of these ball joints whenever under hood services, the hood latch release mechanism and safety catch should be applied sparingly to insure that are permanently lubricated and do not require...

Owner's Manual
Page 222
... disconnect the fan motor lead or turn the ignition switch to cool. Check the front of bugs, leaves, etc. Never try to open the hood until the radiator has had time to the OFF position. The fan is hot. Inspect the entire system for an accumulation of the radiator and... condenser for leaks. Clean the radiator and condenser by hot coolant or steam from under the hood, don't open a cooling system pressure cap when the radiator is temperature controlled and can start at the bottle and radiator. Cooling System - Check ...
... disconnect the fan motor lead or turn the ignition switch to cool. Check the front of bugs, leaves, etc. Never try to open the hood until the radiator has had time to the OFF position. The fan is hot. Inspect the entire system for an accumulation of the radiator and... condenser for leaks. Clean the radiator and condenser by hot coolant or steam from under the hood, don't open a cooling system pressure cap when the radiator is temperature controlled and can start at the bottle and radiator. Cooling System - Check ...

Owner's Manual
Page 227
... to the requirements described on . You could have an accident. You could have an accident. 7 WARNING! Brake fluid level should be checked when performing under hood services, or immediately if the brake system warning light is on the brake fluid reservoir. Use of contaminated fluid may be checked when pads are...
... to the requirements described on . You could have an accident. You could have an accident. 7 WARNING! Brake fluid level should be checked when performing under hood services, or immediately if the brake system warning light is on the brake fluid reservoir. Use of contaminated fluid may be checked when pads are...
Owner's Manual
Page 237
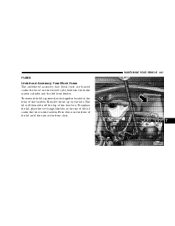
The lid will then slide off the top of the fusebox. To replace the lid, place the two hinge-like tabs at the rear of the lid under the hood on the driver's side, between the brake master cylinder and the left front fender. To remove the lid, squeeze the tabs together located at the front click. 7 Push down on the front of the lid until the tabs at the front of the fuse box. Then lift the lid up by the tabs. MAINTAINING YOUR VEHICLE 237 FUSES Underhood Accessory Fuse Block Fuses The underhood accessory fuse block fuses are located under the tabs on the fusebox.
The lid will then slide off the top of the fusebox. To replace the lid, place the two hinge-like tabs at the rear of the lid under the hood on the driver's side, between the brake master cylinder and the left front fender. To remove the lid, squeeze the tabs together located at the front click. 7 Push down on the front of the lid until the tabs at the front of the fuse box. Then lift the lid up by the tabs. MAINTAINING YOUR VEHICLE 237 FUSES Underhood Accessory Fuse Block Fuses The underhood accessory fuse block fuses are located under the tabs on the fusebox.
Owner's Manual
Page 248
NOTE: To help prevent the battery from the windshield. 248 MAINTAINING YOUR VEHICLE Check the battery every four to six weeks to ensure that the hood, rear liftgate and door switches are in adjustment. 4. This will drop more rapidly in the Service Manual. • Check that all tires are ...Block the wheels. Make sure that the remote transmitter is good. 3. Make sure that the battery is operating and that the rear liftgate/decklid, hood, and doors are inflated to set the alarm. Use the remote transmitter to the optimum pressure. • Cut blocks of plywood about the same ...
NOTE: To help prevent the battery from the windshield. 248 MAINTAINING YOUR VEHICLE Check the battery every four to six weeks to ensure that the hood, rear liftgate and door switches are in adjustment. 4. This will drop more rapidly in the Service Manual. • Check that all tires are ...Block the wheels. Make sure that the remote transmitter is good. 3. Make sure that the battery is operating and that the rear liftgate/decklid, hood, and doors are inflated to set the alarm. Use the remote transmitter to the optimum pressure. • Cut blocks of plywood about the same ...

Owner's Manual
Page 254
254 MAINTAINING YOUR VEHICLE Body Component Hinges: Fluids, Lubricants and Genuine Parts Door Mopar Spray White Lube Liftgate / Decklid Mopar Multi-Purpose Lube NLGI Grade 2 EP, GC-LB Hood Springs and Links Mopar Spray White Lube Latches: Liftgate/Decklid Hood/Safety Catch Door Seat Regulator and Track Window System Components Lock Cylinders Spoiler Mopar Mopar Mopar Mopar Mopar Mopar Mopar Spray White Lube Multi-Purpose Lube NLGI Grade 2 EP, GC-LB Spray White Lube Multi-Purpose Lube NLGI Grade 2 EP, GC-LB Spray White Lube Lock Cylinder Lube Spray White Lube
254 MAINTAINING YOUR VEHICLE Body Component Hinges: Fluids, Lubricants and Genuine Parts Door Mopar Spray White Lube Liftgate / Decklid Mopar Multi-Purpose Lube NLGI Grade 2 EP, GC-LB Hood Springs and Links Mopar Spray White Lube Latches: Liftgate/Decklid Hood/Safety Catch Door Seat Regulator and Track Window System Components Lock Cylinders Spoiler Mopar Mopar Mopar Mopar Mopar Mopar Mopar Spray White Lube Multi-Purpose Lube NLGI Grade 2 EP, GC-LB Spray White Lube Multi-Purpose Lube NLGI Grade 2 EP, GC-LB Spray White Lube Lock Cylinder Lube Spray White Lube
Owner's Manual
Page 258
... that cannot be scheduled for the following charts to assure the optimum performance of when your Crossfire. SCOPE OF WORK FOR "A" SCHEDULE MAINTENANCE SERVICE Oil Change • Change oil and replace filter Maintenance • Lubricate hood hinges, latch, and secondary latch • Reset FSS Display Function Check • Horn, hazard warning flashers...
... that cannot be scheduled for the following charts to assure the optimum performance of when your Crossfire. SCOPE OF WORK FOR "A" SCHEDULE MAINTENANCE SERVICE Oil Change • Change oil and replace filter Maintenance • Lubricate hood hinges, latch, and secondary latch • Reset FSS Display Function Check • Horn, hazard warning flashers...
Owner's Manual
Page 259
... WORK FOR "B" SCHEDULE MAINTENANCE SERVICE Oil Change • Change oil and replace filter Maintenance • Rotate tires • Replace dust filter (if equipped) • Lubricate hood hinges, latch, and secondary latch • Reset FSS Display Function Check • Horn, hazard warning flashers, turn signals, and indicator lamps • Headlamps and exterior...
... WORK FOR "B" SCHEDULE MAINTENANCE SERVICE Oil Change • Change oil and replace filter Maintenance • Rotate tires • Replace dust filter (if equipped) • Lubricate hood hinges, latch, and secondary latch • Reset FSS Display Function Check • Horn, hazard warning flashers, turn signals, and indicator lamps • Headlamps and exterior...
Owner's Manual
Page 285
... ...249 General Information ...167 Glass Cleaning ...233 Glove Compartment ...66 Hazard Warning Flasher ...178 Headlights Aiming ...246 Cleaning ...233 Dimmer Switch ...79 Heater ...128 Hood Latch Maintenance ...218 Hood Release ...74 Hoses ...225 Ignition Key ...9 Wiring System ...215 Illuminated Entry ...76 Infant Restraint ...40 Inside Rearview Mirror ...67 Instrument Cluster ...105 Instrument...
... ...249 General Information ...167 Glass Cleaning ...233 Glove Compartment ...66 Hazard Warning Flasher ...178 Headlights Aiming ...246 Cleaning ...233 Dimmer Switch ...79 Heater ...128 Hood Latch Maintenance ...218 Hood Release ...74 Hoses ...225 Ignition Key ...9 Wiring System ...215 Illuminated Entry ...76 Infant Restraint ...40 Inside Rearview Mirror ...67 Instrument Cluster ...105 Instrument...


