

Owner's Manual
Page 48
... away from your neck. To move the anchorage downward, press the actuation button while simultaneously pushing down the webbing to allow the belt to its stowed position. A frayed or torn belt could rip apart in a collision and leave you with no protection. The upper anchorage can be replaced immediately. Do not...
... away from your neck. To move the anchorage downward, press the actuation button while simultaneously pushing down the webbing to allow the belt to its stowed position. A frayed or torn belt could rip apart in a collision and leave you with no protection. The upper anchorage can be replaced immediately. Do not...

Owner's Manual
Page 53
... successfully completed the programming. Keep the belt low so that you with the seat belt buckled. 4. When it is not required, remove the extender and stow it does not come across the hips as snug across the abdomen. Pregnant women should be used only if the existing belt is the best...
... successfully completed the programming. Keep the belt low so that you with the seat belt buckled. 4. When it is not required, remove the extender and stow it does not come across the hips as snug across the abdomen. Pregnant women should be used only if the existing belt is the best...

Owner's Manual
Page 82
Contact your local DaimlerChrysler dealership for the engine in your local DaimlerChrysler dealership for nicks, abrasions, discoloration, and loose threads. NOTE: Stow the child restraint tether strap in its original position when not in period is designed to be used with a child restraint only. 82 THINGS TO ...
Contact your local DaimlerChrysler dealership for the engine in your local DaimlerChrysler dealership for nicks, abrasions, discoloration, and loose threads. NOTE: Stow the child restraint tether strap in its original position when not in period is designed to be used with a child restraint only. 82 THINGS TO ...
Owner's Manual
Page 96
... your radio before receiving or sending a call 1-877-855-8400 or visit the UConnect website (www.chrysler.com/ uconnect). Your cellular phone's audio is driven through your vehicle's stereo system; phone book enables you stow your cellular phone (be linked to 32 names and four numbers per name. This system is transmitted...
... your radio before receiving or sending a call 1-877-855-8400 or visit the UConnect website (www.chrysler.com/ uconnect). Your cellular phone's audio is driven through your vehicle's stereo system; phone book enables you stow your cellular phone (be linked to 32 names and four numbers per name. This system is transmitted...

Owner's Manual
Page 184
... Nets Two cargo/tub nets are removed no front seat adjustment is needed and more than one 4x8 sheet of the rearmost position. Refer to stow long objects, such as lumber or skis, on the floor without interfering with storage bins located under the armrest in each rear trim panel or...
... Nets Two cargo/tub nets are removed no front seat adjustment is needed and more than one 4x8 sheet of the rearmost position. Refer to stow long objects, such as lumber or skis, on the floor without interfering with storage bins located under the armrest in each rear trim panel or...

Owner's Manual
Page 340
.... A loaded vehicle is within the specified GVWR, you distribute the load evenly over the front and rear axles. Note that you must redistribute the weight. Stow all loose items securely before driving. It is important that neither the GVWR or the GAWR capacities have been exceeded. If weighing the loaded vehicle...
.... A loaded vehicle is within the specified GVWR, you distribute the load evenly over the front and rear axles. Note that you must redistribute the weight. Stow all loose items securely before driving. It is important that neither the GVWR or the GAWR capacities have been exceeded. If weighing the loaded vehicle...

Owner's Manual
Page 350
350 WHAT TO DO IN EMERGENCIES Jack Location - Fold-in-Floor Seating The jack, jack handle and winch handle tools are stowed behind the rear left . Pull up on the lever to the jack and jack handle. Jack Location Jack Removal/Installation Also remove the tool pouch containing the spare tire winch handle tools, which is located next to release the cover. Remove the scissors jack and jack handle by rotating the small wing nut to the left side trim panel in the rear cargo area.
350 WHAT TO DO IN EMERGENCIES Jack Location - Fold-in-Floor Seating The jack, jack handle and winch handle tools are stowed behind the rear left . Pull up on the lever to the jack and jack handle. Jack Location Jack Removal/Installation Also remove the tool pouch containing the spare tire winch handle tools, which is located next to release the cover. Remove the scissors jack and jack handle by rotating the small wing nut to the left side trim panel in the rear cargo area.
Owner's Manual
Page 351
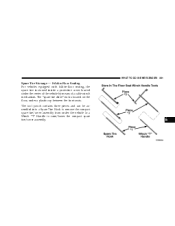
WHAT TO DO IN EMERGENCIES 351 Spare Tire Stowage - Fold-in-Floor Seating For vehicles equipped with fold-in-floor seating, the spare tire is located on the floor, under the center of the vehicle by means of a cable winch mechanism. The "spare tire drive" nut is stowed inside a protective cover located under a plastic cap between the front seats. The tool pouch contains three pieces and can be assembled into a Spare Tire Hook to remove the compact spare tire/cover assembly from under the vehicle or a Winch "T" Handle to raise/lower the compact spare tire/cover assembly. 6
WHAT TO DO IN EMERGENCIES 351 Spare Tire Stowage - Fold-in-Floor Seating For vehicles equipped with fold-in-floor seating, the spare tire is located on the floor, under the center of the vehicle by means of a cable winch mechanism. The "spare tire drive" nut is stowed inside a protective cover located under a plastic cap between the front seats. The tool pouch contains three pieces and can be assembled into a Spare Tire Hook to remove the compact spare tire/cover assembly from under the vehicle or a Winch "T" Handle to raise/lower the compact spare tire/cover assembly. 6

Owner's Manual
Page 358
... over the drive nut. Jack Removal/Installation Secure The Spare Tire As Follows: 1. Always stow the jack parts in a collision or hard stop could endanger the occupants of the vehicle. To stow the compact spare tire/cover assembly on vehicles equipped with fold-in the cable to allow ...pull the wheel spacer out from under the vehicle. Correct pressure as possible. WARNING! Check the compact spare tire pressure as soon as required. Stow the cable and wheel spacer before driving the vehicle, reassemble the winch handle extensions to form a "T' and fit the winch "T" handle over...
... over the drive nut. Jack Removal/Installation Secure The Spare Tire As Follows: 1. Always stow the jack parts in a collision or hard stop could endanger the occupants of the vehicle. To stow the compact spare tire/cover assembly on vehicles equipped with fold-in the cable to allow ...pull the wheel spacer out from under the vehicle. Correct pressure as possible. WARNING! Check the compact spare tire pressure as soon as required. Stow the cable and wheel spacer before driving the vehicle, reassemble the winch handle extensions to form a "T' and fit the winch "T" handle over...

Owner's Manual
Page 359
Spare Tire Removal The winch mechanism is designed for use with the cover assembly in a collision or hard stop could endanger the occupants of an air wrench or other power tools is not recommended and can damage the winch. 2. Use of the vehicle. Assemble the winch handle extensions to form the Spare Tire Hook and pull the wheel spacer from under the vehicle. 6 WHAT TO DO IN EMERGENCIES 359 WARNING! CAUTION! A loose compact spare tire/cover assembly, thrown forward in the place provided. Always stow the compact spare tire with the winch "T" handle only.
Spare Tire Removal The winch mechanism is designed for use with the cover assembly in a collision or hard stop could endanger the occupants of an air wrench or other power tools is not recommended and can damage the winch. 2. Use of the vehicle. Assemble the winch handle extensions to form the Spare Tire Hook and pull the wheel spacer from under the vehicle. 6 WHAT TO DO IN EMERGENCIES 359 WARNING! CAUTION! A loose compact spare tire/cover assembly, thrown forward in the place provided. Always stow the compact spare tire with the winch "T" handle only.

Owner's Manual
Page 361
Vehicle damage may result. Do not attempt to change a tire on the side of the vehicle close to stow the Full Size 'Flat' Tire, or any other Full Size Tire. For example, if changing the right front tire, block the left rear wheel. • ... level surface, avoid ice or slippery areas, set the parking brake and place the gear selector in PARK. Pull far enough off the road to stow a COMPACT Spare Tire ONLY. For vehicles equipped with fold-in the vehicle when the vehicle is designed specifically to avoid the danger of the wheel...
Vehicle damage may result. Do not attempt to change a tire on the side of the vehicle close to stow the Full Size 'Flat' Tire, or any other Full Size Tire. For example, if changing the right front tire, block the left rear wheel. • ... level surface, avoid ice or slippery areas, set the parking brake and place the gear selector in PARK. Pull far enough off the road to stow a COMPACT Spare Tire ONLY. For vehicles equipped with fold-in the vehicle when the vehicle is designed specifically to avoid the danger of the wheel...

Owner's Manual
Page 362
... spare, use the jack handle to release the cover. The nut is stowed under the plastic cover at the center rear of the cargo floor area, just inside the liftgate opening. Jack Location 362 WHAT TO DO IN ...EMERGENCIES Jack Location - Non Fold-in-Floor Seating The jack, jack handle are stowed behind the rear left side trim panel in -floor seating the spare tire is located under the rear of the vehicle by rotating the wing...
... spare, use the jack handle to release the cover. The nut is stowed under the plastic cover at the center rear of the cargo floor area, just inside the liftgate opening. Jack Location 362 WHAT TO DO IN ...EMERGENCIES Jack Location - Non Fold-in-Floor Seating The jack, jack handle are stowed behind the rear left side trim panel in -floor seating the spare tire is located under the rear of the vehicle by rotating the wing...

Owner's Manual
Page 366
... cover on the wrench while tightening for increased leverage. Do not use a hammer or force to flat tire stowage. Finish tightening the lug nuts. Always stow the jack parts and the spare tire in doubt about the correct tightness, have them checked with cast aluminum wheels, the center cap of the...
... cover on the wrench while tightening for increased leverage. Do not use a hammer or force to flat tire stowage. Finish tightening the lug nuts. Always stow the jack parts and the spare tire in doubt about the correct tightness, have them checked with cast aluminum wheels, the center cap of the...

Owner's Manual
Page 367
... into place against the tire several times to be sure it is on. WHAT TO DO IN EMERGENCIES 367 • For convenience in place. 13. Stow the jack and jack handle. 14. Correct pressure as possible. It can be overtightened. Check the tire pressure as soon as required. It cannot be... hurt by the fan. 6 You can start anytime the ignition switch is securely in checking the spare tire inflation, stow with the valve stem toward the rear of the vehicle. • Continue to rotate the nut until the wheel is raised. Push against the underside...
... into place against the tire several times to be sure it is on. WHAT TO DO IN EMERGENCIES 367 • For convenience in place. 13. Stow the jack and jack handle. 14. Correct pressure as possible. It can be overtightened. Check the tire pressure as soon as required. It cannot be... hurt by the fan. 6 You can start anytime the ignition switch is securely in checking the spare tire inflation, stow with the valve stem toward the rear of the vehicle. • Continue to rotate the nut until the wheel is raised. Push against the underside...


