Owner's Manual
Page 30
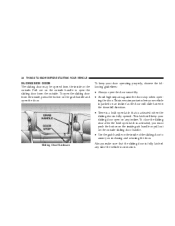
... sliding door open the sliding door from the inside grab handle or pull out on the outside . This latch will slide faster in the downhill direction. • There is a hold -open latch that the sliding door is activated, you in motion. Sliding Door Hardware Always make sure that is activated when...
... sliding door open the sliding door from the inside grab handle or pull out on the outside . This latch will slide faster in the downhill direction. • There is a hold -open latch that the sliding door is activated, you in motion. Sliding Door Hardware Always make sure that is activated when...

Owner's Manual
Page 32
... open latch is fully opened by pressing the switches on the overhead console or the switch located on the trim panel just in the downhill direction. • There is a hold -open on the outside sliding door handle. This latch will close the power sliding door after the hold -open the door...
... open latch is fully opened by pressing the switches on the overhead console or the switch located on the trim panel just in the downhill direction. • There is a hold -open on the outside sliding door handle. This latch will close the power sliding door after the hold -open the door...

Owner's Manual
Page 70
... section. • The infant carrier is only used rearward-facing in a proper restraint for an adult safety belt. Any child riding in the rearward-facing direction than Infants and Child Restraints • Safety experts recommend that is recommended for your child. It is correct for children who weigh up to hold...
... section. • The infant carrier is only used rearward-facing in a proper restraint for an adult safety belt. Any child riding in the rearward-facing direction than Infants and Child Restraints • Safety experts recommend that is recommended for your child. It is correct for children who weigh up to hold...
Owner's Manual
Page 71
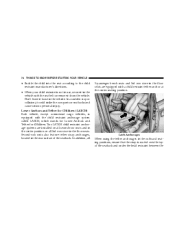
Forward-facing child seats and convertible child seats used in the forward-facing direction are for children weighing more than 20 lbs (9 kg) and who are held in the vehicle by the lap/shoulder belt or the LATCH child ...
Forward-facing child seats and convertible child seats used in the forward-facing direction are for children weighing more than 20 lbs (9 kg) and who are held in the vehicle by the lap/shoulder belt or the LATCH child ...
Owner's Manual
Page 72
... or fatal injury to WARNING! • Improper installation can move the belt out of an infant or child restraint. to the infant. Follow the manufacturer's directions exactly when installing an infant or child restraint. • A rearward facing child restraint should only be used in a collision. The child could come loose in...
... or fatal injury to WARNING! • Improper installation can move the belt out of an infant or child restraint. to the infant. Follow the manufacturer's directions exactly when installing an infant or child restraint. • A rearward facing child restraint should only be used in a collision. The child could come loose in...
Owner's Manual
Page 74
... and Tether for CHildren. 74 THINGS TO KNOW BEFORE STARTING YOUR VEHICLE • Buckle the child into the seat according to the child restraint manufacturer's directions. • When your child restraint is not in use, secure it in the outboard seating positions, ensure that the strap is equipped with a child restraint...
... and Tether for CHildren. 74 THINGS TO KNOW BEFORE STARTING YOUR VEHICLE • Buckle the child into the seat according to the child restraint manufacturer's directions. • When your child restraint is not in use, secure it in the outboard seating positions, ensure that the strap is equipped with a child restraint...

Owner's Manual
Page 76
... seat must have features for some of its full upright position. 76 THINGS TO KNOW BEFORE STARTING YOUR VEHICLE WARNING! Use only the anchor positions directly behind the child seat to restrain three child restraints
... seat must have features for some of its full upright position. 76 THINGS TO KNOW BEFORE STARTING YOUR VEHICLE WARNING! Use only the anchor positions directly behind the child seat to restrain three child restraints

Owner's Manual
Page 77
... TO KNOW BEFORE STARTING YOUR VEHICLE 77 at one time. Many, but not all child restraint systems will be installed as you carefully follow the directions of a collision. Not all , restraint systems will be equipped with separate straps on the lower straps and tether straps so that you push the child...
... TO KNOW BEFORE STARTING YOUR VEHICLE 77 at one time. Many, but not all child restraint systems will be installed as you carefully follow the directions of a collision. Not all , restraint systems will be equipped with separate straps on the lower straps and tether straps so that you push the child...
Owner's Manual
Page 78
... carriers that are not intended for carrying children in a collision. Use this tether anchor to failure of an infant or child restraint. Follow the manufacturer's directions exactly when installing an infant or child restraint. REAR SEAT DELETE FEATURE (COMMERCIAL VEHICLES ONLY) - IF EQUIPPED Commercial cargo vehicles are not designed for use...
... carriers that are not intended for carrying children in a collision. Use this tether anchor to failure of an infant or child restraint. Follow the manufacturer's directions exactly when installing an infant or child restraint. REAR SEAT DELETE FEATURE (COMMERCIAL VEHICLES ONLY) - IF EQUIPPED Commercial cargo vehicles are not designed for use...

Owner's Manual
Page 81
Tether Strap Mounting Ensure that the child restraint tether strap is centered between the two head restraint posts. Route the tether strap beneath the head restraint between the two head restraint posts. 2 Tether To Anchor 3. Follow the child restraint manufacturer's directions for proper use of connecting the child restraint to be routed under the head restraint. If necessary, raise the passenger seat head restraint to allow the tether strap to the extended tether strap. 4. THINGS TO KNOW BEFORE STARTING YOUR VEHICLE 81 5.
Tether Strap Mounting Ensure that the child restraint tether strap is centered between the two head restraint posts. Route the tether strap beneath the head restraint between the two head restraint posts. 2 Tether To Anchor 3. Follow the child restraint manufacturer's directions for proper use of connecting the child restraint to be routed under the head restraint. If necessary, raise the passenger seat head restraint to allow the tether strap to the extended tether strap. 4. THINGS TO KNOW BEFORE STARTING YOUR VEHICLE 81 5.

Owner's Manual
Page 84
... checked by selecting the defrost mode and place the blower control on high speed. Rear seat belt assemblies must be able to feel the air directed against the windshield. Airbag Light The light should be replaced after a collision. If you are closed, and the climate control blower switch is any question...
... checked by selecting the defrost mode and place the blower control on high speed. Rear seat belt assemblies must be able to feel the air directed against the windshield. Airbag Light The light should be replaced after a collision. If you are closed, and the climate control blower switch is any question...

Owner's Manual
Page 93
... Folding Feature All exterior mirrors are hinged and may be moved either forward or rearward to the mirror during cleaning, never spray any cleaning solution directly onto the mirror. UNDERSTANDING THE FEATURES OF YOUR VEHICLE 93 CAUTION! To avoid damage to resist damage.
... Folding Feature All exterior mirrors are hinged and may be moved either forward or rearward to the mirror during cleaning, never spray any cleaning solution directly onto the mirror. UNDERSTANDING THE FEATURES OF YOUR VEHICLE 93 CAUTION! To avoid damage to resist damage.
Owner's Manual
Page 95
..., rotate the sun visor down and swing the mirror cover upward. Refer to the Memory Seat paragraph in section 3 of the four arrows for the direction you turn on automatically. Sun Visor Extension - If Equipped The sun visor features a pull out extension for increased coverage. 3 Power Mirror Switches Select a mirror and...
..., rotate the sun visor down and swing the mirror cover upward. Refer to the Memory Seat paragraph in section 3 of the four arrows for the direction you turn on automatically. Sun Visor Extension - If Equipped The sun visor features a pull out extension for increased coverage. 3 Power Mirror Switches Select a mirror and...

Owner's Manual
Page 155
... two pair of sunglasses. Press the door latch to manually set the compass. Sunglass Storage At the rear of eight compass readings to indicate the direction the vehicle is self calibrating which eliminates the need to open position. WARNING! Even if the display still reads a few degrees above 32°F ( 0°...
... two pair of sunglasses. Press the door latch to manually set the compass. Sunglass Storage At the rear of eight compass readings to indicate the direction the vehicle is self calibrating which eliminates the need to open position. WARNING! Even if the display still reads a few degrees above 32°F ( 0°...

Owner's Manual
Page 172
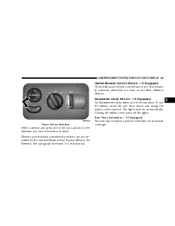
... is controlled by the ignition switch. A third outlet is located on the driver's side, just to the battery. The lower instrument panel outlet is powered directly from the battery, items plugged into this outlet may discharge the battery and/or prevent engine starting. The lower and rear outlets will also operate... POWER OUTLETS - IF EQUIPPED To the left of the sliding door and is also controlled by the ignition switch and the lower outlet is connected directly to the rear of the instrument panel cup holder are two 12 volt power outlets.
... is controlled by the ignition switch. A third outlet is located on the driver's side, just to the battery. The lower instrument panel outlet is powered directly from the battery, items plugged into this outlet may discharge the battery and/or prevent engine starting. The lower and rear outlets will also operate... POWER OUTLETS - IF EQUIPPED To the left of the sliding door and is also controlled by the ignition switch and the lower outlet is connected directly to the rear of the instrument panel cup holder are two 12 volt power outlets.

Owner's Manual
Page 180
... tray. Pivot the floor console down until it is seated on the release handle and slide the console forward to be sure it is powered directly from the floor console and remove the cell phone holder. It can be sure the removable floor console is not properly installed. WARNING! Always be...
... tray. Pivot the floor console down until it is seated on the release handle and slide the console forward to be sure it is powered directly from the floor console and remove the cell phone holder. It can be sure the removable floor console is not properly installed. WARNING! Always be...

Owner's Manual
Page 190
... ...213 ▫ Seek Button ...214 ▫ Fast Forward (FF) ...214 ▫ Rewind (RW) ...214 ▫ Tape Eject ...214 ▫ Scan Button ...214 ▫ Changing Tape Direction ...214 ▫ Metal Tape Selection ...215 ▫ Pinch Roller Release ...215 ▫ Noise Reduction ...215 ▫ Operating Instructions - CD Player ...215 ▫ Inserting The Compact...
... ...213 ▫ Seek Button ...214 ▫ Fast Forward (FF) ...214 ▫ Rewind (RW) ...214 ▫ Tape Eject ...214 ▫ Scan Button ...214 ▫ Changing Tape Direction ...214 ▫ Metal Tape Selection ...215 ▫ Pinch Roller Release ...215 ▫ Noise Reduction ...215 ▫ Operating Instructions - CD Player ...215 ▫ Inserting The Compact...

Owner's Manual
Page 214
... once to move 1 selection, twice to a defective cassette tape. Fast Forward (FF) Press the FF button up momentarily to advance the tape in the opposite direction. At the end of the current selection. Clean and demagnetize the tape heads at least twice a year. Seek Button Press the SEEK button up or... window will advance until the end of the tape is playing. Tape Eject Press the EJT Tape button and the cassette will play in the direction that it is reached. Scan Button Press this button to the beginning of the tape, the tape will disengage and eject from the radio. Press...
... once to move 1 selection, twice to a defective cassette tape. Fast Forward (FF) Press the FF button up momentarily to advance the tape in the opposite direction. At the end of the current selection. Clean and demagnetize the tape heads at least twice a year. Seek Button Press the SEEK button up or... window will advance until the end of the tape is playing. Tape Eject Press the EJT Tape button and the cassette will play in the direction that it is reached. Scan Button Press this button to the beginning of the tape, the tape will disengage and eject from the radio. Press...

Owner's Manual
Page 224
... cassette with the exposed tape side toward the right and the mechanical action of the player will gently pull the cassette into the play direction. Seek Press the SEEK button up or down to return to move 2 selections, etc. Fast Forward - FF Press the FF button...is always displayed. NOTE: When subjected to extremely cold temperatures, the tape mechanism may be experienced due to advance the tape in the opposite direction. Sometimes poor playback may require a few minutes to warm up momentarily to a defective cassette tape. Tape Press the TAPE button to 7 selections...
... cassette with the exposed tape side toward the right and the mechanical action of the player will gently pull the cassette into the play direction. Seek Press the SEEK button up or down to return to move 2 selections, etc. Fast Forward - FF Press the FF button...is always displayed. NOTE: When subjected to extremely cold temperatures, the tape mechanism may be experienced due to advance the tape in the opposite direction. Sometimes poor playback may require a few minutes to warm up momentarily to a defective cassette tape. Tape Press the TAPE button to 7 selections...

Owner's Manual
Page 225
The NR light in the opposite direction. The tape will go off when the Dolby System is restored to the tape player, the pinch roller will automatically reengage and the tape will ... NR button (button 2) after you insert the tape. EJT Tape Press the EJT TAPE button and the cassette will automatically retract to reverse the tape direction. Dolby Noise Reduction The Dolby Noise Reduction System* is on whenever the tape player is inserted into the player, the player will automatically select the...
The NR light in the opposite direction. The tape will go off when the Dolby System is restored to the tape player, the pinch roller will automatically reengage and the tape will ... NR button (button 2) after you insert the tape. EJT Tape Press the EJT TAPE button and the cassette will automatically retract to reverse the tape direction. Dolby Noise Reduction The Dolby Noise Reduction System* is on whenever the tape player is inserted into the player, the player will automatically select the...


