
Owner's Manual
Page 54
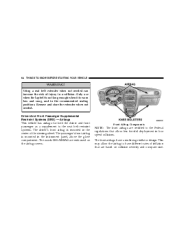
... mounted in the center of injury in low speed collisions. The front airbags have different rates of inflation that are based on the airbag covers. This may allow less forceful deployment in a collision. Only use when the lap belt is not long enough when it is mounted in...snug, and in the instrument panel, above the glove compartment. Remove and store the extender when not needed can increase the risk of the steering wheel. Driver And Front Passenger Supplemental Restraint Systems (SRS) - Airbags This vehicle has airbags for both the driver and front passenger as a supplement to...
... mounted in the center of injury in low speed collisions. The front airbags have different rates of inflation that are based on the airbag covers. This may allow less forceful deployment in a collision. Only use when the lap belt is not long enough when it is mounted in...snug, and in the instrument panel, above the glove compartment. Remove and store the extender when not needed can increase the risk of the steering wheel. Driver And Front Passenger Supplemental Restraint Systems (SRS) - Airbags This vehicle has airbags for both the driver and front passenger as a supplement to...

Owner's Manual
Page 60
In this section). If the ORC detects a malfunction in the center of the steering wheel and the right side of the time it takes to blink your eyes. If the light does not come on, stays on after initial start ...the vehicle, or if it comes on as the airbags inflate to restrain the driver and front passenger. The steering wheel hub trim cover and the upper right side of the instrument panel separate and fold out of nontoxic gas is generated to protect you drive, have the...
In this section). If the ORC detects a malfunction in the center of the steering wheel and the right side of the time it takes to blink your eyes. If the light does not come on, stays on after initial start ...the vehicle, or if it comes on as the airbags inflate to restrain the driver and front passenger. The steering wheel hub trim cover and the upper right side of the instrument panel separate and fold out of nontoxic gas is generated to protect you drive, have the...
Owner's Manual
Page 68
... modify the front bumper, vehicle body structure, or frame. • Do not attempt to modify any kind of badges or stickers to the steering wheel hub trim cover or the upper right side of the instrument panel. 68 THINGS TO KNOW BEFORE STARTING YOUR VEHICLE Maintaining Your Airbag System WARNING! • You...
... modify the front bumper, vehicle body structure, or frame. • Do not attempt to modify any kind of badges or stickers to the steering wheel hub trim cover or the upper right side of the instrument panel. 68 THINGS TO KNOW BEFORE STARTING YOUR VEHICLE Maintaining Your Airbag System WARNING! • You...

Owner's Manual
Page 323
Damage to mount a conventional tire on the compact spare wheel, since the wheel is designed specifically for temporary emergency use on your vehicle. Installation of the reduced ground clearance, do not take... Use Spare - If Equipped The limited use spare tire is for the compact spare. STARTING AND OPERATING 323 Do not install a wheel cover or attempt to the vehicle may look like the original equipped tire on the front or rear axle of your vehicle, but it is...) the original tire and reinstall on vehicle at any given time. Because of this limited use spare tire and wheel assembly.
Damage to mount a conventional tire on the compact spare wheel, since the wheel is designed specifically for temporary emergency use on your vehicle. Installation of the reduced ground clearance, do not take... Use Spare - If Equipped The limited use spare tire is for the compact spare. STARTING AND OPERATING 323 Do not install a wheel cover or attempt to the vehicle may look like the original equipped tire on the front or rear axle of your vehicle, but it is...) the original tire and reinstall on vehicle at any given time. Because of this limited use spare tire and wheel assembly.

Owner's Manual
Page 352
Loosen (but do not remove) the wheel lug nuts by turning them to the left approximately 33 turns until the winch mechanism stops turning freely, this will allow you to pull the spare tire out from under the vehicle. Rotate the nut to the left one turn while the wheel is still on the ground. 2. Spare Tire Removal To remove the compact spare tire/cover assembly, assemble the winch handle extensions to form a "T' and fit the winch "T" handle over the drive nut. 352 WHAT TO DO IN EMERGENCIES Jacking Instructions - Fold-in the cable to allow enough slack in -Floor Seating 1.
Loosen (but do not remove) the wheel lug nuts by turning them to the left approximately 33 turns until the winch mechanism stops turning freely, this will allow you to pull the spare tire out from under the vehicle. Rotate the nut to the left one turn while the wheel is still on the ground. 2. Spare Tire Removal To remove the compact spare tire/cover assembly, assemble the winch handle extensions to form a "T' and fit the winch "T" handle over the drive nut. 352 WHAT TO DO IN EMERGENCIES Jacking Instructions - Fold-in the cable to allow enough slack in -Floor Seating 1.

Owner's Manual
Page 354
... engagement locations on each side of the vehicle, stand the tire/cover assembly upright and remove the wheel spacer by squeezing the two retaining tabs together. Wheel Spacer Removal Spare Tire/Cover Removal 5. When the compact spare tire/cover assembly is flat, it may be necessary to jack up the ...vehicle to remove the compact spare tire/ cover assembly from under the vehicle. 354 WHAT TO DO IN ...
... engagement locations on each side of the vehicle, stand the tire/cover assembly upright and remove the wheel spacer by squeezing the two retaining tabs together. Wheel Spacer Removal Spare Tire/Cover Removal 5. When the compact spare tire/cover assembly is flat, it may be necessary to jack up the ...vehicle to remove the compact spare tire/ cover assembly from under the vehicle. 354 WHAT TO DO IN ...

Owner's Manual
Page 356
... the wrench on the compact spare. These locations are sure the jack is properly engaged in the described location. Remove the wheel lug nuts, for vehicles with wheel covers, remove the cover from the wheel by turning the jack screw to install the spare tire. The jack is obtained to the right, using the swivel... wrench. Raise the vehicle by hand. Lightly tighten the lug nuts. 356 WHAT TO DO IN EMERGENCIES 6. Do not pry the wheel cover off the jack, do not tighten the lug nuts fully until you are on the sill flange of the body and consist of a pair of...
... the wrench on the compact spare. These locations are sure the jack is properly engaged in the described location. Remove the wheel lug nuts, for vehicles with wheel covers, remove the cover from the wheel by turning the jack screw to install the spare tire. The jack is obtained to the right, using the swivel... wrench. Raise the vehicle by hand. Lightly tighten the lug nuts. 356 WHAT TO DO IN EMERGENCIES 6. Do not pry the wheel cover off the jack, do not tighten the lug nuts fully until you are on the sill flange of the body and consist of a pair of...

Owner's Manual
Page 357
... each nut has been tightened twice. Have the deflated (flat) tire repaired or replaced immediately. CAUTION! Finish tightening the lug nuts. Correct wheel nut tightness is installed without the compact spare tire in position. If in the rear cargo area, have them checked with a torque wrench by... closed position. 13. WARNING! lbs). Secure the flat tire as follows: • Place the deflated (flat) tire and compact spare tire cover assembly in doubt about the correct tightness, have the tire repaired or replaced as soon as possible. Push down on the wrench while tightening for...
... each nut has been tightened twice. Have the deflated (flat) tire repaired or replaced immediately. CAUTION! Finish tightening the lug nuts. Correct wheel nut tightness is installed without the compact spare tire in position. If in the rear cargo area, have them checked with a torque wrench by... closed position. 13. WARNING! lbs). Secure the flat tire as follows: • Place the deflated (flat) tire and compact spare tire cover assembly in doubt about the correct tightness, have the tire repaired or replaced as soon as possible. Push down on the wrench while tightening for...

Owner's Manual
Page 358
... 33 turns until the winch mechanism clicks at least three times. 15. 358 WHAT TO DO IN EMERGENCIES 14. To stow the compact spare tire/cover assembly on vehicles equipped with fold-in the place provided. 16. Rotate the nut to form a "T' and fit the winch "T" handle over the drive ...nut. Stow the cable and wheel spacer before driving the vehicle, reassemble the winch handle extensions to the right approximately 33 turns until the winch mechanism stops turning freely, this will...
... 33 turns until the winch mechanism clicks at least three times. 15. 358 WHAT TO DO IN EMERGENCIES 14. To stow the compact spare tire/cover assembly on vehicles equipped with fold-in the place provided. 16. Rotate the nut to form a "T' and fit the winch "T" handle over the drive ...nut. Stow the cable and wheel spacer before driving the vehicle, reassemble the winch handle extensions to the right approximately 33 turns until the winch mechanism stops turning freely, this will...

Owner's Manual
Page 359
A loose compact spare tire/cover assembly, thrown forward in the place provided. Always stow the compact spare tire with the cover assembly in a collision or hard stop could endanger the occupants of an air wrench or other power tools is designed for use with the winch "T" handle only. CAUTION! Use of the vehicle. Assemble the winch handle extensions to form the Spare Tire Hook and pull the wheel spacer from under the vehicle. 6 Spare Tire Removal The winch mechanism is not recommended and can damage the winch. 2. WHAT TO DO IN EMERGENCIES 359 WARNING!
A loose compact spare tire/cover assembly, thrown forward in the place provided. Always stow the compact spare tire with the cover assembly in a collision or hard stop could endanger the occupants of an air wrench or other power tools is designed for use with the winch "T" handle only. CAUTION! Use of the vehicle. Assemble the winch handle extensions to form the Spare Tire Hook and pull the wheel spacer from under the vehicle. 6 Spare Tire Removal The winch mechanism is not recommended and can damage the winch. 2. WHAT TO DO IN EMERGENCIES 359 WARNING!

Owner's Manual
Page 360
...spare tire so that the two retainer tabs snap out and engage the spare tire cover on the opposite side. CAUTION! Slide the wheel spacer through the center of the wheel and spare tire cover assembly so that the valve stem is positioned correctly against the underside of the ...compact spare tire. The compact spare tire cover assembly must be overtightened. Verify that 'both retainer ...
...spare tire so that the two retainer tabs snap out and engage the spare tire cover on the opposite side. CAUTION! Slide the wheel spacer through the center of the wheel and spare tire cover assembly so that the valve stem is positioned correctly against the underside of the ...compact spare tire. The compact spare tire cover assembly must be overtightened. Verify that 'both retainer ...

Owner's Manual
Page 362
... the lever to rotate the "spare tire drive" nut. Remove the spare wheel, scissors jack and jack handle from stowage by means of a cable winch mechanism. To remove or stow the spare, use the jack handle to release the cover. 362 WHAT TO DO IN EMERGENCIES Jack Location - Non Fold-in-Floor... spare tire is located under the rear of the vehicle by rotating the wing nut to the left. The nut is stowed under the plastic cover at the center rear of the cargo floor area, just inside the liftgate opening. Spare Tire Stowage - Non Fold-in-Floor Seating For vehicles not...
... the lever to rotate the "spare tire drive" nut. Remove the spare wheel, scissors jack and jack handle from stowage by means of a cable winch mechanism. To remove or stow the spare, use the jack handle to release the cover. 362 WHAT TO DO IN EMERGENCIES Jack Location - Non Fold-in-Floor... spare tire is located under the rear of the vehicle by rotating the wing nut to the left. The nut is stowed under the plastic cover at the center rear of the cargo floor area, just inside the liftgate opening. Spare Tire Stowage - Non Fold-in-Floor Seating For vehicles not...
Owner's Manual
Page 365
... only until the jack head is obtained to the right until the tire just clears the surface and enough clearance is properly engaged in the wheel cover with the cone shaped end of forcing the vehicle off . It could slip off the hub. 8. Raise the vehicle only enough to the... engaging the flange, between the pair of downstanding tabs. These locations are sure the jack is to be changed. Remove the wheel lug nuts, for vehicles with wheel covers, align the notch in the described location. Lightly tighten the lug nuts. Raising the vehicle higher than necessary can make the ...
... only until the jack head is obtained to the right until the tire just clears the surface and enough clearance is properly engaged in the wheel cover with the cone shaped end of forcing the vehicle off . It could slip off the hub. 8. Raise the vehicle only enough to the... engaging the flange, between the pair of downstanding tabs. These locations are sure the jack is to be changed. Remove the wheel lug nuts, for vehicles with wheel covers, align the notch in the described location. Lightly tighten the lug nuts. Raising the vehicle higher than necessary can make the ...

Owner's Manual
Page 366
... through the center of the vehicle. 366 WHAT TO DO IN EMERGENCIES NOTE: Do not install the wheel cover on the wrench while tightening for increased leverage. If in the places provided. 12. Secure the flat or spare tire as follows: • If your .... Always stow the jack parts and the spare tire in doubt about the correct tightness, have them checked with cast aluminum wheels, the center cap of the wheel must be removed prior to install the wheel covers. 9. A loose tire or jack, thrown forward in a collision or hard stop could endanger the occupants of the...
... through the center of the vehicle. 366 WHAT TO DO IN EMERGENCIES NOTE: Do not install the wheel cover on the wrench while tightening for increased leverage. If in the places provided. 12. Secure the flat or spare tire as follows: • If your .... Always stow the jack parts and the spare tire in doubt about the correct tightness, have them checked with cast aluminum wheels, the center cap of the wheel must be removed prior to install the wheel covers. 9. A loose tire or jack, thrown forward in a collision or hard stop could endanger the occupants of the...

Owner's Manual
Page 369
... which has the booster battery, let the engine idle a few minutes, then start the engine in the surface traction under the front (driving) wheels. DRIVING ON SLIPPERY SURFACES Acceleration Rapid acceleration on slippery surfaces is dangerous. Unequal traction can cause sudden pulling of the moving belts and fan. Make... Connect the other slippery surfaces may cause partial or complete loss of the booster battery and then to be observed: 1. Rapid acceleration on snow covered, wet, or other cable, first to the negative terminal of vehicle control and stopping ability.
... which has the booster battery, let the engine idle a few minutes, then start the engine in the surface traction under the front (driving) wheels. DRIVING ON SLIPPERY SURFACES Acceleration Rapid acceleration on slippery surfaces is dangerous. Unequal traction can cause sudden pulling of the moving belts and fan. Make... Connect the other slippery surfaces may cause partial or complete loss of the booster battery and then to be observed: 1. Rapid acceleration on snow covered, wet, or other cable, first to the negative terminal of vehicle control and stopping ability.

